OctoPrint has been in development since 2012 and has a huge community to learn from. Plugins like “Bed Level Visualizer” make it possible to check how level the bed is before printing.
Bed level visualizer is a useful OctoPrint plugin that stresses varying heights on a 3D printer bed in relation to the nozzle. This will show you where to adjust the height in order to get it level. This plugin also helps you identify whether you have a warped bed or just a tilted one.
The plugin uses your BLTouch or other sensors to measure the distance from the nozzle to the bed, but instead of giving the printer additional instructions on how to counteract the discrepancies, it gives you a detailed visual, which will help you level the bed out properly.
By going through this process, you’ll get better print results because your auto-leveling hardware won’t have to work as hard. Having a straight print bed means less wear and tear on your printer because the stepper motors don’t have to adjust as much.
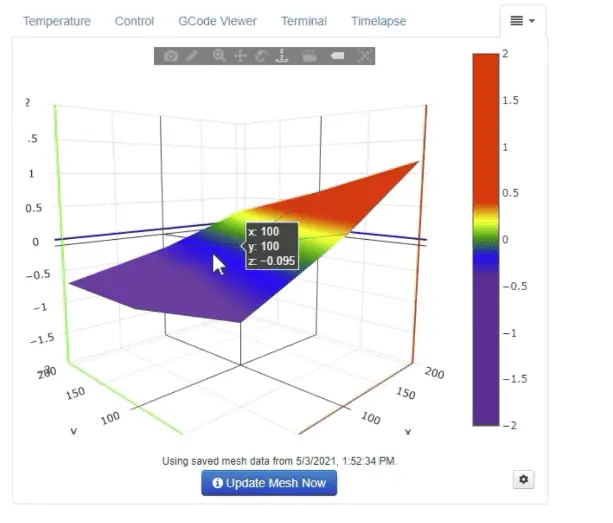
Before you can use the plugin, you’ll have to install the main application, OctoPrint. So if you haven’t already installed it, I’ve put a video at the bottom of the article for you on how to get it done. But if you’re all set up with OctoPrint on your Raspberry Pi 3 or 4, you can install the plugin.
NB: Your printer needs to have bed mesh leveling in software or have an auto bed leveling sensor, like the BLTouch.
Recommended Hardware
- Raspberry Pi 4 Starter Kit on Amazon (The one I use)
- Raspberry Pi Camera on Amazon
- USB Cable A-Male to Mini-B on Amazon
- USB Cable A-Male to B-Male on Amazon
- BLTOUCH on Amazon
- Ender 3 Pro on Amazon
- Ender 3 V2 on Amazon
- HATCHBOX Filament on Amazon
*All links to Amazon for products I use.
How To Install Bed Level Visualizer PlugIn
With OctoPrint already installed on your computer, adding this plugin is very easy. Installing extra system dependencies by running a command through an SSH connection is unnecessary since version 1.1.0, so this is all you need to do:
- Open OctoPrint and go to the settings icon.
- In the OctoPrint Settings, click on “Software Update” and check for updates.
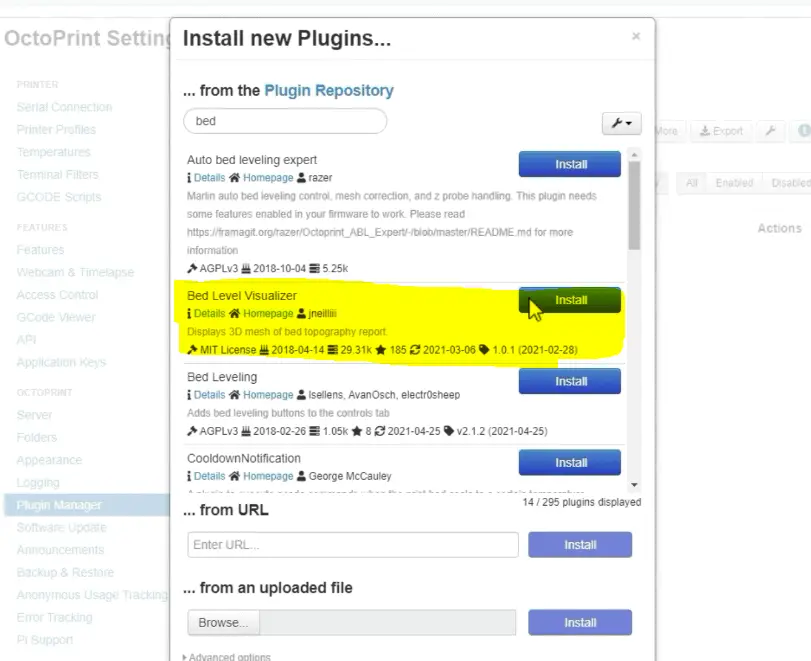
- Now click on “Plugin Manager” from the list on the left and click on the “Get More” button on the right.
- Search “Bed Level Visualizer” in the search bar.
- Click on the install button for this plugin.
- After the plugin has been installed, restart OctoPrint.
- Reload your OctoPrint webpage.
Once you reload OctoPrint, there should be a drop-down menu at the top right side of the OctoPrint main page. Click on that drop-down menu to access the plugin.
How To Use Bed Level Visualizer
Add the GCODE
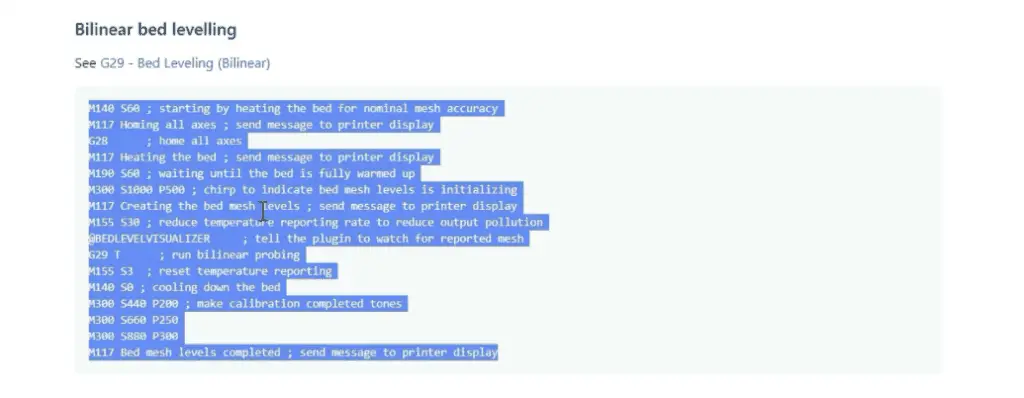
Once you’ve installed the plugin, you’ll need to add the appropriate GCODE commands for the Mesh Update Process. There are some default templates for you to copy and paste into the plugin if you click on the link in the settings.
For most of you, Bilinear bed leveling will work, but you should check through the other examples to see if there’s a better match according to your hardware.
Power the printer
Make sure that the printer is powered up because the Raspberry Pi cannot heat the build plate by itself. If you forget to power the printer before starting this process, the Raspberry Pi will error out when it tries to heat the plate.
Connect to the printer
Select the printer profile and click on the connect button.
Update Mesh In The Plugin
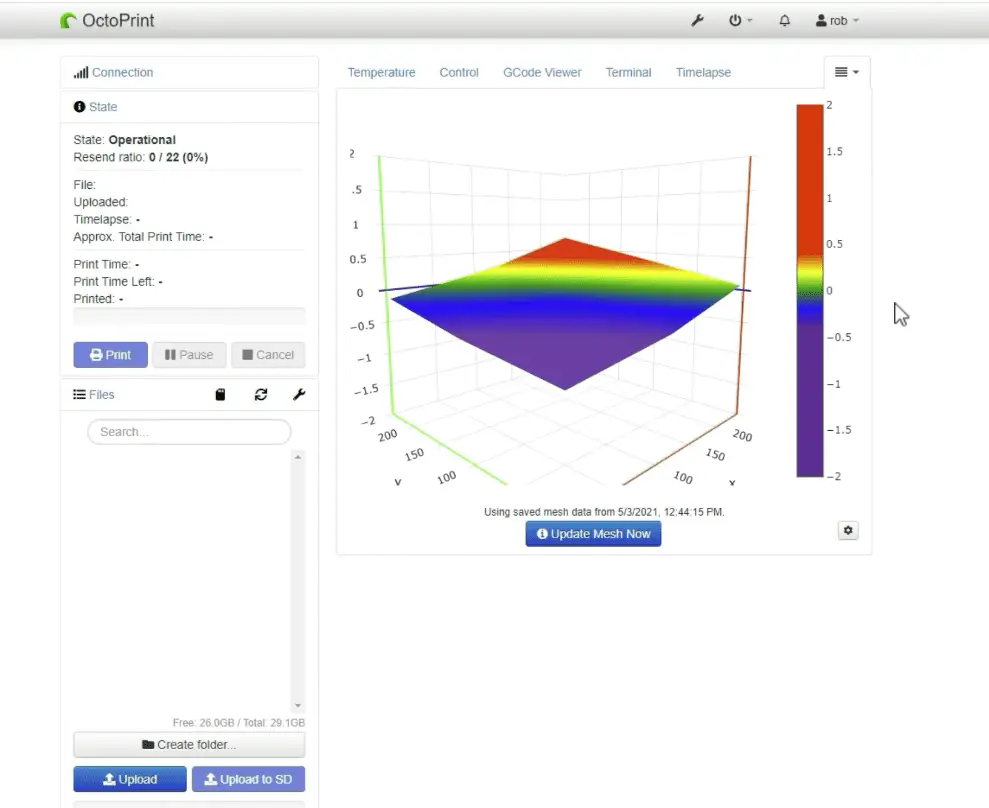
Select the plugin in from the drop-down menu and click the “Update Mesh Now” button.
Monitor the process
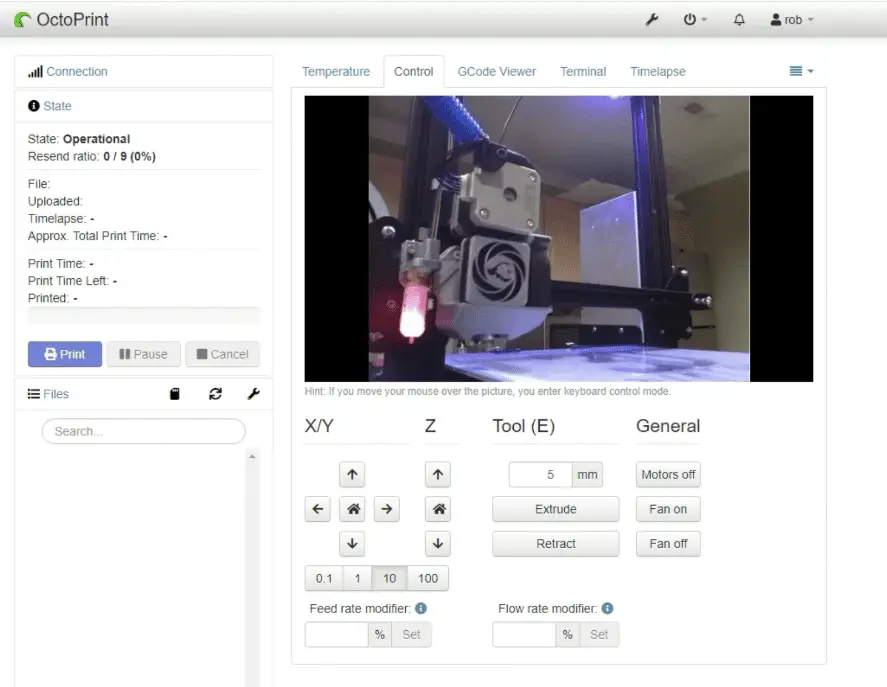
If you have a camera connected, you can go to the “Control” tab to see what the printer is doing. You can monitor the temperatures and check the GCODE as it runs by navigating through the OctoPrint tabs.
Check that the bed gets up to the right temperature to get the most accurate readings. It should already be set up in the GCODE.
Analyse the results
After you click on the Update Mesh Now button, the printer will auto-home, heat up the bed, and start going through the mesh according to the GCODE you added to the plugin.
If the results show a purple to red rainbow pattern from one side to the other, you just need to manually level the bed. But if you have random bumps almost like ant hills in the results, the bed is warped and your BLTouch will have to compensate for the inconsistencies. At this point, you might want to upgrade to a thicker, glass bed to reduce the chance of warping.
Which Raspberry Pi Do I Need For Octoprint?
OctoPrint recommends using the Raspberry Pi 3B, 3B+, 4B or Zero 2. While it will work with other versions, it will lead to print defects and plugin incompatibilities. I got the Raspberry Pi 4 Starter Kit like this one on Amazon and it works well.
How To Install OctoPrint
Installing OctoPrint isn’t difficult if there’s someone guiding you step by step, so I made this video to do just that. It’s a complete OctoPrint configuration guide.
Related Articles
- Ender 3 Bed Leveling Issues – Common Causes and Fixes
- Ender 3 Pro Glass Bed Upgrade – Complete Guide!
- Cura Brim Build Plate Adhesion – Everything You Need to Know!
- Top Ender 3 Printable Upgrades – My Picks!
- How To Connect Ender 3 to PC
- Ender 3 Pro Cura Setup – The Basics (2021 Edition)
Conclusion
This was just a quick overview of the Bed Level Visualizer plugin. It’s one that I really like because it’s one more tool to get the bed as straight as possible. The BLTouch can correct for an uneven bed, but it’s best to have the bed as level as possible anyway. The less work your BLTouch has to do during the print, the longer the stepper motors will last and the more accurate your prints will be.
If you don’t have any auto bed leveling hardware, you’ll have to stick with a standard mesh to get the job done.
Make sure you check out our YouTube channel, and if you would like any additional details or have any questions, please leave a comment below. If you liked this article and want to read others click here.
