Bed leveling, in 3D printing terms, refers to a consistent distance from the bed and the print nozzle at any point. It’s for this reason that all the other moving parts of the printer can put the bed and nozzle out of alignment.
I’ve put some of the most common bed leveling issues together here to help you identify what the problem could be when struggling to level the print bed.
With any luck, all you’ll need to do is some tightening up or fine adjustments here and there.
Here are some of the most common bed leveling issues, along with how to solve them.
The Nozzle Is Scraping The Bed
Sometimes you can level an Ender 3 print bed perfectly but still have the print nozzle crash into the bed when the print starts. There are a few things to look at if this is happening to you. The first thing I suggest, before we move on to the more complicated fixes, is to heat the bed before leveling.
There are a few other things that could be happening, but this is a good place to start. If leveling the print bed while it’s hot doesn’t work, you might need to tighten belts, screws, bolts, or adjust sensors as we’ll go over in the next suggestions.
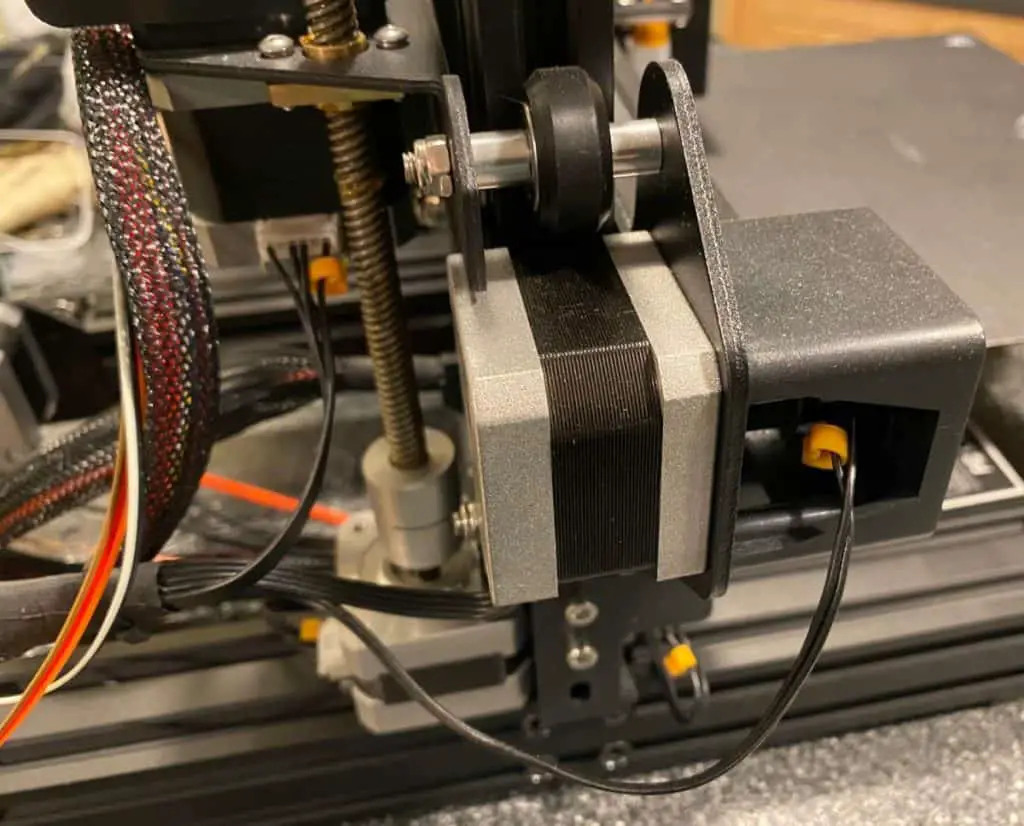
Bed Wobble
If it feels like the print bed is a bit loose when moving it with your fingers, you may need to tighten it against the rail at the bottom of the printer. The print bed is secured to a plate that rides on a rail. There are four rollers that assist the plate in moving up and down on the Y axis. You’ll need to tighten the bolts behind two of the rollers. I’ll explain how.
- Carefully position the printer on its back so that the bottom of the print bed is exposed.
- Use the wrench you got in the packaging to tighten the two hex keys behind the rollers on the right side.
- Feel the print bed for wobble as you tighten the bolts. (The wobble should decrease as you tighten)
- Tighten each bolt incrementally going back and forth between the two. This will help them stay aligned.
As soon as you feel the print bed stiffen up against the plate, you can put the printer back up and proceed with the normal bed leveling procedure.
One Corner Is Higher
You might run into a problem where one corner is higher than the rest, but the adjustment knob is turned all the way to maximum. In this case, you should adjust the rollers at the bottom of the printer.
Adjust rollers at the bottom
This is similar to the previous instructions about eliminating bed wobble, but this time you should loosen the screws that hold the rollers in place and align everything up so that the left and right side rollers are uniform on the rail. Then tighten them all up a little each time, working your way around the four screws.
Lower the z-stopper
The z-stopper on the side of the printer might be too high for the nozzle to reach the bed plate properly in all areas. To lower the z-stopper, follow these steps.
- First, turn the adjustment knob back down to halfway or lower so that you can make adjustments after lowering the z-stopper.
- Loosen the screws on the side of the printer where the z-stopper is located.
- Move the stopper/sensor down to lower its position until the print nozzle is around 1mm from the print bed.
- Now lift the limiter a little for it to click into position.
- Tighten the screws again and use the bed adjustment knob to adjust the bed level according to the new nozzle height.
Loose Printer Belts
Loose printer belts can cause you to believe that the bed isn’t level because of how both issues cause layer shifts in the model. Layer shifts are when the layers of a part don’t match up with each other. You might get parts with wavy lines that make it seem like the bed isn’t leveled properly. Here’s the easiest way to tighten the belts on your Ender 3.
- Use the hex keys that are included with the printer to loosen the bolts on the tensioner.
- Now slide the longest hex key down between the tensioner and the rail.
- Use the long key as a lever to push the tensioner away from the rail and increase the belt tension.
- Use the other smaller hex key to tighten the screws while holding the tension.
- Repeat the procedure for the other axes.
Install a belt tensioner
Belt tensioners make the process a lot easier. Once installed, all you’ll need to do is turn a knob to tighten the belts next time. Here’s how they look on amazon.com.
To install belt tensioners, simply unscrew the default tension plates and replace them with these upgraded ones.
Replace The Bed Springs
The bed springs that come with the Ender 3 by default are weak and flimsy. They can last a fair amount of time, but if one or more of them are weaker than the rest, it can definitely cause issues with your bed leveling.
Printer bed springs are easy to replace. Just unscrew the four big knobs at the bottom of the bed to release the bed from the printer. Remove the old springs and replace them with fresh, longer lasting springs like these on amazon.com. Some options include upgraded leveling nuts that are made of premium aluminium alloy, making them stronger and more resistant to corrosion.
Screw the knobs back into the bed from the bottom and you’re good to go.
Bed Becomes Unbalanced After One Print
The most common cause of the bed becoming unbalanced after a single print is loose parts.
You’ll need to tighten up the bolts that hold the bed to the plate at the bottom of the printer. Make sure the rollers at the bottom are aligned properly and tighten up the printer belts, as mentioned above.
The Printer Surface Isn’t Level
It’s possible that the workbench you’re using isn’t 100% level, which could be throwing everything off. Level out the workbench with a spirit level and make sure the table is very stable even if you try to wobble it.
Test the printer on the floor if you’re certain the floor is perfectly flat to see if it solves the leveling issue.
Related Articles
- Top Ender 3 Printable Upgrades – My Picks!
- How To Connect Ender 3 to PC
- Ender 3 Pro Cura Setup – The Basics (2021 Edition)
- Ender 3 Fan Upgrade – My Choice and Install Guide
- How Do You Resume A 3D Printer After Power Loss?
Conclusion
The main causes for bed leveling issues are related to the printer not being assembled perfectly. If you’re lucky, you’ll get away with some minor adjustments to the bolts, rails, tensioning belts, and other basic settings to get your print bed level.
However, you may need to disassemble most of the machine and start from scratch if things are really out of alignment. Here’s a detailed video on how to put your Ender 3 together along with some pro-tips to make things as easy as possible.
Make sure you check out our YouTube channel, and if you would like any additional details or have any questions, please leave a comment below. If you liked this article and want to read others click here.
Rob
Thank you for your Videos and Website.
I recently bought an ENDER7 and would like to build my own firmware to use the CR Touch. I have installed the CR Touch but the Creality Firmware sucks for leveling.
Do you have any suggestions
Hi, The process isn’t too difficult and I have made a video that covers it. You can see that here. https://youtu.be/iaQSXZsybl0
I have been trying to level my bed on my ender 3 pro as I just got new springs. but on the left side, the corners are too high while in-between them, the plastic wasn’t even laying. I used paper and got a rough level then I leveled it using this print. https://www.thingiverse.com/thing:2987803 I noticed that the top left corner was too high(the nozzle wasn’t scraping but also wasn’t printing its layer much at all) and the layer on the bottom left corner was there but you could tell its just a bit too high. that side is supposed to print curved but it always comes out straight. the other sides didn’t have this issue and my printer is less than a year old. do I need to replace my whole bed?
Hi,
I would make sure your base is level, maybe try moving it to a different surface. I’ve actually had something similar happen to me when the printer was on a surface that wasn’t level. Basically, it made more adjustments necessary to level the bed and I couldn’t dial it in.
Hello,
I have realized that using plate adhesion raft provides a level surface for it to print on and I’ve printed 2 of these https://www.thingiverse.com/thing:3495390 which is by far my most failed print, and they both printed perfectly. I will look into getting a more stable place for my printer as right now it’s on a plastic table. Thank you very much, Rob!
You’re Welcome. I’m glad to hear you got everything working.
Hi,
I was wondering if the base nozzle that comes with the ender 3 pro is capable of printing petg? Or do I need to purchase a different one?
Thanks.
It should be fine, PETG isn’t really abrasive.
I’ve just upgraded to a CR Touch. I have an Ender 3 with a PEI sprung steel plate and a SKR mini E3 v2 board hooked up to a Pi 3B running Octoprint. I can run the Bilinear ABL using 3×3 or 5×5 but when I go to print the far right side above the leveling knobs prints about 0.5 mm above the build plate and nothing sticks. I’ve tried adjusting my gantry and wheels but had no luck. Any advice would be appreciated!
Hi,
Are you kicking off the mesh at the start of the print? Also, this may be easier to troubleshoot on Discord if you can join.
Hello I just recent purchased an ender 3 pro and am having trouble getting the printer to run correctly after installing the CR Touch ABL as well as the Spider hot end. Keep getting corrupted blue screen after updating board and screen. Or nozzle just slams into bed.
Hi,
I think you reached out on YouTube, but what is the full filename of the firmware you are running?