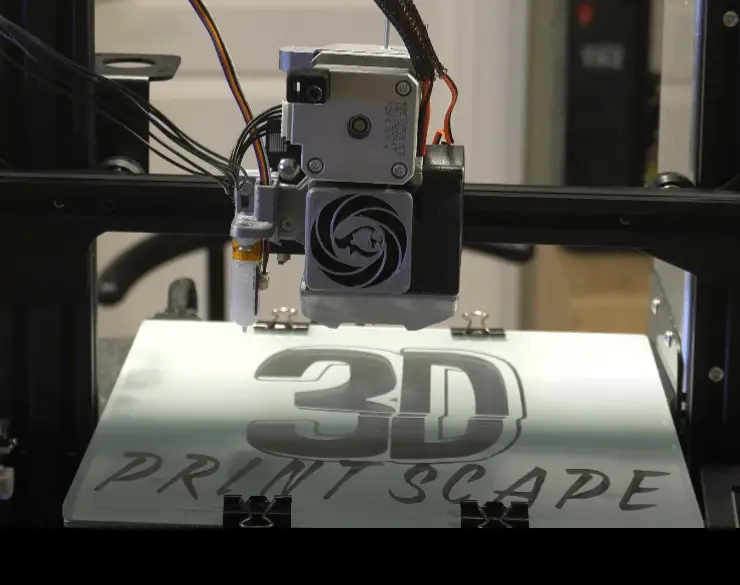
One thing that tends to be lacking on many of the typical hobbyist printers, including the Ender 3, is proper cooling for the filament. It ships with a basic fan that doesn’t do much in regards to cooling the filament quickly. This leads to potential bridging and overhang issues. The good news is that you can fix this without needing to spend a lot of money.
Here are the steps to replacing the stock filament cooling fan on the Ender 3.
- Physical Install
- Remove the Old Fan Housing and Fans
- Connect the 5015 Blower Fan
- Mount the New Fan Hosing
- Mount the Front Fan
- Mount the 5015 Blower
- Mount the BLTouch *If Used
- Update the Firmware *Required if BLTouch is used
- Set Z-Offset *Required if BLTouch is used
*This guide assumes you have an Ender 3 but will also work for most of the 3d printers in the Creality lineup.
Why Upgrade the Fan?
Upgrading the fan is a cheap and easy way to improve your prints by giving you better bridging and overhangs. In addition, it reduces the noise coming from the fans on the extruder. It’s really a win/win and an upgrade that I would highly recommend.
Pros
- Provides better bridging
- Provides better overhangs
- Reduces noise from the extruder fans
- *This is a benefit of the fand duct cover, not necessarily tied to the fan upgrade.
Cons
- Will need to buy the blower fan
- Cost of the filament for the fan duct housing
- Time to print and install everything
Step-by-Step Fan Install Guide
Requirements
Required Hardware
- Ender 3 Pro (Or another Creality printer)
- 5015 Blower Fan
- M3 Bolts
Optional Tools
*Links are to Amazon and for the products I use.
Prints
Fan Housing
Front Fan Cover
BLTouch Adapters *Required if you are using a BLTouch
Print Settings
- Infill: 40%
- Support: Tree
- Support Placement: Touching Build Plate
- Printing Temperature: This should be based on results from a temperature tower.
- Build Plate Adhesion: Brim or Raft
*You can download the Cura Profiles I use.
Step-by-Step Guide
Physical Install
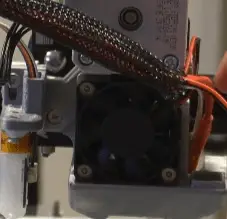
Remove the Old Fan Housing and Fans
The first thing you need to do is remove the existing fan duct housing and fans. To do this, you will remove the two screws holding on the housing and the four screws holding on each fan.
Make sure the when you do this, you are careful when working around the wires that are going to the hoted. Those wires are to the heating element and Thermador.

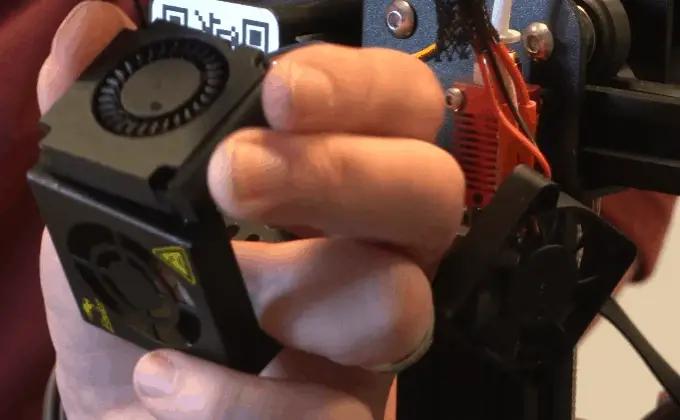
Connect the 5015 Blower Fan
Next, we need to connect the new blower fan. There are two ways you can do this.
Option 1
The first option is to disconnect the old fan from the mainboard and connected the new one. This option will take more time, but you won’t have to cut into the existing wires.
Here are the steps to do that.
- Remove the hosing around the mainboard
- Disconnect the 2-pin adapter for the fan
- Pull the wires back through the cable sleeve
- Run the wires for the new fan
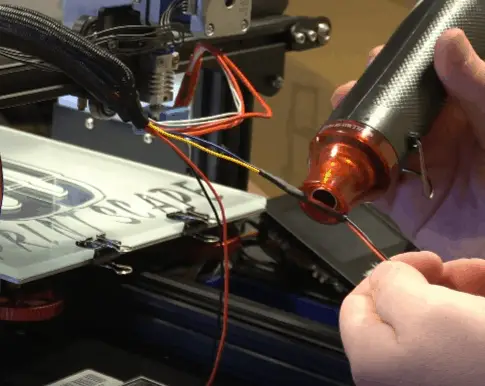
- If the new fan’s wires are not long enough, you will need to cut them and add additional wire to match the length of the fan you removed.
- You should solder the cables together and use heat shrinking tube if you can. If you can’t, then make sure you get a good connection and use electric tape.
- Connect the 2-pin adapter to the board
Option 2
The second option would be to pull the sleeve around the cables back and slice into the wires that go to the fan you are removing. This is the route I took because it’s easier and requires less time.
Here are the steps to do that
- Slide the black sleeve back about six inches
- Cut the wire going to the old fan about four inches away from it
- Cut the wire on the new fan so that once it’s connected the length will be a little longer than the old one’s length.
- Connect the new fan to the old wires
- The blue wire is positive and should go to the red wire
- You should solder the cables together and use heat shrinking tube if you can. If you cant, then make sure you get a good connection and use electric tape.

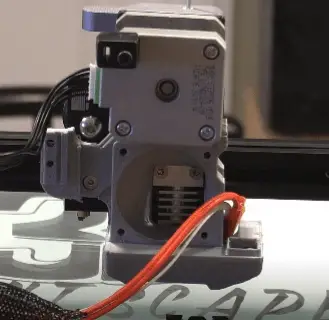
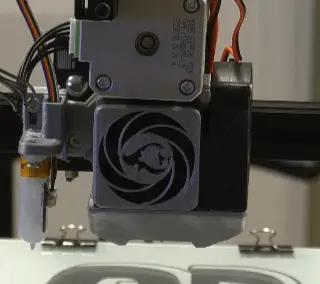
Mount the New Fan Hosing
Now that the new fan is connected, we will need to mound the fan housing to the printer. It’s important that you do this before you connect the fans to the housing.
The fan housing will connect using the same screws that you removed. If you are using a BLTouch you want to make sure you connect the mounting arm at this point. One thing to note is that you should put the nut in the top hole on the back now; you won’t be able to get to it later.
If you are not using a BLTouch, you can mount it as is or print a cover piece to go over the indent for the BLTouch mount.
Mount the Front Fan
Now we want to mount the front fan. You want to make sure that the label is facing the heat sink when you mount the fan. Once the fan is in place, you will use four M3x12mm bolts (available on Amazon) to hold it in place, one in each corner of the fan.
Next, you can mount the fan cover on the front of the fan; it just pops into place. I recommend using the cover to prevent you from accidentally hitting the fan while working on your printer.
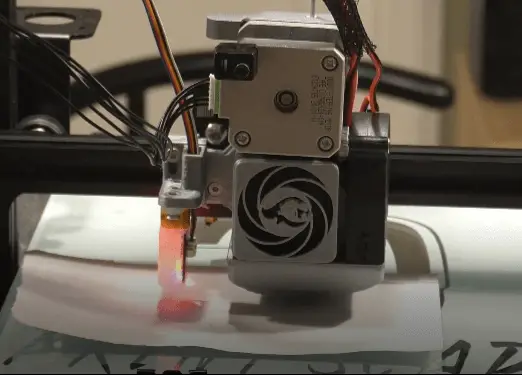
Mount the 5015 Blower
Once the front fan is in place, we can go ahead and mount the new 5015 blower. This will just sit on the opening on the fan housing’s right side and connect in on the top with an M3x20mm bolt (available on Amazon). Make sure you don’t overtighten the bolt as the fan is plastic and can snap.
Also, there is an optional bracket that you can use for the bottom bolt, but it did fit with my direct drive setup, so I didn’t use it. If you choose to use it, it will need to be mounted before the blower with M2x6mm bolts or glue.

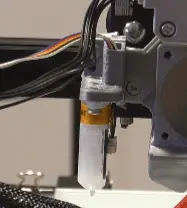
Mount the BLTouch *If Used
Now that the fans are in place, you can mount the BLTouch. You will want to mount the BLTouc to the adapter using two M3x8mm bolts (available on Amazon), then mount that bracket to the adapter arm using an M3x12mm bolt (available on Amazon).
Also, you will need to update the firmware to account for the X & Y offsets and adjust your Z offset. I will cover this in more detail below.
Update the Firmware *Required if BLTouch is used
Next, we need to update the firmware to account for the BLTouch X & Y offsets. If you are not using a BLTouch, this step can be skipped.
If you haven’t built custom firmware before, I would suggest watching this video first. It should give you a good starting point.
Assuming you had the BLTouch before, you only need to adjust the offsets for the X & Y-axis. To do this, search for “#define NOZZLE_TO_PROBE_OFFSET” and update the values to match what I have below.
| Old Value | New Value |
|---|---|
| #define NOZZLE_TO_PROBE_OFFSET { X, Y, 0 } | #define NOZZLE_TO_PROBE_OFFSET { -49, -19, 0 } |
If you are installing the BLTouch as part of this upgrade, I recommend watching the video below to set up the BLTouch.
Set Z-Offset
If you are using a BLTouch, you must now set the z-offset. To do this, you will want to follow the steps below.
- Auto home the printer
- Lower the axis until you can only get a sheet of paper between the nozzle and the build surface
- This was at -3.3 for me
- Set the offset
- Set the z-offset to the value you just got, so -3.3 in this example.
- Save/Store settings
*Note: This article isn’t focused on how to set the Z-offset, but I wanted to give you some basic instructions. If you are running into issues here is a video I created showing the process.
Related Questions
- Can I upgrade the fan duct cover without upgrading the fan: Yes, here is a video I did covering the process.
- Why does the BLTouch require so many extra steps: The BLTouch is a great upgrade, but the firmware must know where it is compared to the nozzle. The X & Y values get stored in the firmware, and the Z offset is typically set at the printer.
- Is the BLTouch upgrade worth it: Yes, the BLTouch is one of my favorite upgrades and is well worth it. It may take a little extra effort to make mods if you have it, but it’s not too bad.
Recap
Upgrading the blower fan is a great upgrade that will improve bridges and overhangs. The upgrade can be under in under 30 minutes and for about $10. In my opinion, this upgrade is well worth the investment and I would recommend you do it.
Make sure you check out our YouTube channel, and if you would like any additional details or have any questions, please leave a comment below or join us on Discord. If you liked this article and want to read others click here.