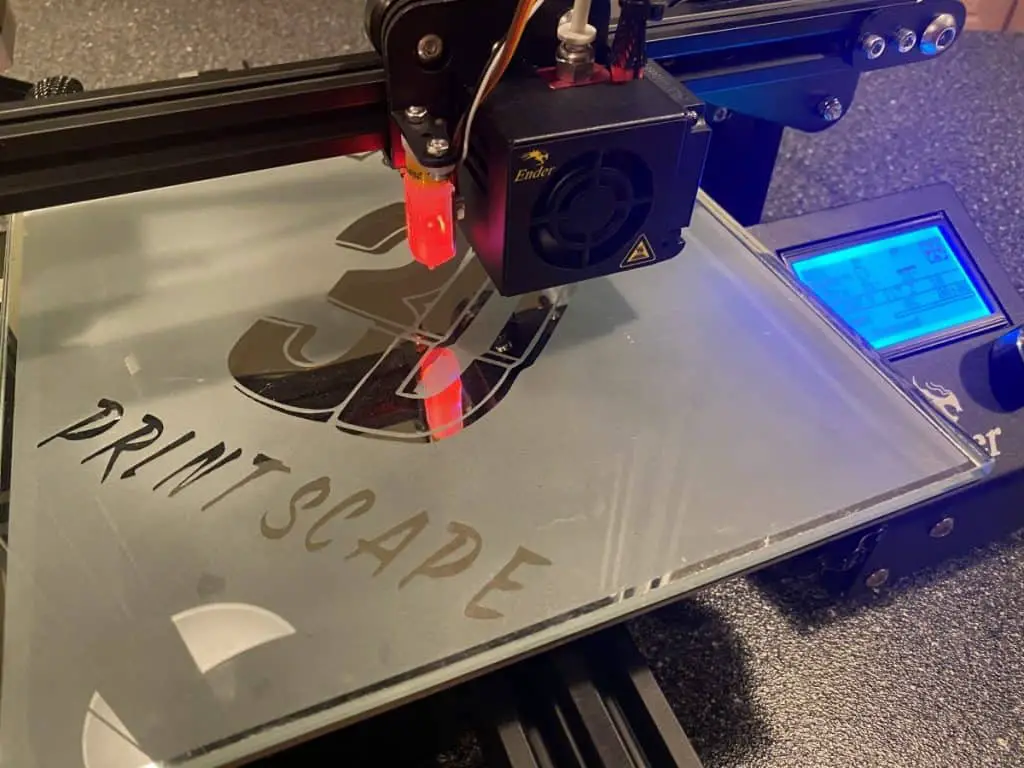
One of the most challenging parts of setting up a 3d printer is getting the bed leveled right and keeping it level between prints. Some of the more expensive printers have a built-in auto bed leveling kit that aids in this process, but that’s not the case for popular printers like the Creality Ender 3. Fortunately, that can be solved for by adding an aftermarket auto bed leveling kit, like the BLTouch, to printers that support it.
Here are the steps to install a BLTouch on a Creality 32-bit mainboard.
- Physical Install
- Firmware Update
- Set Z-Offset
- Update Printer Profile in Cura
*This process assumes you have a Creality 32-bit mainboard and plan to upgrade it using the pre-compiled Creality firmware. If you’re looking to build custom firmware, you will want to follow this guide “Marlin Firmware on Creality Board – Complete Guide!“.
** This process has been tested with the Creality 4.2.2 and 4.2.7 mainboard.
Step-by-Step Install Guide
Requirements
Required Hardware
- Creality 3d Printer *Like the Ender 3 Pro or v2
- Micro SD Card *8GB or smaller
- SD Card Reader
- BLTouch
- Computer
*Links are to Amazon, and for the products I use.
Step-by-Step Guide
Physical Install
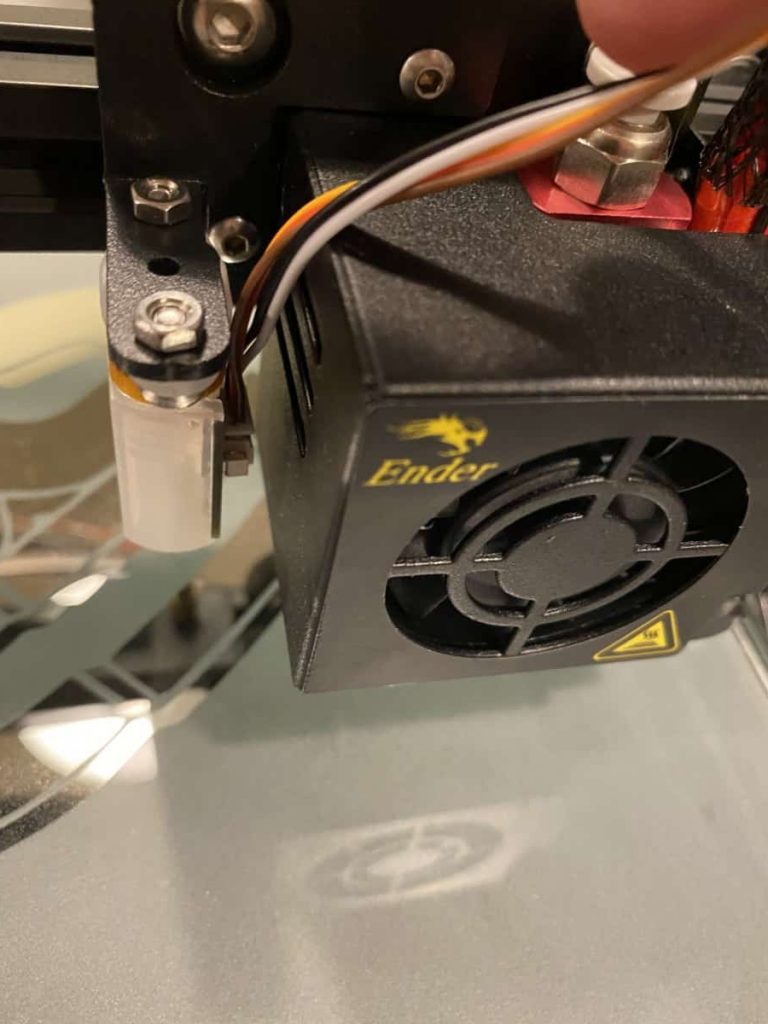
The first thing you will want to do is install the BLTouch on the printer. This involves you running the wires, connecting the cables to the BLTouch and mainboard, and mounting it to the x-axis carriage.
Run Wires
I like to run the wires before I try to mount anything. You will want to run the wires alongside the cables for the extruder and leave enough slack at the extruder to be able to plug the adapter into the BLTOUCH. At this point, I would not use a couple of zip ties to hold the wires in place loosely. You want to make sure you can still adjust the wires if needed.
*Note: You should make sure that the adapter that connects to the BLTouch is by the extruder; only one of the adapters will connect to it.
Connect Wires to the BLTouch
Once the wires have been run, you can connect the adapter to the BLTOUCH. It adapter should be connected with the brown wire on the left and white wire on the right, as pictured below.
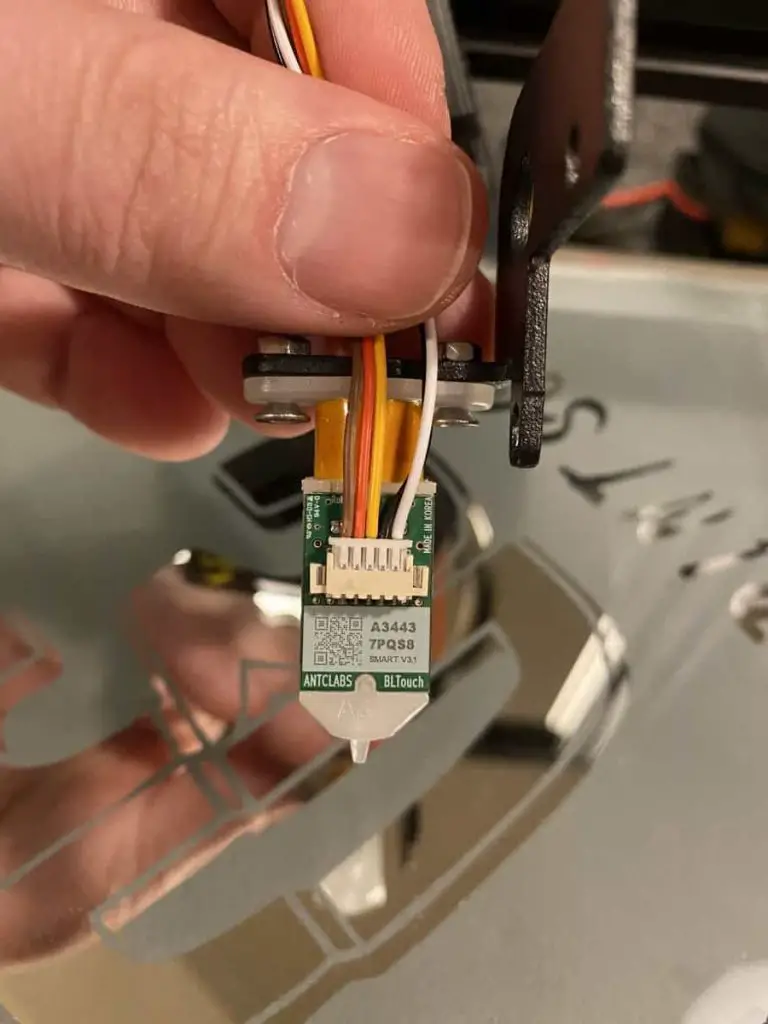
*Note: If you ended up getting a BLTouch clone, the wire colors may be different.
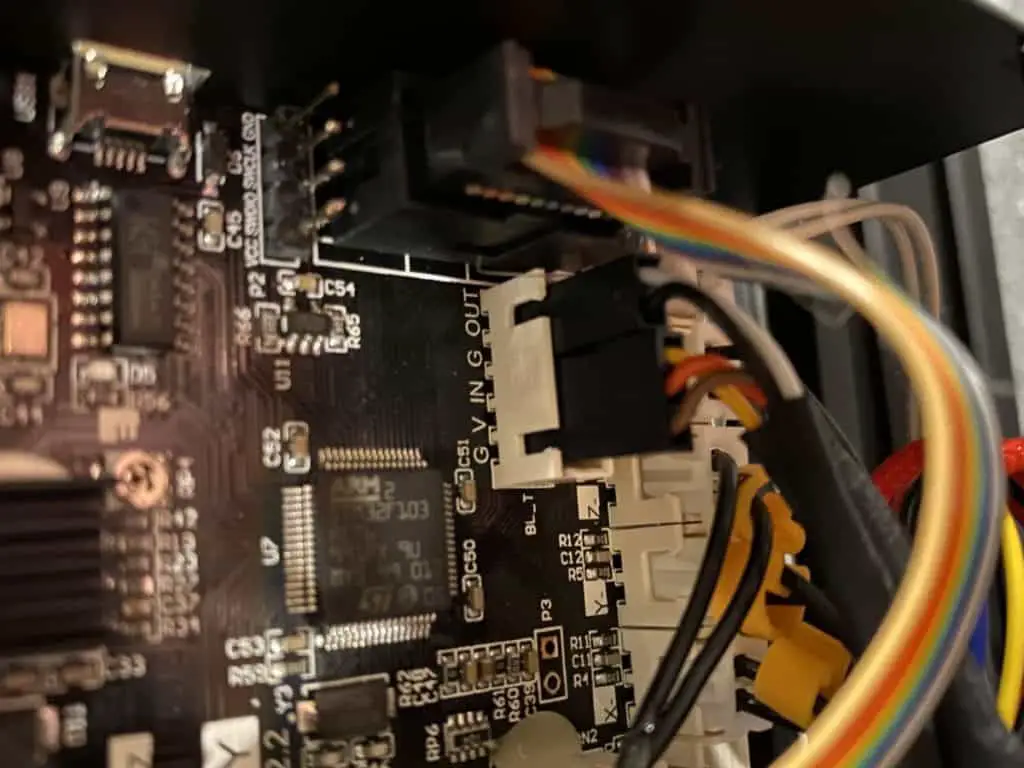
Connect Wires to the Mainboard
Next, we want to connect the wire to the mainboard. They should be connected in this order shown in the picture below.
Here is an overview of what each wire is for.
| Wire Color | Board Pin | Board Label |
|---|---|---|
| Brown | GND | G |
| Red | +5V | V |
| Yellow | PA1 | IN |
| Black | GND | G |
| White | PC14 | OUT |
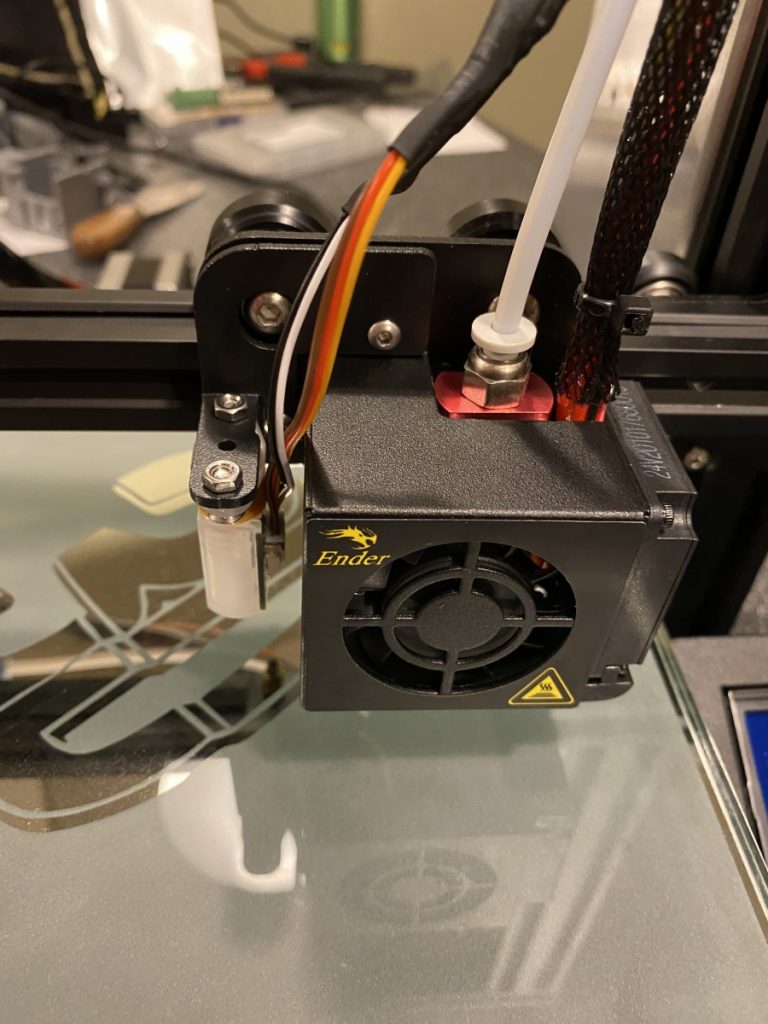
Clean up the cabling
Now that everything is wired up, you should spend a couple of minutes cleaning up the cables. You will want to tighten the loose zip ties from before and add a couple more where it makes sense. I would target one zip tie every 6 – 8 inches. The main purpose of this will be to make sure the cables don’t get caught or pinched when the printer is in operation.
Mount BLTouch to Mounting Bracket
The next thing you want to do is mount the BLTouch to the mounting bracket that came with the kit. The wires should be on the inside of the bracket, and you will use the provided bolts to mount everything in place.

Mount Bracket to the X-Axis Carriage
Finally, we will want to mount the bracket to the x-axis carriage. To do this, you will need to remove the two screws that are on the left side of the fan duct cover. Hold the BLTouch bracket in place, then put the screws back in. The bracket should go on the outside of the fan duct cover.
It may be a little tricky to get the screws back in, but I found that if I push one of the screws all the way through it’s easier to align it with the threads on the carriage.
Firmware Update
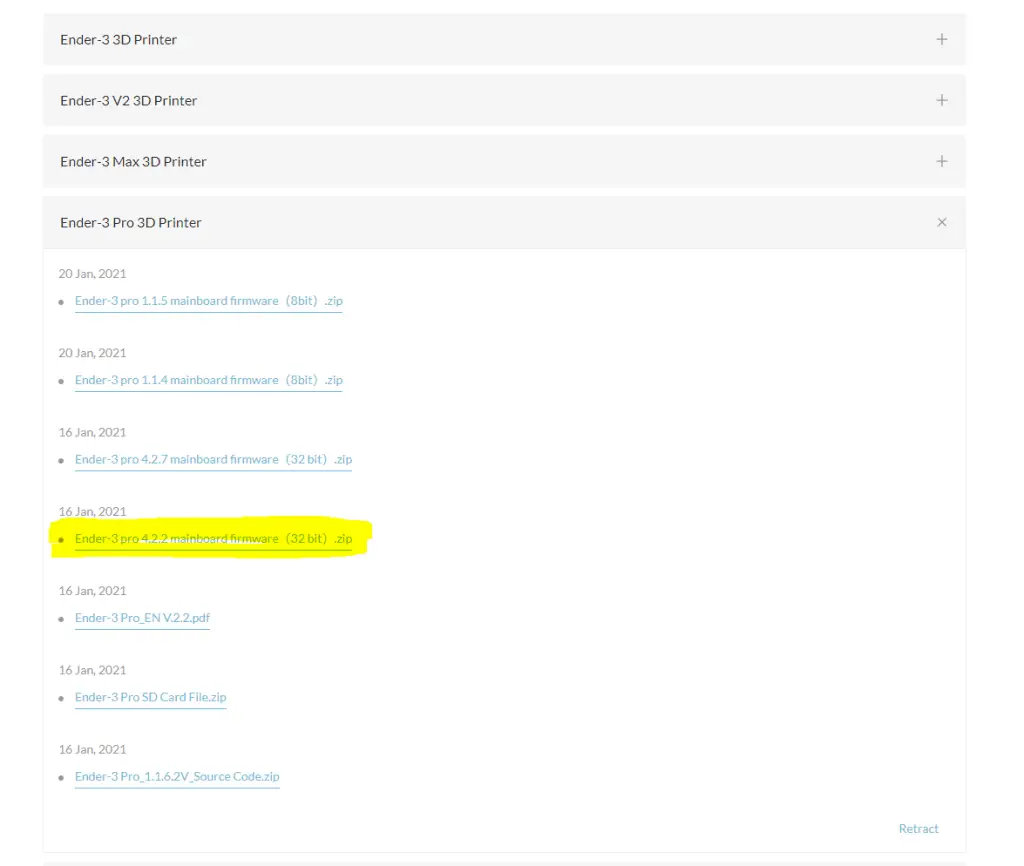
Download the Firmware Package
Next, we want to go to Creality’s download site and get the latest firmware for the printer and board combo you are using. In this example, I have the Ender 3 Pro with the 4.2.2 mainboard, so I will want to get the firmware bundle for that.
Move Firmware Package to SD Card
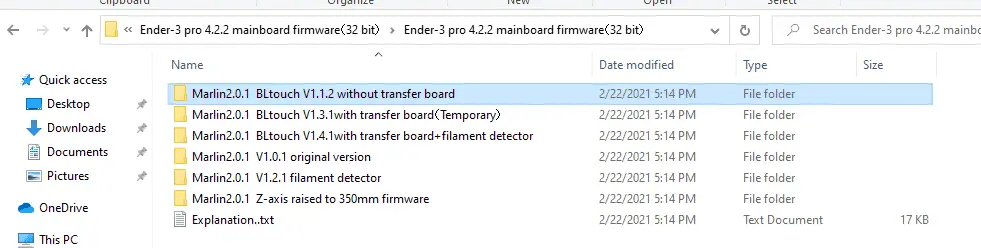
Once you have the firmware bundle from Creality, you will want to unzip the folder and find the actual firmware file you need. In my example, I want to get the “Ender-3 Pro- Marlin2.0.1 – V1.1.2 – BLTouch.bin” file that’s under the “Marlin2.0.1 BLTouch V1.1.2 without transfer board” folder.
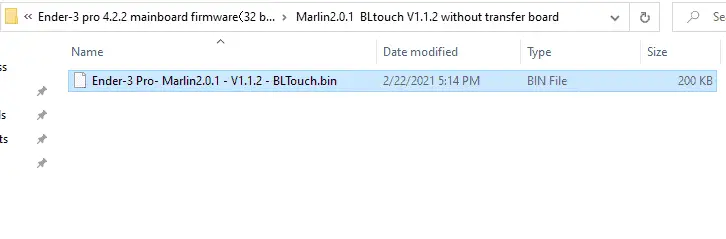
Once you found the firmware bundle binary that you’re looking for, you will want to drag it to an empty SD card that is under 8GB or less.
Install the New Firmware on the Printer
This step sounds more challenging than it actually is. Assuming you copied the right file to the SD card, all you need to do is put the SD card in the printer and power it on. From there, the printer will pull the file and install it on the printer. The entire process should take less than 30 seconds. Once the printer boots into the standard interface, you can remove the SD card.
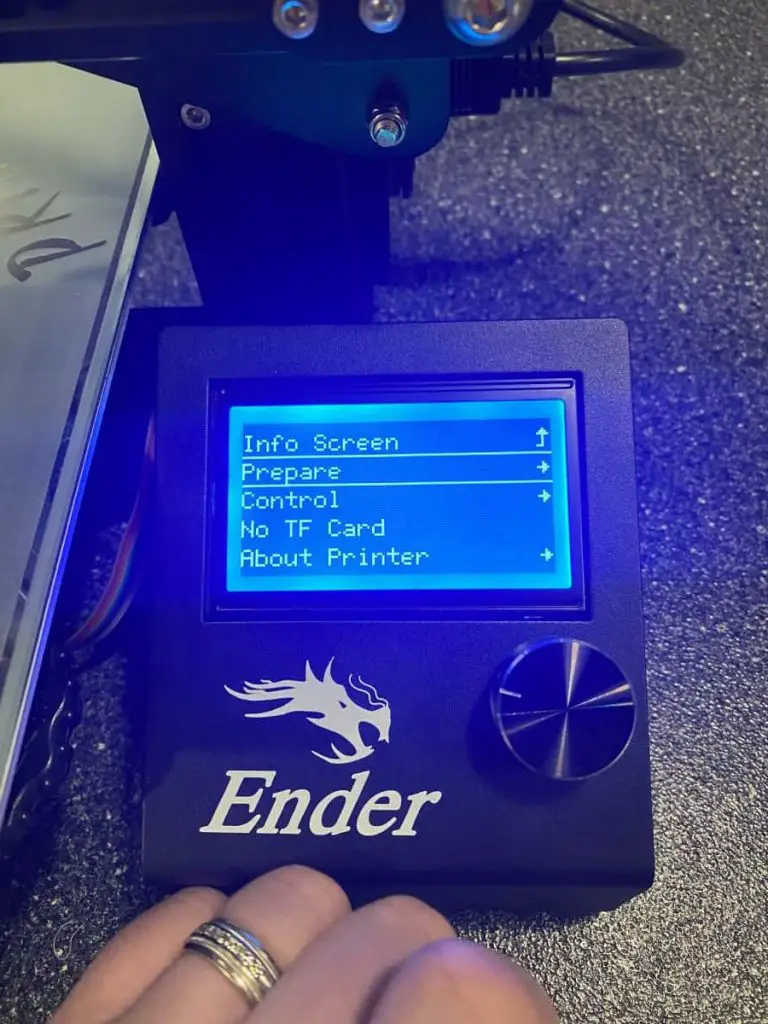
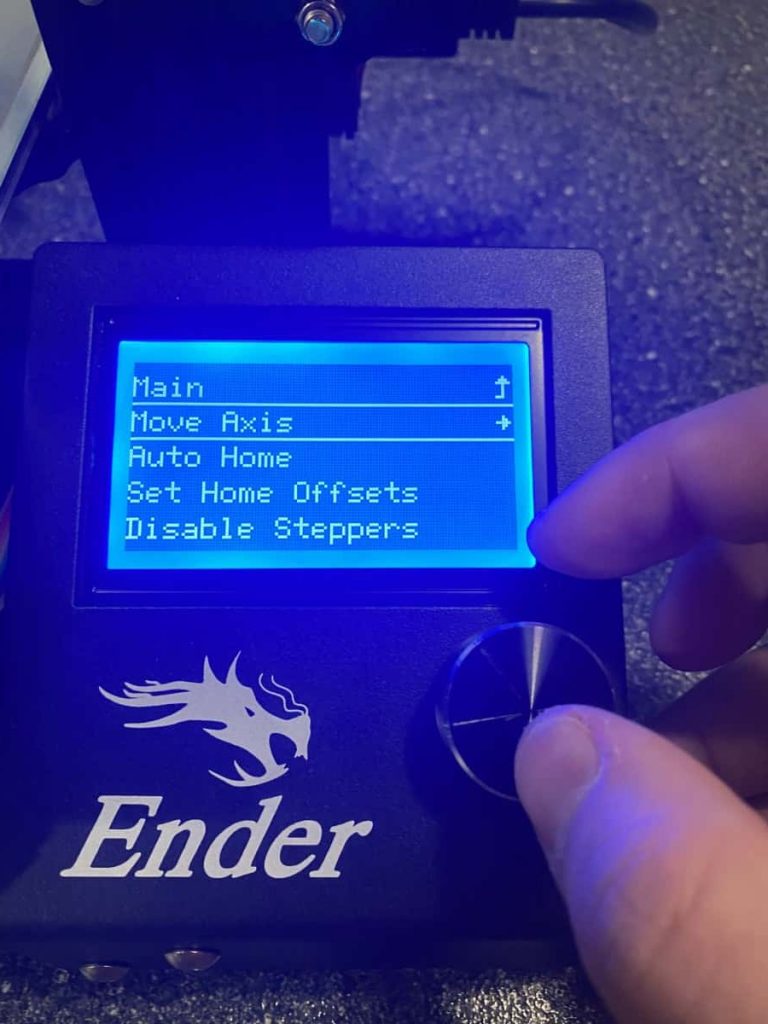
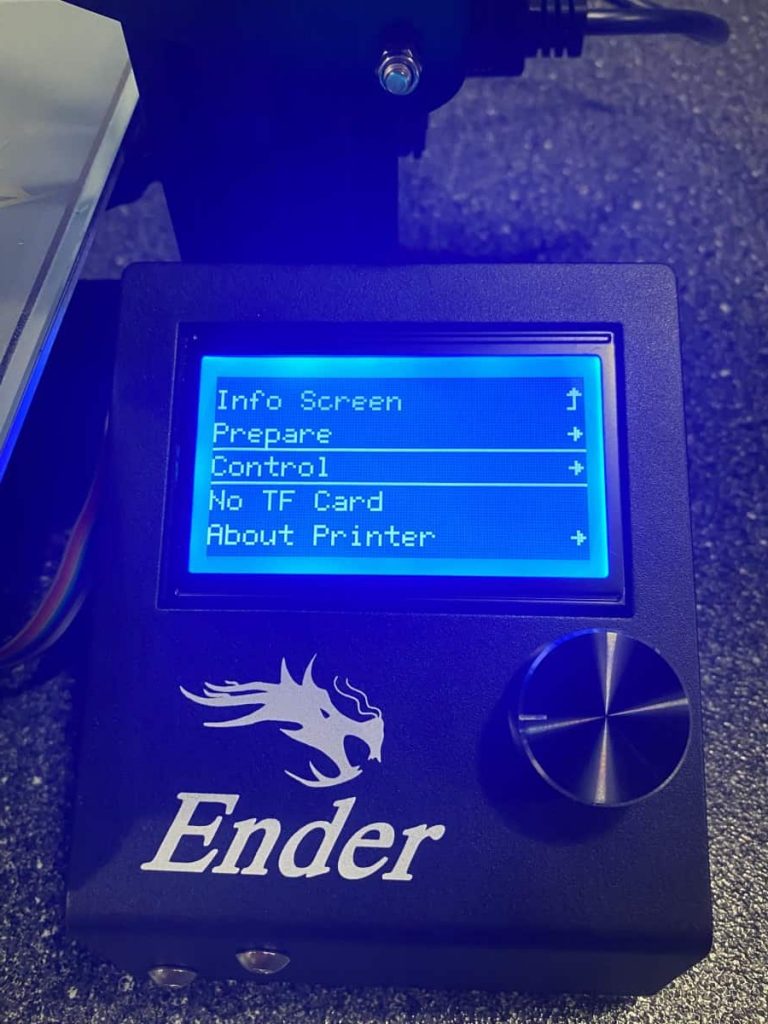
Now you will want to make sure the new firmware has been uploaded by following the steps we did to get the initial version. You will go into the menu then go to about printer. From there, you will make sure the version matches what was on the SD card, so 1.1.2 in this example.
Z-Offset
Once the BLTouch is in place, and the firmware has been updated, you will need to set your z-offset. This is arguably the most challenging part of setting up a BLTouch, and it may take you a couple of times to get right. I will break this section into two parts, getting the z-offset then setting the z offset.
Get Z-Offset
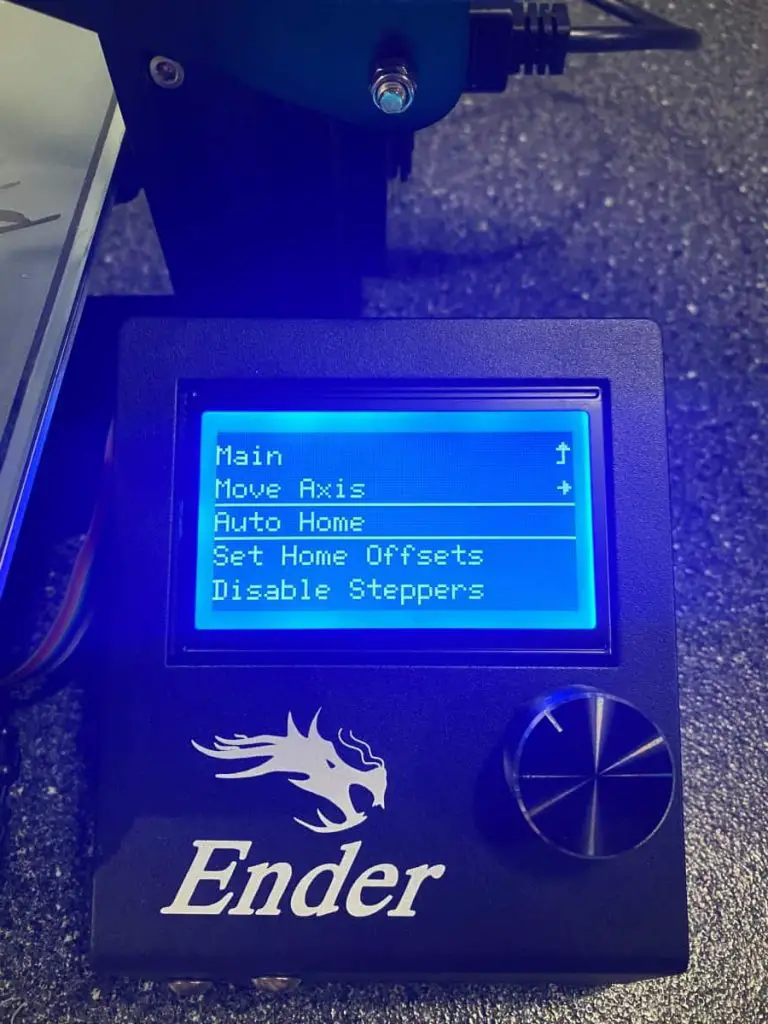
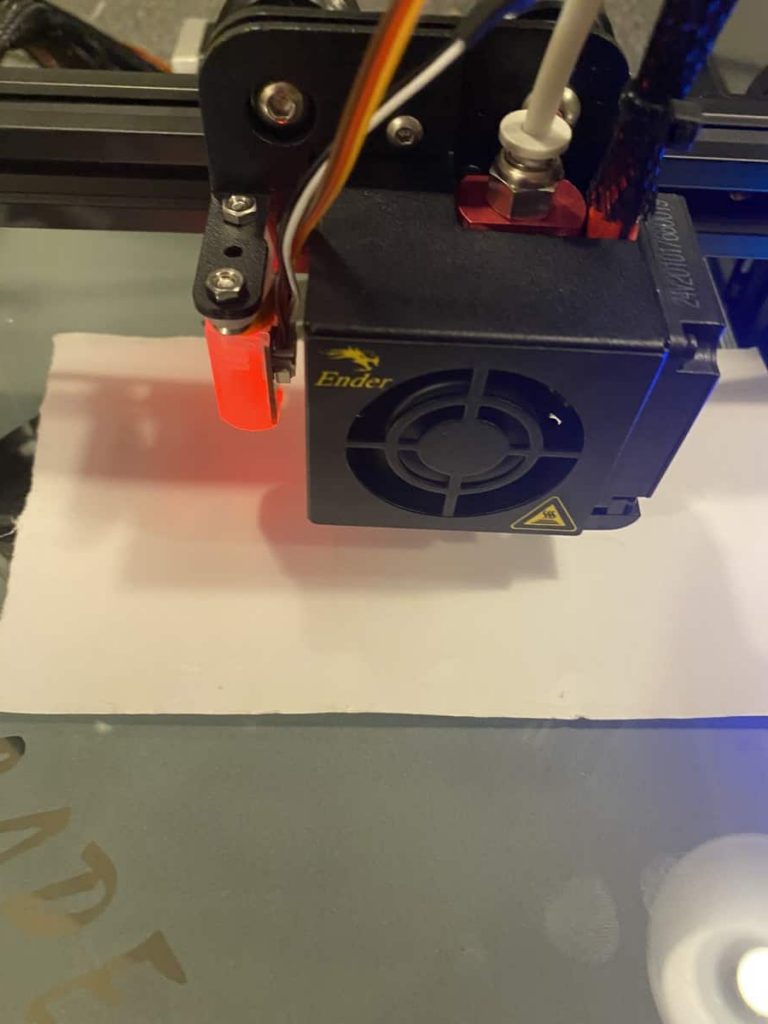
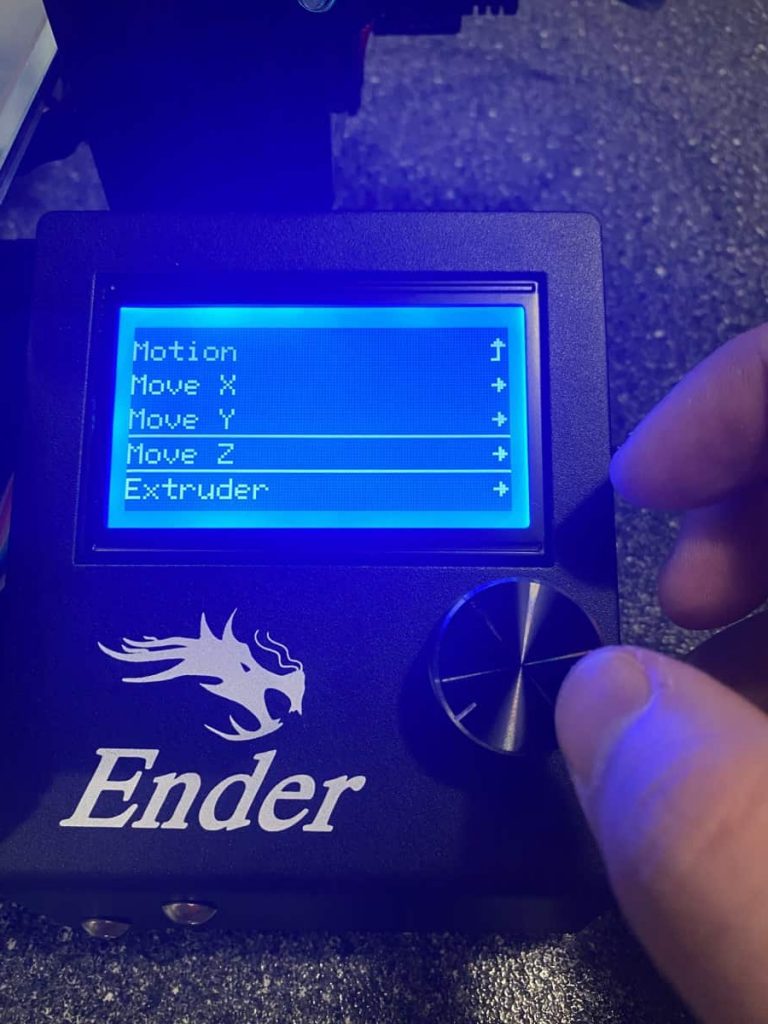
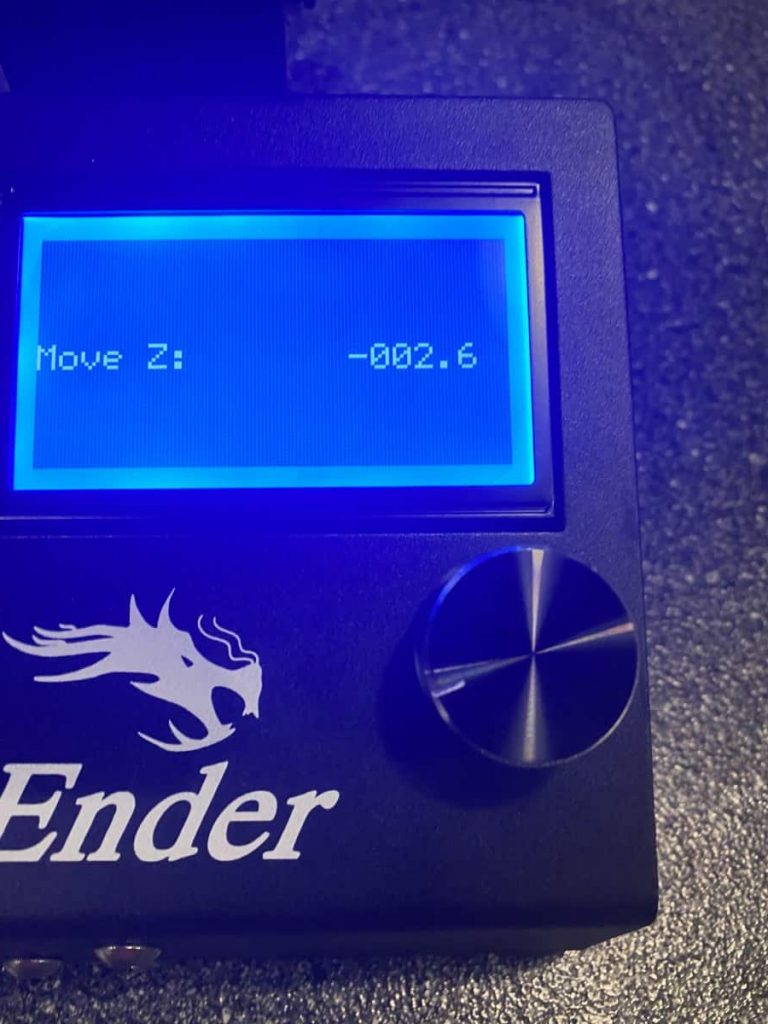
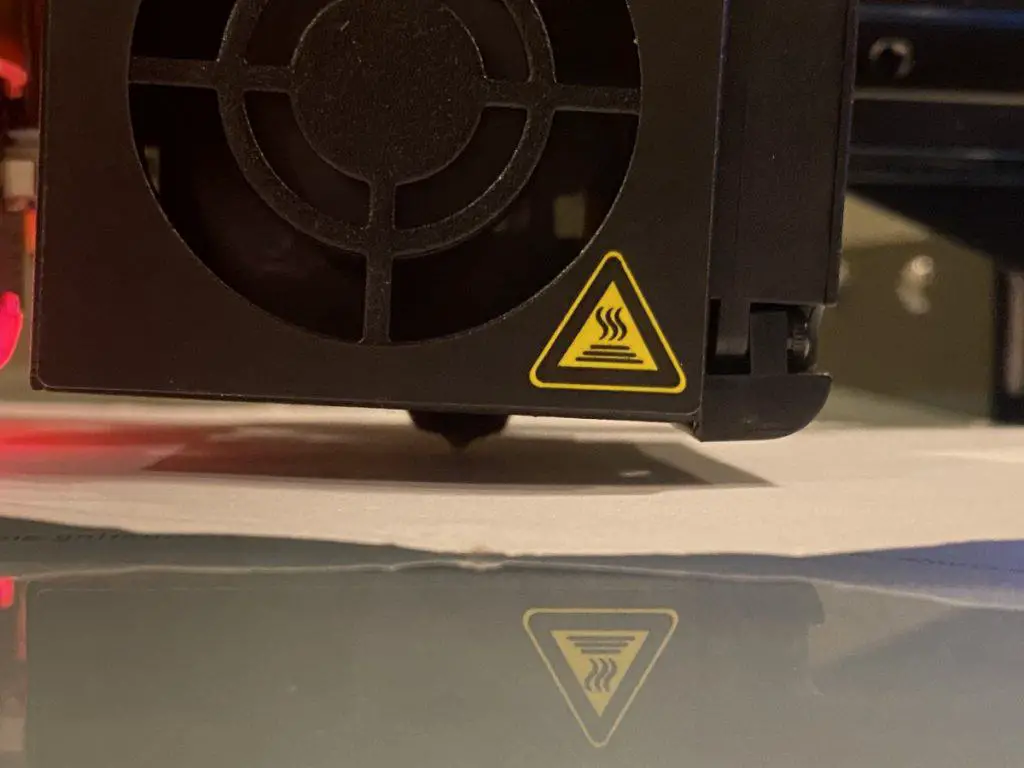
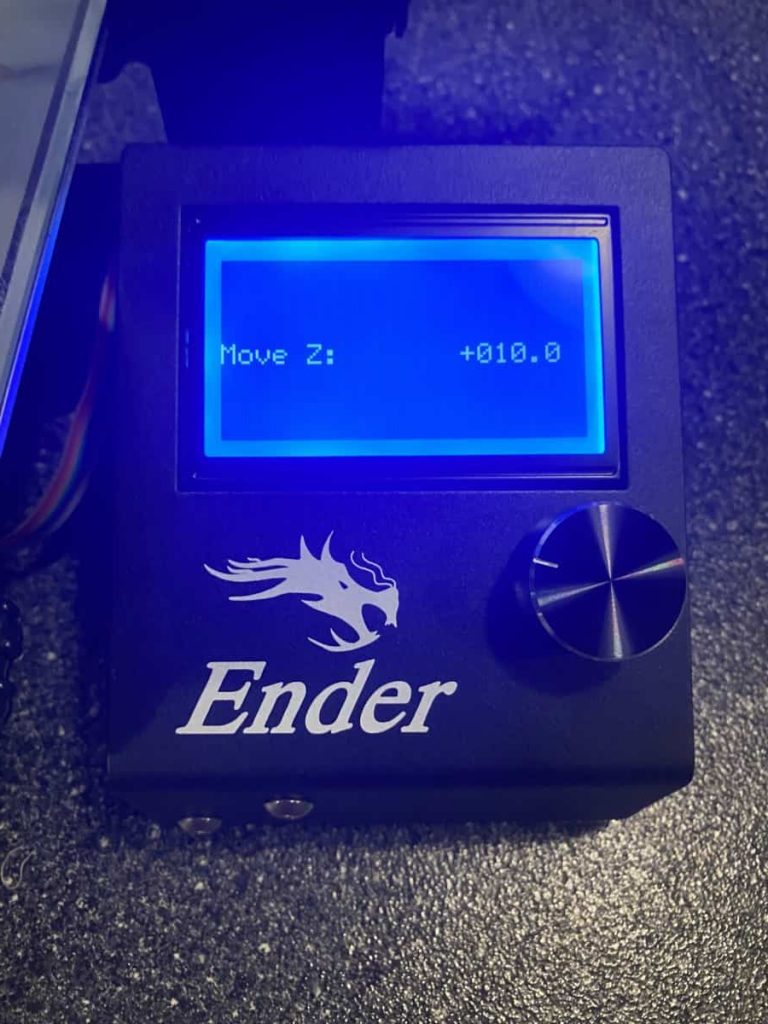
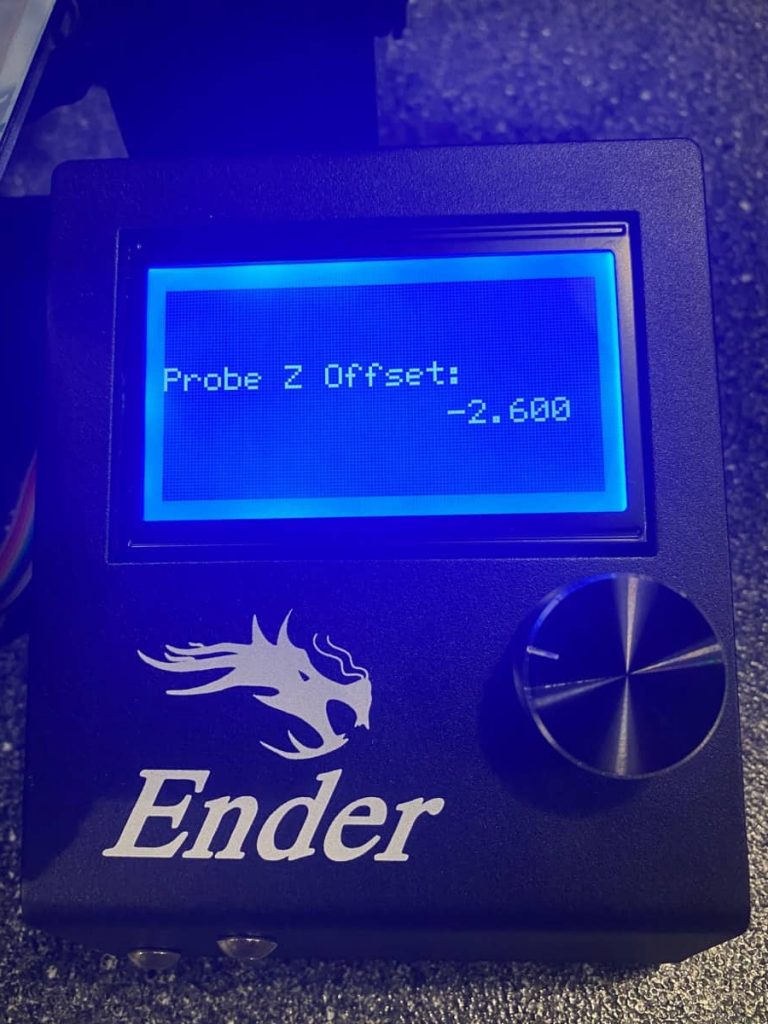
The first thing you will need to do is get the z-offset. You will get that by going to Menu – Prepare – and selecting Auto Home. Once the auto home runs, you will want to get a sheet of paper to use, similar to what you would use to manually level the build plate. Next, you go to Menu – Prepare – Move Axis – Moze Z and lower the z-axis until it’s scraping the paper. Make a note of that value as it will be your z-offset, in my example, it was -2.6. Now raise the z-axis back up or rerun the auto home (*don’t skip this part).
*The Z-Offset needs to be set to 0.00 (the default setting) for this to be accurate. If you were making changes before, I would clear the EEPROM or make sure this value is set to 0.00.
Set Z-Offset
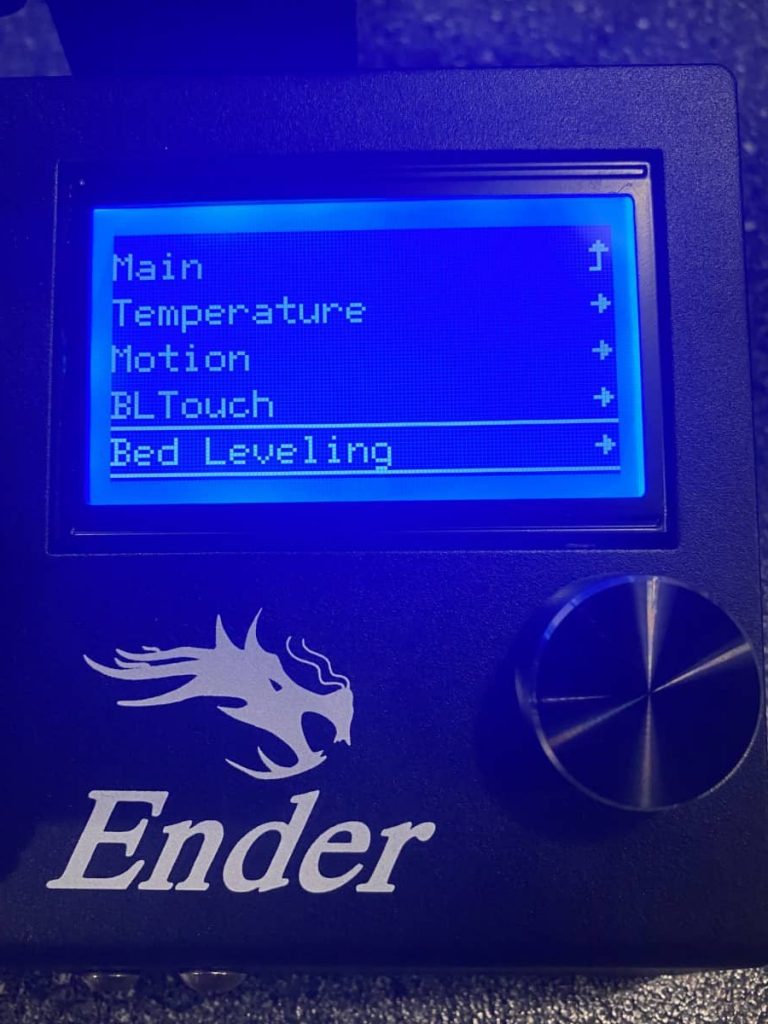
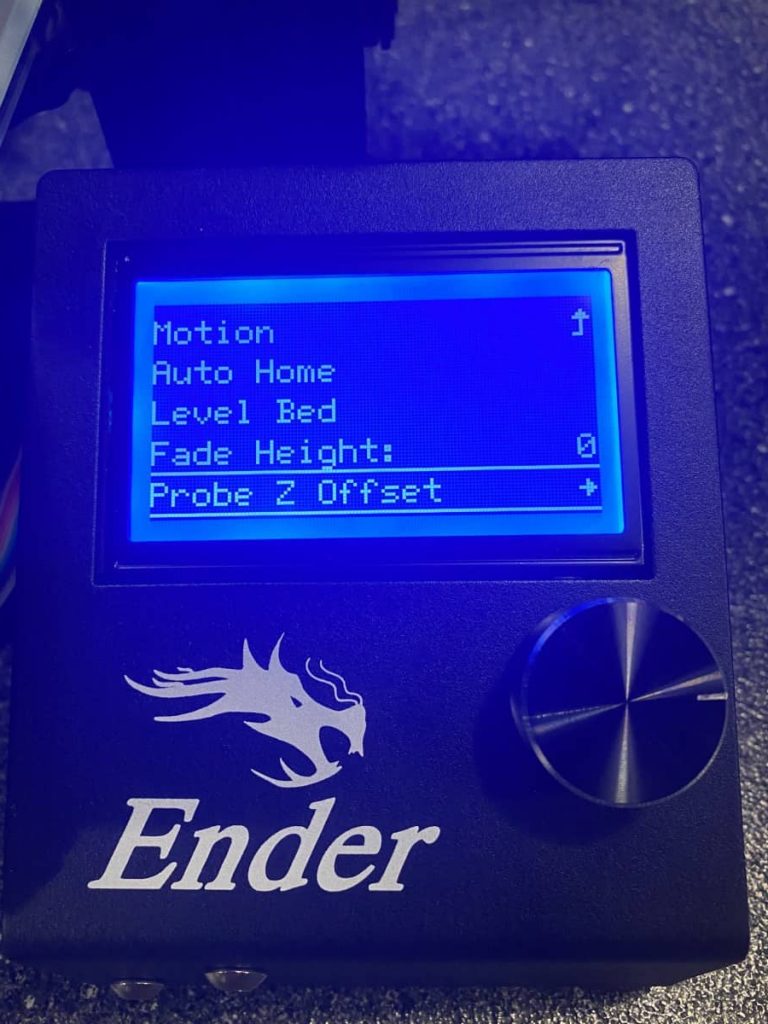
Now that we know the z-offset value, we can set it. You will want to go to Menu – Control – Bed Leveling – Probe Z Offset. Once there, you will set the z-offset value to the value you set in the previous step, -2.6 in my example.

Now got to the Menu – Control – Bed Leveling – Store Settings. It’s important that you do this. If you don’t, the value will be erased when you power the printer off.
Next, you will want to kick off a test print and make sure the first layer looks right. If its off, you will need to go back and make small adjustments to the z-offset.
Update Printer Profile in Cura
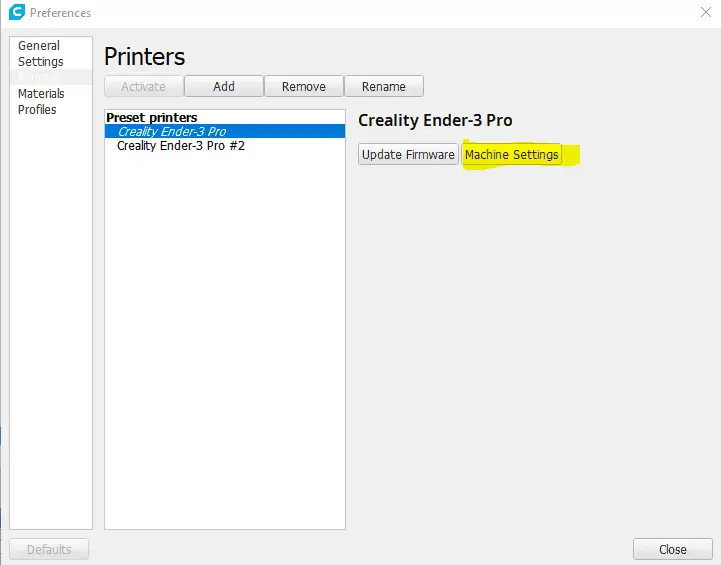
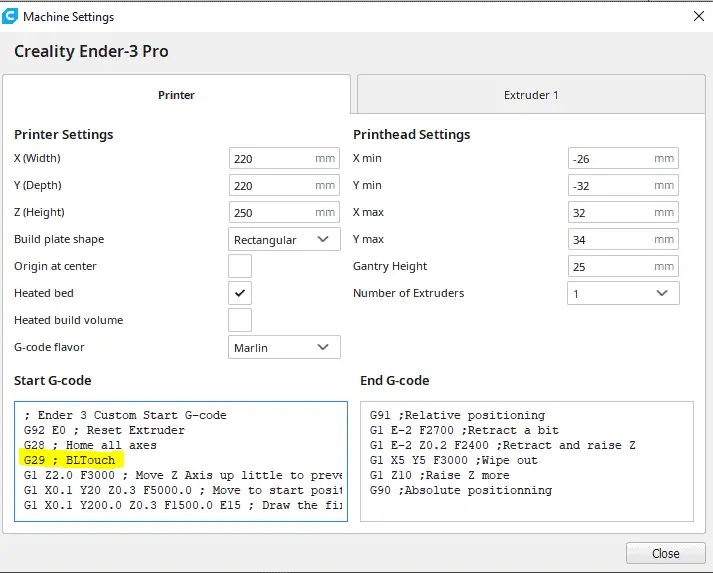
The final step is to add a G29 code to the Start-G-code box in the machine settings box in your printer profile. Doing this will tell your printer to run the grid that the BLTouch will use at the start of each print.
To do this, go to preferences – Configure Cura – Printers – Select the printer you are working with and click on Machine Settings. Once there, add G29 ; BLTouch under G28 ; Home all axes in the Start-G-code box. After that has been added you can close out of the machine settings window and use Cura as normal.
*This process assumes that you have Cura installed and a profile for your printer. If you don’t, I recommend starting with this video first and download my Cura profiles.
Related Questions
Why is a BLTouch recommended? – I recommend the BLTouch because it uses software to make mini movements as needed to account for the build plate not being level or having warps. Many 3d printers have warped build plates that will impact prints and can only be corrected by being replaced with a flat one or an auto bed leveling device like the BLTouch.
What if I have an 8-bit Creality mainboard? – You will need to install a bootloader on the printer, then push the firmware to it. I created a video covering the upgrade process and adding the BLTouch. That said, if you don’t already have the hardware to do this upgrade, it will probably cost you around $20, and I would recommend putting that $20 towards a silent 32-bit board like the SKR Mini.
What if I need to modify the firmware? – If the Creality pre-compiled firmware doesn’t meet your needs, you can build a custom version of the Marlin firmware. I cover the process in more detail here (coming soon) and in this video.
Recap
Add an auto bed leveling kit to your 3d printer will make a massive difference in your prints and has been one of my favorite upgrades. The BLTouch does require a little work to get set up and working, but once it’s working, it will make things much easier.
Make sure you check out our YouTube channel, and if you would like any additional details or have any questions, please leave a comment below or join us on Discord. If you liked this article and want to read others click here.
Hi,
Thank you for this Instruction…
But I have still a problem, to get my BL-Touch activated correctly…
I have an Ender 3 with an Creality 4.2.7 Board. For the BL-Touch I have an V3.1 smart BL-Touch, bought on amazon with the 5-pol-Cable, wich can directly plugged to the BL-Socket…
I followed your instruction and did it completly the same, but when I want to Auto-Home, X- and Y-Axis moved to the endswitches, then the extruder drive to the middle of the bed… The extruder goes up for a few millimeters… But then, instead of moving down to touch the Bed, the BL-Touch only pop out and pop in two or three times. This popping out and in will repeat another one and then there is a “Stopped”-Message at my display…
Did you heared from a problem like this one?
Could you please help me, I try to fix this now for weeks and can’t do it…
That would be awesome…
Many greetings
Peter
Hi,
This may be easier to try to troubleshoot over discord but I would look at the wiring for the BLTouch to make sure the pinout is right. Also, make sure all the connections are good and the z stop is connected.
Hey Peter – Experiencing the exact samel on an Ender 3 (2021) with the 4.2.2 board and the non-silent drivers. Did you ever find a solution for this issue?
Thanks
A
Created an account to say thank you for your guides. I was able to get Merlin flashed to my Ender 3 V1 with a 4.2.7 board that I got a few days ago. I imagine I will soon be a patron to get into your discord but wondered if you could throw out any suggestions for this problem.
I’ve gotten my BLtouch z-offset tuned great and it has been doing prints fine without adding G29 in Cura. As soon as I add it and it starts probing the bed, I get really uneven and wavy first layers that vary between nothing on the bed and too-thin. The most frequent result is a perfectly fine purge line on the left followed by nothing printed on the model, it’s like the nozzle is at exactly 0. Using the bed visualizer plugin my bed seems pretty flat (plus I’m printing fine in “dumb” mode). Any ideas what I could try to get the bed leveling function working? The steps I’ve taken is turn Bed Leveling on, storing settings, and printing with G29 right after G28. I’ve tried using Merlin 2.0.9.3 and most recently as of yesterday with a nightly Bugfix 2.0.x.
Hi,
Thanks for the feedback. It sounds like the nozzle may be too close to the build plate, or was at one point, or has a partial clog.