Understanding the characteristics of the filament you are using can go a long way when it comes to getting the best print possible from a 3d printer. This is especially true when it comes to knowing the temperature that works best with the filament. A five-degree change in either direction can be the difference between getting a great print or a stringy mess with some types of filament. That’s where a temperature tower comes into play.
Most modern slicing software can change the temperature mid-print by injecting additional commands into the g-code file. With Cura, that’s done using the ChangeAtZ plugin, and I’m going to show you how to use it.
Before we dig into how to print a temperate tower, let’s first talk about what it is and why you would want to print one to begin with.
How to Print a Temperature Tower
Now that we talked about what a temperature tower is and when you would want to print one, let’s dig into how you actually do that.
If your looking for a good filament, I recommend HATCHBOX (link to Amazon). Its an all around great filament for a good price and my go to filament.
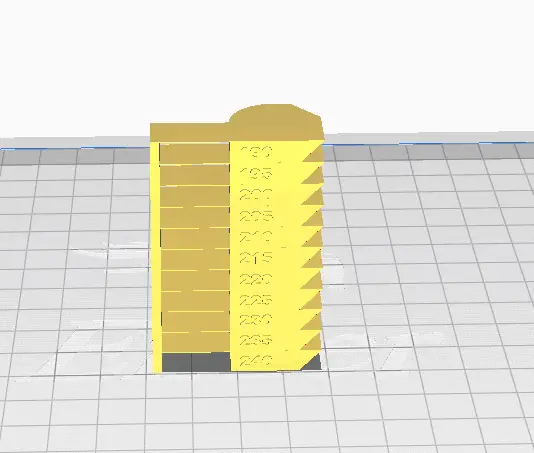
- Download the temperature tower you want to use. I would recommend one of these, but I will use the first one as an example.
- Review the notes in the tower selected to see when you should be changing the temperature and what the starting temperature should be.
- For example, the 190-240 heat tower should start at 240 and decrease by 5 degrees every 5mm.
- Import the tower into Cura and select the profile you plan on using.
- Set the starting temperature as the main printing temperature.
- In this example, it would be 240.

- Set the infill density to 10%, unless the notes on the tower you are using recommends differently.
- Go to Extensions à Post Processing à and click on Modify G-Code
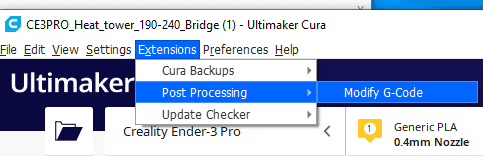
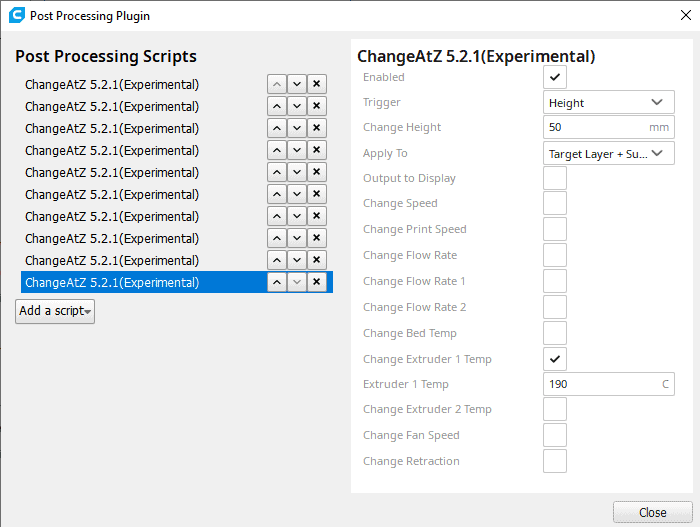
- Click on Add a script and select ChangeAtZ, you will do this ten times. The values should look like this.

- Make sure the Trigger is set to height, change height is set to 5.0mm, Change extruder 1 Temp should be checked, and Extruder 1 temp should be set to 235.
- The values for each plugin will change, basically layer height increases by 5 mm, and the temperature decreases by 5 degrees. Here is an overview of what all the values should be.
| Plugin Number | Trigger | Height | Change Extruder Temp | Extruder Temp |
|---|---|---|---|---|
| 1 | Height | 5mm | Checked | 235 |
| 2 | Height | 10mm | Checked | 230 |
| 3 | Height | 15mm | Checked | 225 |
| 4 | Height | 20mm | Checked | 220 |
| 5 | Height | 25mm | Checked | 215 |
| 6 | Height | 30mm | Checked | 210 |
| 7 | Height | 35mm | Checked | 205 |
| 8 | Height | 40mm | Checked | 200 |
| 9 | Height | 45mm | Checked | 195 |
| 10 | Height | 50mm | Checked | 190 |
- Next, you will want to go back through and verify everything looks right, it’s easy to make a typo.
- Slice the object and save it to an SD card.
- Enter the SD card into your printer.
- Kick off the print.
*Note: There have been some cases of the temperature not changing appropriately when using height as the trigger in Cura 4.8. If this ends up being happening to you, the workaround would be to switch the trigger from height to layers and increment the layer number by 25 (assuming you are using a .2mm layer height).
Here is a video I made covering the process. If you are still having issues, I would revert back to Cura 4.7 until the ChangeAtZ plugin can be patched.
What is a Temperature Tower
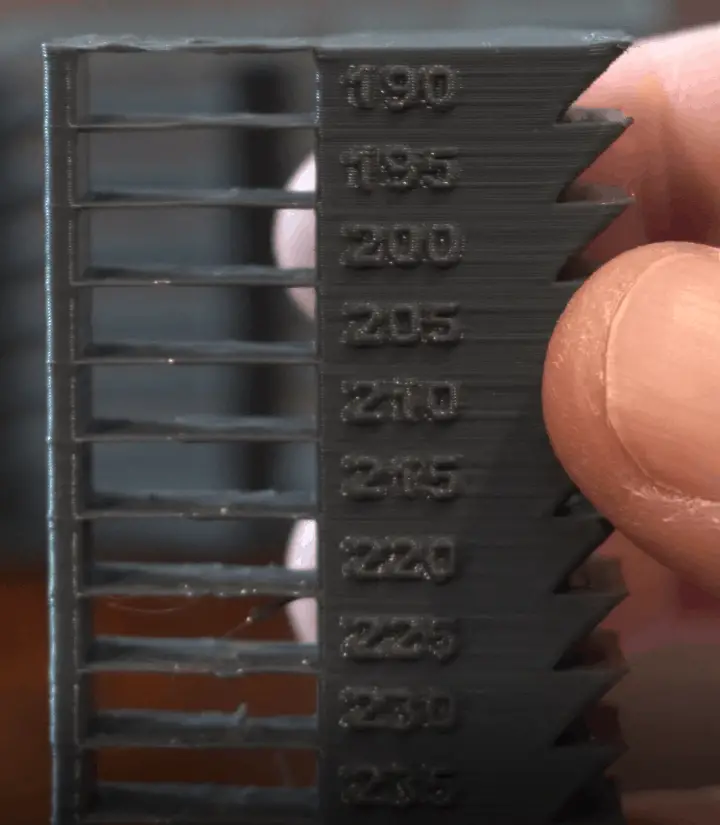
A temperature tower is a 3d object that is divided into sections that are printed at different temperatures. The object can be as simple as a tower or have additional features like bridges, cylinders, and cones. The main purpose of it is to help you identify the best temperature to use when printing with a specific filament.
You would do that by looking at the printed object to see what temperature looked the best, had the least amount of defects and stringing, and had the best bridge. With some filaments on Amazon, the results can be pretty close, and you would just need to make a judgment call on what one appears to be the best. With others, there can be a significant difference, and the right choice would be obvious.
Here are a couple of temperature towers from Thingiverse that I would recommend.
- Heat tower (190-240) 5mm steps
- Better temperature tower 240-180
- Smart compact temperature calibration tower
Most of the time I print a temperature tower that has a solid area, bridge, and a slight overhang. If I am working with more expensive filament, I typically opt to print a more complex tower to get the most from the filament.
Why Print a Temperature Tower
You would want to print a temperature to help you determine what temperature works best for the filament that you are using. The filament manufacture tends to give you a range you can use, but that range is typically 15-30 degrees, so it really only provides you a starting point. The difference between printing at the min and max of the range can be day and night, especially with more specialty filaments.
When should I print a temperature tower
You should print a temperature tower for each filament brand and type you use. For example, if you use HATCHBOX and Overture PLA filament (both available on Amazon), you would want to print a temperature tower for each of those even though they are both PLA because they are made differently and have different specs.
If you bought another roll of something you already printed a temperature tower for, you wouldn’t need to print another one. The same thing stands true for going between filament types like PLA, ABS, TPU, etc.
Related Articles
- Cura First Layer Settings
- Cura Jerk Settings: How to Set Them
- Cura Profiles
- How to Remove the Disallowed Areas in Cura
Recap
Understanding the characteristics of the filament you are using can go a long way when it comes to getting the best print possible from a 3d printer. With most modern slicing software being able to change the temperature mid-print by injecting additional commands into the g-code file, it’s easy to print a temperature tower, and I highly recommend doing so when you start to use new filament.
Make sure you check out our YouTube channel, and if you would like any additional details or have any questions, please leave a comment below. If you liked this article and want to read others click here.