One of the most challenging parts of setting up a 3d printer is getting the bed leveled correctly and keeping it that way. Some of the more expensive printers have a built-in auto bed leveling kit that helps in this process, but that’s not the case for many of the popular printers like the one in the Creality lineup. If your reading this article, that means you probably have an SKR Mini mainboard which makes solving this problem much easier as it has direct support for the BLTouch auto-bed leveling kit.
Here is the list of steps that you will need to follow to set up a BLTouch on an SKR Mini board.
- Physical Install of the BLTouch
- Update the Firmware
- Set Your Z-Offset
- Update Your Printer Profile in Cura

*This process assumes you are familiar with building Marlin firmware. If your not, I recommend checking out this article first. Coming soon
Step-by-Step Install Guide
Requirements
Required Hardware
- SKR Mini e3 V2
- Micro SD Card *8GB or smaller
- SD Card Reader
- BLTouch
- Computer
*Links are to Amazon, and for the products I use.
Step-by-Step Guide
Physical Install of the BLTouch
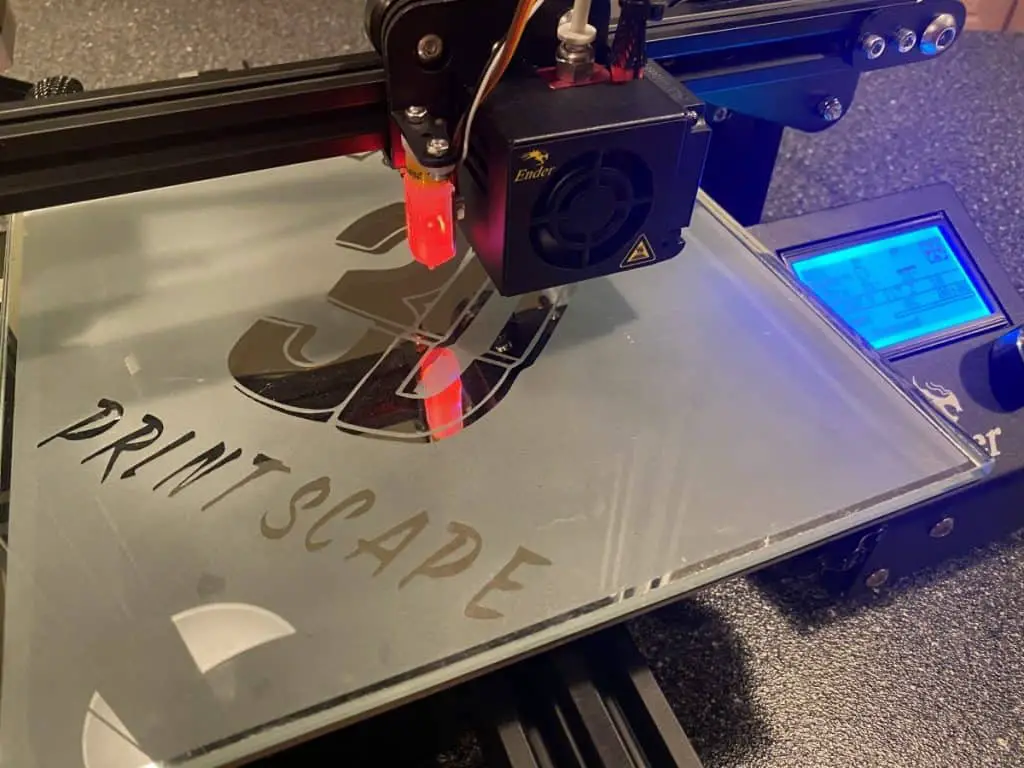
The first thing you will want to do is install the BLTouch on the printer. This involves running the wires, connecting the cables to the BLTouch and mainboard, and mounting it to the x-axis carriage.
Run Wires
I like to run the wires before I try to mount anything. You will want to run the wires alongside the cables for the extruder and leave enough slack at the extruder to be able to plug the adapter into the BLTOUCH. At this point, I would not use a couple of zip ties to hold the wires in place loosely. You want to make sure you can still adjust the wires if needed.
*Note: You should make sure that the adapter that connects to the BLTouch is by the extruder; only one of the adapters will connect to it.
Connect Wires to the BLTouch
Once the wires have been run, you can connect the adapter to the BLTOUCH. It adapter should be connected with the blue wire on the left and the white wire on the right, as pictured below.
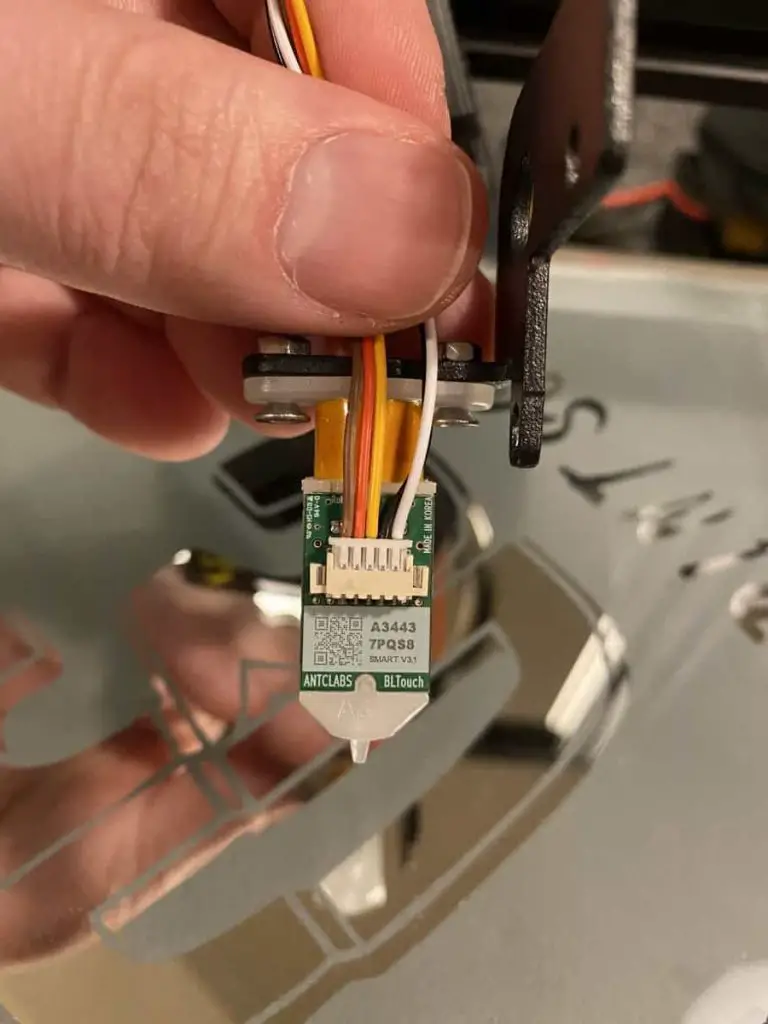
*Note: If you ended up getting a BLTouch clone, or off-brand, the wire colors might be different.
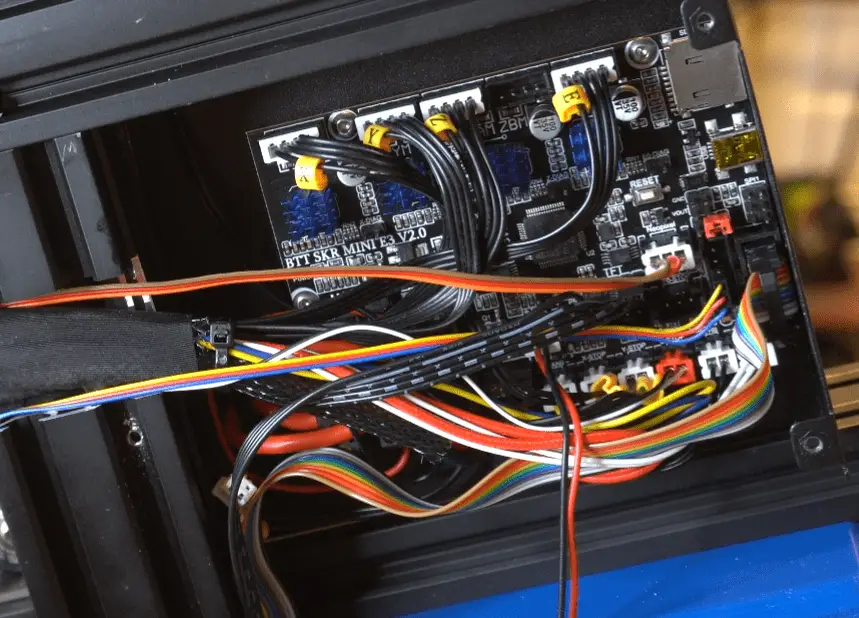
Connect Wires to the Mainboard
Next, we want to connect the wire to the mainboard. There are two wiring options that I will cover but be sure to pay attention to which option you choose because the firmware will need to be updated accordingly.
Option One
The standard way to connect the BLTouch would be to connect all five wires to the BLTouch port. This option provides an extra layer of protection in case the probe on the BLTouch has issues. If you go this route, they should be connected in this order shown in the picture below.
Here is an overview of what each wire is for.
| Wire Color | Board Pin | Board Label |
|---|---|---|
| Blue | GND | G |
| Red | +5V | V |
| Yellow | PA1 | IN |
| Black | GND | G |
| White | PC14 | OUT |
Option Two
Another common way to connect the BLTouch is to connect the probe stop into the z-stop port and not use the z-stop at all. If you decide to go this route, the wires should be connected in the order shown below.
BLTouch Port
| Wire Color | Board Pin | Board Label |
|---|---|---|
| Blue | GND | G |
| Red | +5V | V |
| Yellow | PA1 | IN |
Z-Stop Port
| Wire Color | Board Pin | Board Label |
|---|---|---|
| Black | GND | G |
| White | PC14 | OUT |
*Note: The z-stop cable will no longer be used.
Clean up the cabling
Now that everything is wired up, you should spend a couple of minutes cleaning up the cables. You will want to tighten the loose zip ties from before and add a couple more where it makes sense. I would target one zip tie every 6 – 8 inches. The main purpose of this will be to make sure the cables don’t get caught or pinched when the printer is in operation.
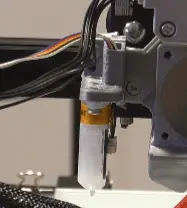
Mount BLTouch to Mounting Bracket
The next thing you want to do is mount the BLTouch to the mounting bracket that came with the kit or the custom fan duct cover you printed. The wires should be on the inside of the bracket, and you will use the provided bolts to mount everything in place.
Mount Bracket to the X-Axis Carriage
Finally, we will want to mount the bracket to the x-axis carriage. To do this, you will need to remove the two screws that are on the left side of the fan duct cover. Hold the BLTouch bracket in place, then put the screws back in. The bracket should go on the outside of the fan duct cover.
It may be a little tricky to get the screws back in, but I found that if I push one of the screws all the way through it’s easier to align it with the threads on the carriage.
Firmware Update
When it comes to the firmware, you have a couple of options. The first option would be to use the precompiled firmware from BTT. This will work fine if you are only adding a BLTouch and are using the standard fan duct cover and mounting bracket. The second option would be to build your own firmware. This option is required if you have additional mods then need firmware changes or if you are using a custom fan duct cover that moves the BLTouch location.
You can also download a copy of Marlin I built with the required changes and use supplied configs as a starting point. The firmware is available to download from “3D Printscape Marlin Builds“.
Download the Firmware Package
Option One
If you are going with the precompiled firmware option, all you need to do is download the appropriate firmware, then move to the “Move Firmware Package to SD Card”, step.
To get the firmware, you will go to BIGTREETECH GitHub Page and download firmware-bltouch.bin if you wired the BLtouch using the first wiring option above or firmware-bltouch-for-z-homing.bin if you used the second option.
Option Two
Next, we will need to download the firmware we plan on using. You have two options here. Option one would be to use the firmware from the BIGTREETECH GitHub Page. Option two would be to use the latest Marlin bug fix release. Option two can potentially provide more features and be more stable, so it’s the route I went. The build process is the same for both options.
BIGTREETECH Repo
Step 1: Download the Firmware
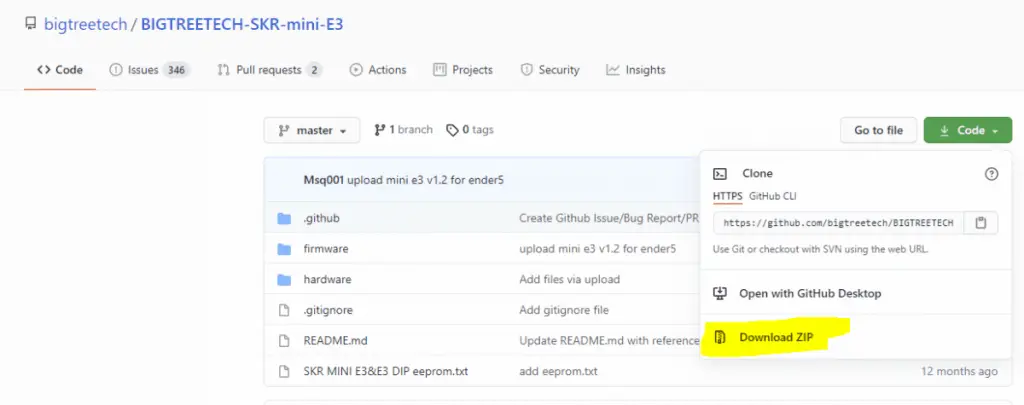
Go to the root of the BIGTREETECH-SKR-mini-E3 Repo, click code, the click download zip.
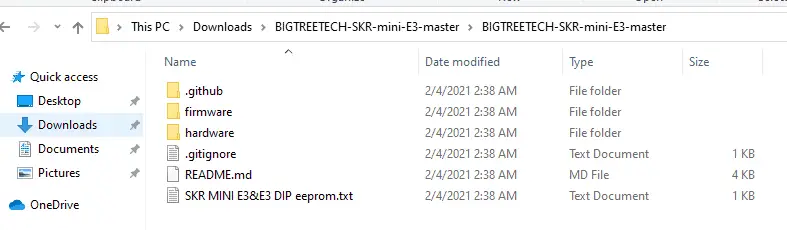
Step 2: Unzip the Files
Unzip the firmware package you downloaded. Once unzipped, go to firmware, then the folder of the board version you have. In my case, I went to “C:\Users\Owner\Downloads\BIGTREETECH-SKR-mini-E3-master\BIGTREETECH-SKR-mini-E3-master\firmware\V2.0\”.
Step 3: Copy the Needed Firmware to Your Working Directory
Once in the firmware directory for your board, you will want to copy the Marlin folder to your desktop ,or another location close to the root of your drive, and rename the folder to Marlin.
In my case I move the folder and contents from “C:\Users\Owner\Downloads\BIGTREETECH-SKR-mini-E3-master\BIGTREETECH-SKR-mini-E3-master\firmware\V2.0\Marlin-2.0.7.2-SKR-mini-E3-V2.0” to “C:\Users\Owner\Desktop\Marlin” .
Marline Bug Fix Repo
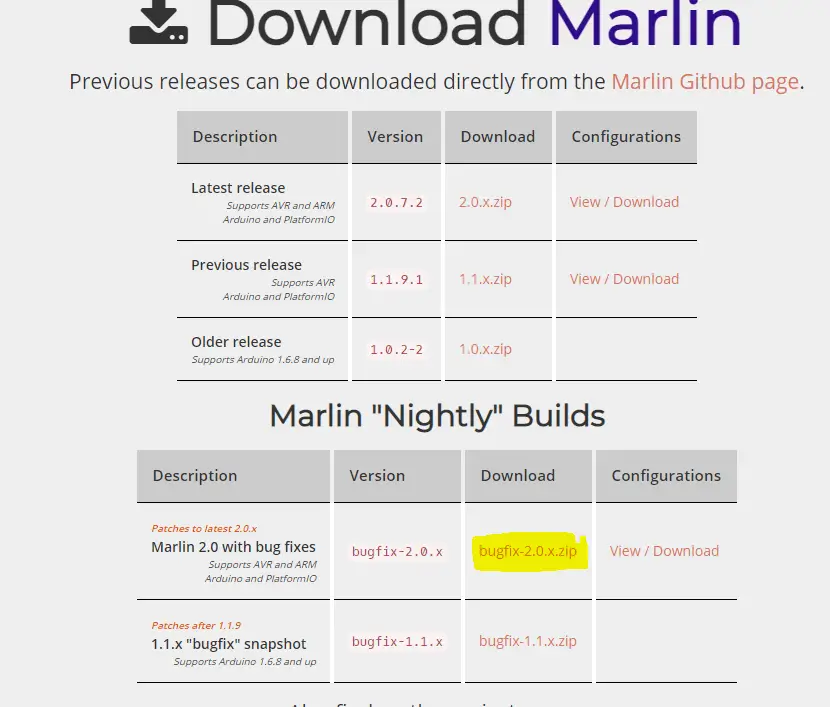
Step 1: Download the Firmware
Go to the Marlin download site and download both bugfix-2.0.x.zip, shown below.
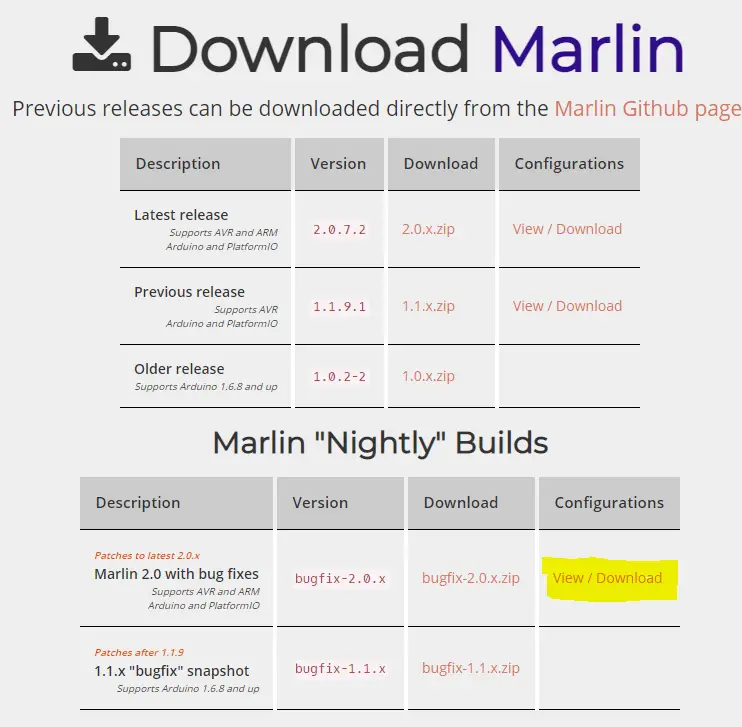
Step 2: Download the configuration examples
To get the example configurations, click on View/Download next to the firmware you just downloaded to get to the GitHub page. Then click on the green code button and click Download Zip.
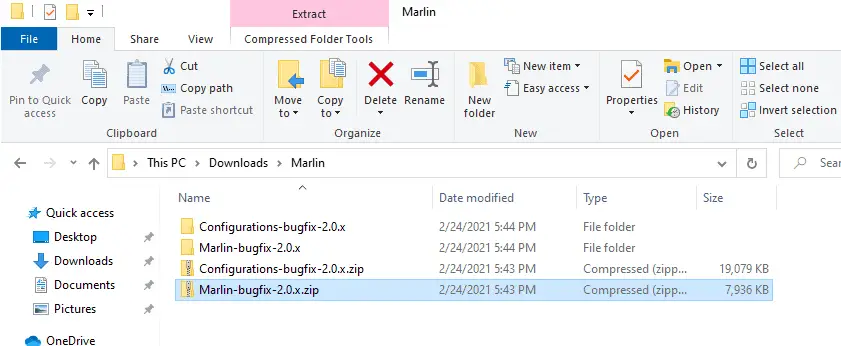
Step 3: Unzip the Files
Now that we have downloaded both packages we need, you will want to unzip them. You can unzip both files in the location they are in, but you will want to move the unzipped firmware to your desktop or somewhere closer to the root of the drive. The firmware needs to be close to the root of the drive to prevent any issue around the length of the file path.
Step 4: Copy Configuration Files to the Marlin Firmware Directory
Now we will want to copy the example configs from the example directory to the Marlin folder in the firmware directory, in my case, “C:\Users\Owner\Desktop\Marlin-bugfix-2.0.x\Marlin”.
You will find the example configs in the Configurations-bugfix-2.0.x folder that you extracted. Once in that folder, you will want to get the examples for the printer you are working with. I have the Ender 3 Pro with the SKR Mini V2 board, so that’s what I will be looking for and can be found in the Creality folder. From there, I need to go into the folder for the board I’m using.
In that folder, you will find four config files ending with .h. You want to copy those files to the Marlin folder mentioned above, overwriting any files that already exist.
Update the Marlin Configuration
If you went with option one above, you can skip this step.
Step 1: Update the platformio.ini File
Next, we will want to update the default_envs value in the platformio.ini file that is in the root directory of the firmware.
Path: root of the firmware folder
| Default Value | Updated Value | Notes |
|---|---|---|
| default_envs = mega2560 or default_envs = STM32F103RC_btt | default_envs = STM32F103RC_btt_512K | Only needed if using a build before July 2021. You will get an error if using this on a later build. |
Step 2: Load the Firmware into VS Code
The next thing you will want to do is load the firmware into VS Code to make the necessary changes and build it. To do that, you will want to follow these steps.
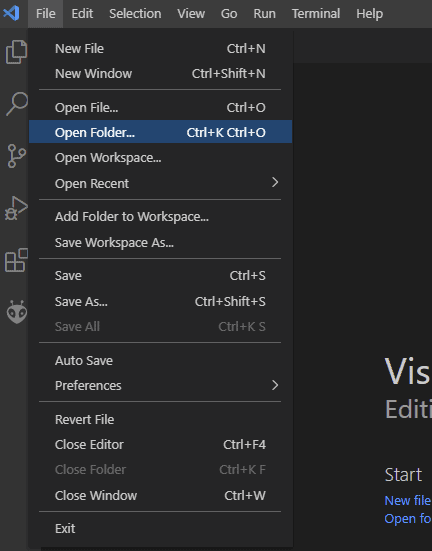
- Open VS Code
- Go to File – Open Folder
- Browse to the firmware folder and click Select Folder
Step 3: Configuration.h Changes
Path: Marlin\Configuration.h
Settings that apply to both wiring options.
| Default Value | Updated Value | Notes |
|---|---|---|
| #define CUSTOM_MACHINE_NAME “Ender-3 Pro” | #define CUSTOM_MACHINE_NAME “CUSTOM VALUE HERE” | Repalce “CUSTOM VALUE HERE” with what you want on the display. |
| //#define S_CURVE_ACCELERATION | #define S_CURVE_ACCELERATION | |
| //#define LEVEL_BED_CORNERS | #define LEVEL_BED_CORNERS | |
| //#define INDIVIDUAL_AXIS_HOMING_MENU | #define INDIVIDUAL_AXIS_HOMING_MENU | |
| #define Z_MIN_PROBE_ENDSTOP_INVERTING false | #define Z_MIN_PROBE_ENDSTOP_INVERTING true | Only needed if using a build before July 2021. You will get an error if using this on a later build. |
| //#define BLTOUCH | #define BLTOUCH | Enables BLTouch |
| #define NOZZLE_TO_PROBE_OFFSET { 10, 10, 0 } | #define NOZZLE_TO_PROBE_OFFSET { X, Y, 0 } | X & Y should be replaces with your offsets |
| //#define AUTO_BED_LEVELING_BILINEAR | #define AUTO_BED_LEVELING_BILINEAR | |
| #define MESH_BED_LEVELING | //#define MESH_BED_LEVELING | This is enabled by default in some firmware packages. Make sure to disable it. |
| //#define Z_SAFE_HOMING | #define Z_SAFE_HOMING |
Settings that apply only to wiring option one.
| Default Value | Updated Value |
|---|---|
| #define Z_MIN_PROBE_USES_Z_MIN_ENDSTOP_PIN | //#define Z_MIN_PROBE_USES_Z_MIN_ENDSTOP_PIN |
| //#define USE_PROBE_FOR_Z_HOMING | #define USE_PROBE_FOR_Z_HOMING |
Step 4 : Configuration_adv.h Changes
Path: Marlin\Configuration_adv.h
| //#define BLTOUCH_DELAY 500 | #define BLTOUCH_DELAY 500 | Skip this if you have an offband BLTouch |
| //#define BLTOUCH_FORCE_SW_MODE | #define BLTOUCH_FORCE_SW_MODE | Skip this if you have an off-band BLTouch |
| //#define BLTOUCH_HS_MODE | #define BLTOUCH_HS_MODE | This is optional but will speed things up. |
| //#define PROBE_OFFSET_WIZARD | #define PROBE_OFFSET_WIZARD | |
| // #define PROBE_OFFSET_WIZARD_START_Z -4.0 | #define PROBE_OFFSET_WIZARD_START_Z -4.0 | |
| //#define BABYSTEP_DISPLAY_TOTAL | #define BABYSTEP_DISPLAY_TOTAL | |
| // #define BABYSTEP_ZPROBE_OFFSET | #define BABYSTEP_ZPROBE_OFFSET |
*You should also make any additional changes you want/need to at his point.
Step 5: Build the Firmware
Once all your changes have been made, you will want to click on the checkmark in the bottom left of the VS Code user interface. That will kick off the build and shouldn’t take longer than a couple of minutes to complete. You should see success in the terminal window if everything worked. If it didn’t, you will be able to get the error from there to troubleshoot.

Move Firmware Package to SD Card
Now that you have the firmware, you will want to copy it to an empty SD card that is 8GB or less. The firmware.bin file should be the only thing on the card.
Once you found the firmware bundle binary that you’re looking for, you will want to drag it to an empty SD card that is under 8GB or less.
Install the New Firmware on the Printer
This step sounds harder than it actually is. Assuming you copied the right file to a blank SD card, all you need to do is put the SD card in the printer and power it on. From there, the printer will pull the file and install it on the printer. The entire process should take less than 30 seconds. Once the printer boots into the standard interface, you can remove the SD card.
Z-Offset
Heat Build Plate and Nozzle to Normal Printing Temperature
The first thing you will want to do is heat your build plate and nozzle to average printing temperatures. For me, I did 60 and 190 degrees.
You can do that by following these steps.
- Open the Menu
- Go to Temperature
- Select Nozzle
- Set to 190
- Select Bed
- Set to 60
- Wait for everything to get up to the set temperatures
Run the Z-Offset Wizard to Get Your Initial Z-Offset
Once everything is up to temperature, you will want to run the Z-Offset Wizard. If you went with the precompiled firmware, this won’t be available, and you should follow this video.
Steps to run the Z-Offset Wizard
- Open the Menu
- Go to Configuration – Advanced Settings – Probe Offsets – Z Prob Wizard
- Select Move 0.1mm
- Lower the z-axis by 0.1mm until you get to paper height from the build plate
- Closeout of that Move 0.1mm window
- Select Done
Kick-Off Test Print and Use Babystepping to Make Adjustments
Once you have your initial z-offset value set, you will want to kick off a test print and make any needed adjustments.
*I cover setting the z-offset in more detail in this article, “Z-Offset Wizard – Complete Guide!“.
Update Cura Printer Profile
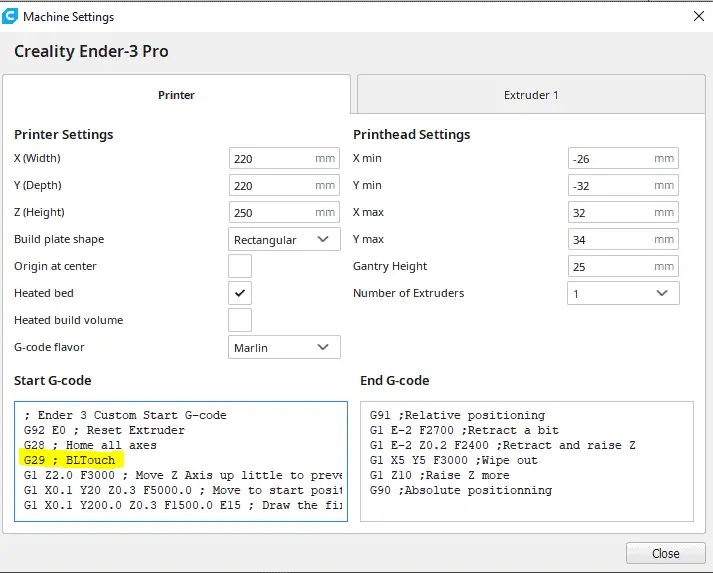
The final step is to add a G29 code to the Start-G-code box in the machine settings box in your printer profile. Doing this will tell your printer to run the grid that the BLTouch will use at the start of each print.
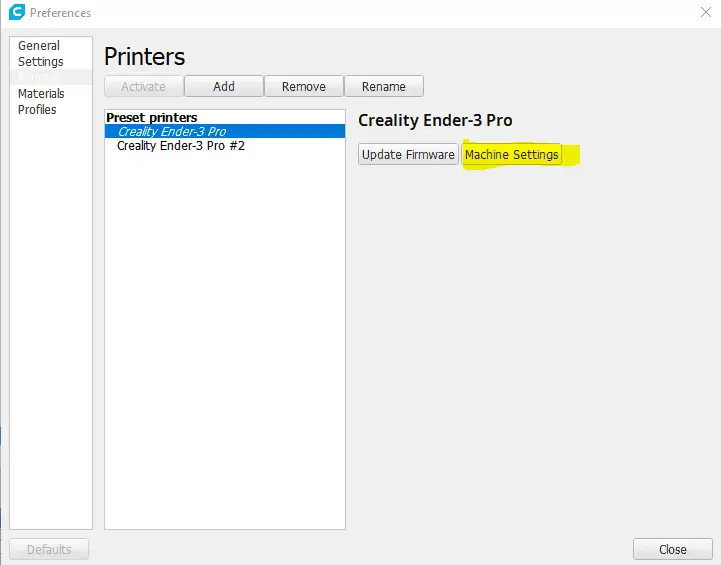
To do this, go to preferences – Configure Cura – Printers – Select the printer you are working with and click on Machine Settings. Once there, add G29 ; BLTouch under G28 ; Home all axes in the Start-G-code box. After that has been added you can close out of the machine settings window and use Cura as normal.
*This process assumes that you have Cura installed and a profile for your printer. If you don’t, I recommend starting with this video first and download my Cura profiles.
Related Questions
Why is a BLTouch recommended? – I recommend the BLTouch because it uses software to make mini movements as needed to account for the build plate not being level or having warps. Many 3d printers have warped build plates that will impact prints and can only be corrected by being replaced with a flat one or an auto bed leveling device like the BLTouch.
What if I have a Creality 32-bit mainboard? – You have two options if you already have a Creality 32-bit mainboard. Option one would be to install the BLTocuh on that using this guide, “Guide to Install a BLTOUCH on a Creality 32-bit Mainboard “. Option two would be to install an SKR Mini by following this guide, “SKR Mini Install – Complete Guide “.
Related Articles
- NeoPixel LEDs on SKR Mini – Complete Install Guide
- Create a Temperature Tower Using Cura – The Easy Way
- BIGTREETECH Touchscreen Z-Offset Wizard – Complete Guide
- SKR Mini Install – Complete Guide
- Cura Profiles
- 3D Printer Power Supply Silent Fan Upgrade – Install Guide!
- 3D Printscape Marlin Builds
Recap
That covers the process of setting up a BLTouch on an SKR Mini board using either the precompiled or custom-built firmware. The process may look intimidating, but it’s really not that bad, so if your questing if you can do it or not, I would recommend giving it a try. That said, its easier to use the precompiled firmware, so if you don’t have a reason to build your own firmware, you may be better just sticking with the precompiled option.
Make sure you check out our YouTube channel, and if you would like any additional details or have any questions, please leave a comment below or join us on Discord. If you liked this article and want to read others click here.
So, I followed these instructions, and everything checked out but when I tried to build the code I got an error at the top of both the configuration.h and configuration.adv.h. There was a red squiggly line under “* Marlin 3D Printer Firmware” on the first line of both configurations. That was the only error present. How do I fix this as those parts are comments.
Hi,
You should be able to see the actual error from the terminal output. I would need to know that to be able to see that’s going on.
Thanks,
Rob
Its normal to adjust the z offset every time I remove the bl touch because I need to replace the nozzle? thanks