When you model an object in 3D, it is essential to be very clear about the variables that will affect the final result. These variables depend on the print tolerances of the type of manufacturing additive you use. One of the vital elements of tolerance is clearance, so it is valid to ask yourself, how much clearance do I need in 3D printing?.
We must be sure that we have at least 0.5 mm of clearance to prevent two parts from melting as one. If you want to understand this concept, it is appropriate to say that the clearance is the free space between two parts, and we express it in millimeters.
This amount of clearance will depend on the functionality we want to give to a part. The larger the clearance, the better the chance that the pieces will fit together correctly. In this article, we will make a general review of several key technical aspects for the correct use of a 3D printer.

How Much Clearance Do I Need For 3D Printing?
To understand the concept of clearance in 3D printing, you must first understand what tolerance is, why it is essential, and its components.
What Is Tolerance In 3D Technology?
The final print result is often not the same as the model we see on the computer. At this point is where tolerances and their components come into play.
Tolerances are the deviations between the specific value expected versus the final value obtained. Prints can typically deviate slightly from the actual dimensions; however, when you set the tolerance correctly, the accuracy of the result is more likely to be higher.
The printer operator is the one who defines what the tolerance will be, which in turn will determine the accuracy of the final printout. Although we know that there will always be deviations, this deviation should be close enough to the real dimension to be acceptable.
What Is The Importance Of Tolerances?
Tolerances in 3D printing technology are vital when creating objects or parts that must fit together perfectly. When you know the tolerances of your printer model, it is much easier to design objects using the correct clearances. The key is to create parts with enough space between them to allow for possible deviations in the original measurements.
It could happen that the operator does not know the tolerances and clearances of the printer. In that case, he could create parts or objects that do not fit well or that their support structure cannot adhere well to the prints or merge the different parts.
What Are The Tolerance Components?
The components or quantities that define the tolerance are:
- Layer thickness. Is the thickness of each layer placed by the 3D printer. You can find this quantity expressed in micrometers.
- Wall thickness. It is the minimum thickness of the wall, which must have a 3D design to achieve a correct impression. You can find this quantity expressed in millimeters.
- Detail. It is the height or depth of the printing details. You can find this quantity expressed in millimeters.
- Size. It is the maximum size of the 3D model. The size and capacity of the printer represent the main limitation of this quantity. You can find this quantity expressed in inches or millimeters.
- Shrinkage. The shrinkage is when the 3D model shrinks due to heat or because the walls are too thin. The result of this process is that the 3D print will be smaller. The amount of shrinkage comes in percentages.
- Accuracy. This indicator sets the accuracy of the 3D design versus the print result you will get. It comes in percentage.
- Clearance. The clearance is the space between two objects, and it comes in millimeters.
What Is Clearance, And How Much Do I Need In 3D Printing?
The clearance refers to the free space that exists between two adjacent parts in a 3D printing project. If we place the wrong clearance, these gaps close and close, and the object is no longer functional.
Let’s use an example to illustrate clearance. Let’s suppose we make a peg in 3D printing with a diameter of 4 mm, and a hole with a diameter of 4 mm. It will be impossible for the peg to fit in the hole since they share the same diameter.
For this type of impression to work, there must be a clearance between the two pieces. The amount of clearance will depend on the kind of part we want to make. The larger the clearance, the better the chance that the parts will fit together. However, suppose we are working on highly complex moving mechanical parts. In that case, the more clearance there is, the higher the probability that the part will be ineffective.
With all this said, experts recommend that the minimum clearance should always be around 0.5 mm. When the clearance is less than this value, there is a risk that the parts will melt and the object will no longer be functional.
How Can I Improve My 3D Printer Clearance?
The best way to improve 3D printer clearance is to use a clearance and tolerance meter. This gauge tests the 3D printer’s ability to adjust the clearances on the parts to be printed. This tool is handy to know how to adjust the clearances in creating moving parts without running the risk of fusing. This gauge has 0.15 mm and 0.5 mm clearances and a central thread with a clearance of 0.4 mm.
Among the most effective clearance meters available is the Maker’s Muse. If you need to get your clearances straight, especially if you have to fit printed parts to other parts, this clearance and tolerance gauge is one of the best. This clearance testing tool is very effective and comes at a very affordable price.
How Much Of An Overhang Can You 3D Print?
3D printing professionals face the dilemma of making prints that have a pronounced overhang. But what is an overhang?
What Is An Overhang?
Overhangs are geometric shapes of the 3D model that extend outward and go beyond the previous layer. Generally, overhangs do not have support to hold them, making this type of printing quite complex. We must know its rule of thumb to know how much we can print from an overhang.
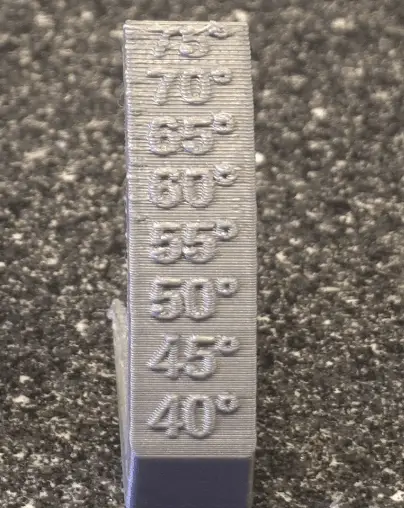
What Is The General Rule Of Thumb For Overhangs?
This rule tells us that when 3D printing an overhang, the angle of the overhang cannot exceed 45°. This condition seeks to ensure that each successive layer has enough support not to deform.
This premise also means that at 45°, the 3D you can print the model correctly. The explanation of this is because each layer has 50% contact with the layer below.
What Is A Good Layer Height For 3D Printing?
For the vast majority of 3D prints, the most suitable layer height is 0.2 mm. This measure establishes a middle ground between speed and print quality, either for large or small prints requiring details. When we decrease the layer height, we will get more detailed prints, but we will increase the printing time of the object. It all depends on the operator’s printing needs.
Minimum Layer Height On Top 3D Printers
| Model | Minimum Layer Height |
|---|---|
| Elegoo Mars 2 Pro – On Amazon | 0.01 mm |
| Prusa i3 MK3S | 0.05 mm |
| Ender 3 Pro – On Amazon | 0.01 mm |
| Ultimaker | 20 microns |
| Formlabs Form 3 | 25 microns |
| Ultimaker S3 – On Amazon | 20 microns |
Is Lower Layer Height Stronger?
Usually, layer heights between 0.1 mm and 0.15 mm are the values that produce the strongest results. When the operator chooses values above or below this range, it can considerably decrease the strength of the print.
An expert study determined that the higher the layer height, the weaker the part. Comparing the maximum versus minimum layer height showed a 3.5 times difference in strength.
What Is The Best Layer Height In Cura?
The layer height setting in Cura is one of the most critical aspects of the 3D printing process. If you choose a proper layer, the other layers will be uniform, and the print quality will improve.
The 0.1 mm layer height is a safe value to start the process. Then, depending on the filament’s flexibility and the printer’s model and manufacturer, you can adjust this height up to 0.3 mm for less flexible filaments.
Related Articles
- Choosing the Right Infill Percentage for the Job
- Create a Temperature Tower Using Cura – The Easy Way
- 3D Printing Blobs and Zits: Tips to Avoid Them
- What Shapes Cannot Be 3d Printed? – Details Inside!
- How to Print a File from Thingiverse (The Easy Way!)
A Final Thought On Clearance In 3D Printing
3D printing has the great advantage of allowing the integration of two objects or parts in the same print, which helps to reduce assembly time. However, when we do not place the necessary minimum clearances, we can obtain a result where the two separate parts merge into one piece. For this reason, knowing the correct clearance measurements is crucial to the success of 3D printing.
Make sure you check out my YouTube channel, and if you’d like any additional details or have questions, please leave a comment below. For more 3D printing articles click here.