Printing speed in Cura plays a massive part in getting excellent print results. At first, you’ll only see “Cura Speed” and “Skirt/Brim Speed” in the main drop-down menu, but if you open up the settings, you can access many Cura speed settings.
Cura print speed is the speed at which the print head moves while printing. Cura speeds are represented in mm/s. You can adjust the print speed of specific parts of your model for increased accuracy or to decrease the print time.
Fine details are printed well at low speeds while basic models can be printed faster. By using the right print speed for the specific model you’re printing, you can improve your print quality and increase its strength.
Here’s everything you need to know about Cura speed and how each setting affects your print.
Cura Speed Settings
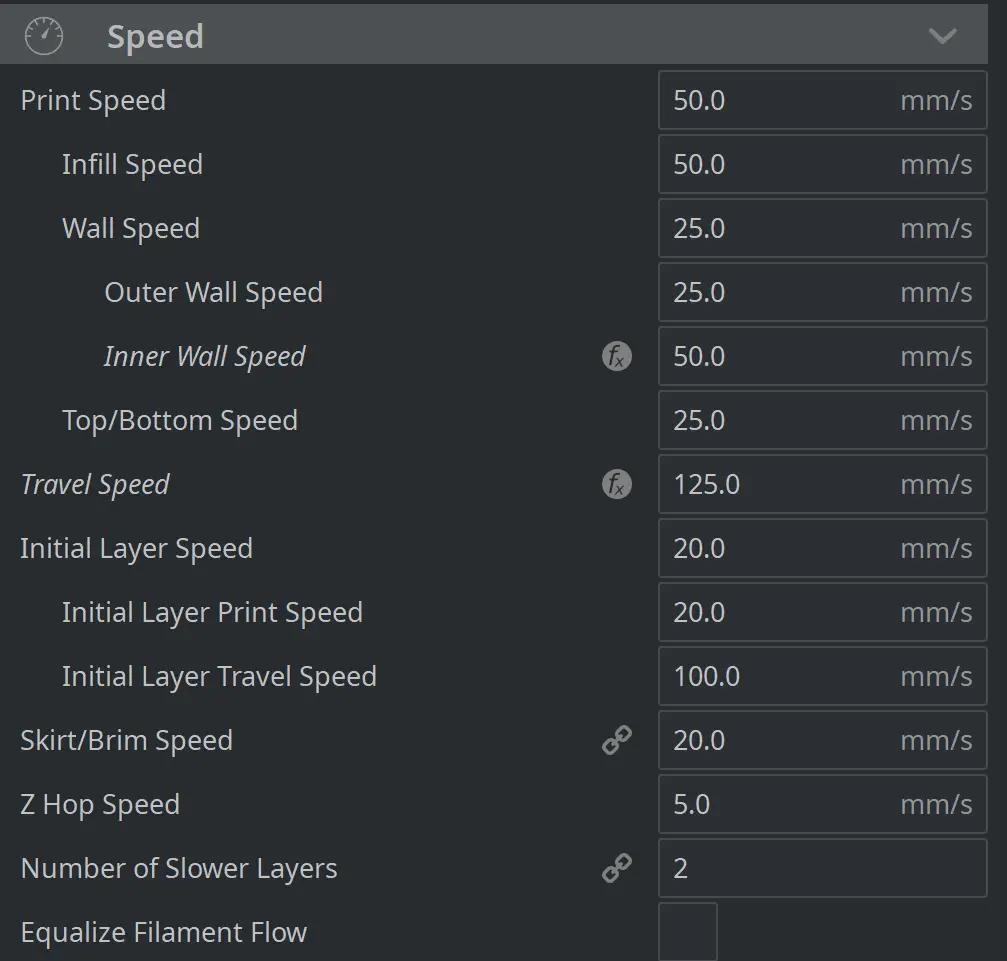
To make all of the speed settings visible, go to the settings tab and click on “configure setting visibility”. Type the word “speed” in the search bar and check all the boxes for the speed settings below. Print speed and Skirt/Brim speed are enabled by default and won’t need to be checked off.
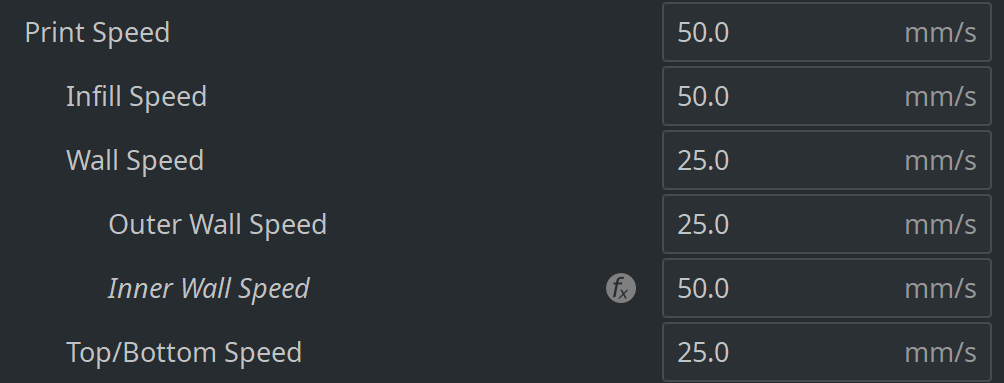
Print Speed
Adjusting the print speed changes the first six advanced speed settings on the list below. For example, the “Wall Speed” is automatically changed to half the value of the “Print Speed”. So if your print speed is 50mm/s, your Wall Speed will automatically be set to 25mm/s. However, you can change any value after you’ve set the main Print Speed.
The default speed values are unique to your printer.
Print Speed Affects:
- Infill Speed
- Wall Speed
- Top/Bottom Speed
- Travel Speed
- Raft Print Speed
Infill Speed
The speed at which the infill is printed. By default, the infill speed is set to the same as the print speed but you can make it faster in most cases. You can make it faster because the infill isn’t visible in the end and doesn’t require flawless precision.
I like to keep the infill speed the same as the default print speed but if you want it to print faster, you can usually increase the infill speed by at least 20% to save a few hours depending on the model.
The fastest infill pattern is the lines pattern, but it’s also the weakest. The honeycomb pattern is the best in terms of material required and strength.
Infill Speed is affected by:
- Print Speed
Wall Speed
The speed at which the walls are printed. By default, the wall speed is set to half the print speed. If your print speed is 50mm/s, the wall speed will be set at 25mm/s. Changing the wall speed will change the outer and inner wall print speeds but you can adjust the different wall speeds independently.
Wall Speed Affects:
- Outer Wall Speed
- Inner Wall Speed
Wall Speed is affected by:
- Print Speed
Outer Wall Speed
The speed at which the outer wall is printed. The outer walls should be printed at a lower speed to minimize errors because the outer walls are what you see in the completed part.
Print Speed Affects:
- Support Speed
- Bridge Wall Speed
Print Speed is affected by:
- Wall Speed
Inner Wall Speed
The speed at which inner walls are printed. Inner walls can be printed slightly faster than outer walls because you won’t see them in the final print.
Inner Wall Speed is affected by:
- Wall Speed
Top/Bottom Speed
The speed at which the top and bottom layers will print. Similar to the outer walls, the top and bottom speeds are half the print speed by default.
Top/Bottom Speed Affects:
- Ironing Speed
- Top Surface Skin Speed
- Support Interface Speed
- Prime Tower Speed
- Bridge Skin Speed
Travel Speed
Travel speed refers to the speed at which the extruder head moves when it’s not printing. This will usually be much faster than the print speed, around three times faster. It can be this fast because it doesn’t lay any plastic down while traveling. Don’t set it too high though or your printer may become unstable. Two to three times your print speed should be perfect.
Travel Speed is affected by:
- Print Speed
Initial Layer Speed
The speed at which the printer head prints and travels during the initial layer.
Print Speed Affects:
- Initial Layer Print Speed
- Initial Layer Travel Speed
- Skirt/Brim Speed
Initial Layer Print Speed
The speed at which the initial layer is printed. This is usually around 40% of the print speed by default to assist with bed adhesion and to decrease other structural issues like warping.
Initial Layer Print Speed is affected by:
- Initial layer speed

Initial Layer Travel Speed
The speed at which the printer head moves while it isn’t printing. This is usually at least 100mm/s but can be faster if your printer is stable enough.
Initial Layer Print Speed is affected by:
- Initial layer speed

Skirt/Brim Speed
The speed at which the Skirt/Brim is printed. Normally this would be the same as the initial layer speed if you don’t change it. Both of which are printed at lower speeds for better bed adhesion.
Skirt/Brim Speed is affected by:
- Initial Layer Speed

How Do I Change The Speed In Cura?
To change the speed in Cura:
- Click on the main drop-down menu on the top right to open the print settings.
- Expand the “Speed” section of the menu.
- Input the Print Speed you’d like to print at.
By adjusting the “Print Speed”, most of the other speed settings will be adjusted automatically. If you want to adjust the other speed settings independently, open the settings visibility in the settings tab at the top and check off all the speed settings you’d like to adjust. Speed settings you check off will be available in your main drop-down menu.
How Can I Speed Up My Cura Print?
To speed up your Cura print in the settings, expand the “Speed” section of the main drop-down menu. Increase the “Print Speed” in small increments, like 50mm/s to 55mm/s and evaluate the results each time to make sure there are no major defects.
You can also decrease the “Infill Density” to speed up the print. Of course, the lower the infill density, the weaker the print will be.
What Is A Good Print Speed For PLA?
50mm/s is a good print speed for PLA in most instances. It’s fast enough to print without oozing while being slow enough to print with detail. Most 3D printers can print PLA at speeds of 20 to 100mm/s while producing excellent results.
Which Infill Pattern Is The Fastest?
The “lines” infill pattern is the fastest to print. Lines take little material and the printer head doesn’t need to change direction as much as other patterns require. Using lines for the infill will cause the model to have a weak structure so it’s best only to use for prints that don’t require much strength.
Can You 3D Print Too Slow?
You can print too slow, which causes deformations in your print. Printing too slowly causes the nozzle to come into contact with the plastic it laid and causes defects. Slow printing can also cause stringing.
Related Articles
- Create a Temperature Tower Using Cura – The Easy Way
- Cura Profiles
- Cura VS Simplify3D – Which is Right for You?
- Cura Brim Build Plate Adhesion – Everything You Need to Know!
- Cura Hacks – My Picks!
In Summary
In most cases, you can leave your Cura print speed on the default value. Cura has default speed values for the printer you chose during the setup. You can increase the speed with certain prints but the physical stability of your printer will limit you. If the print speed is too high, the printer will shake and ruin the print.
If you increase the speed by a large percent, you may need to increase the nozzle temperature to help the plastic flow fast enough.
Decreasing the infill value and increasing the infill speed are ways to print faster without sacrificing visible detail on the end product. You can also use the lines infill pattern to make it faster if the part doesn’t need to be very strong.
Make sure you check out our YouTube channel, and if you would like any additional details or have any questions, please leave a comment below or join us on Discord. If you liked this article and want to read others click here.