One of the most common challenges that many makers face is the appearance of Z-seam imperfections. The goal of this article is to help you minimize the visibility of the Z seam to achieve smoother and more professional-looking prints.
The Z seam refers to the visible lines or marks that appear on a print from when the printer transitions between layers. It occurs due to the change in position of the printer’s nozzle when starting a new layer. The severity depends on things like filament type, layer height, print speed, etc.
So, these imperfections occur when the 3D printer transitions between layers, resulting in visible seams or scars on the printed object. Let’s look at how to adjust some settings in Cura to minimize or hide the seam entirely.
Adjusting Print Settings in Cura
Cura offers a wide range of print settings that can help in minimizing the visibility of Z seam imperfections. Just work your way through them slowly and don’t change too much at the same time or you won’t know what resolved the problem. Here are some key settings to consider.
Layer Height and Print Speed
Using a smaller layer height can reduce the visibility of layer seams, as it allows for finer details and smoother transitions. However, keep in mind that printing at a smaller layer height will increase the overall printing time. Adjusting the print speed can also have an impact on seam visibility. Slower speeds during layer changes can help produce cleaner transitions.
Outer Wall Wipe Distance
The outer wall wipe distance determines the distance the printer nozzle travels along the outer wall before moving to the next layer. Increasing this distance can help hide the seam, as it moves the transition point to a less conspicuous area of the print.
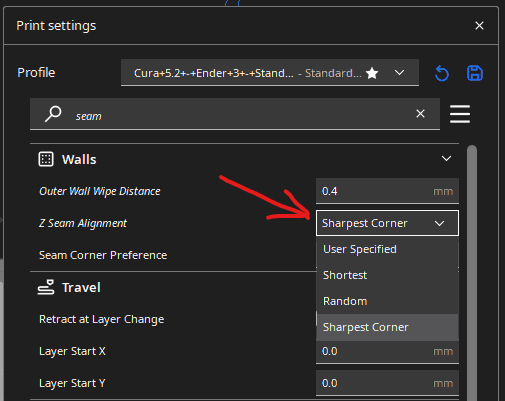
Z Seam Alignment
Cura provides a Z seam alignment feature that allows you to specify where the seam should appear on the model. By strategically positioning the seam in less visible areas or along natural contours, you can make it less noticeable. Experimenting with different seam alignment options can help you find the most suitable placement for your specific model.
Using Z Seam Alignment Feature
The Z seam alignment feature in Cura enables you to control the placement of the seam on your 3D model. By utilizing this feature, you can choose the location that minimizes its visibility.
If you’re printing a functional part, like a casing for an electronic device. You can hide the Z seam to get a professional and seamless appearance. You could position the seam along the inner side of the casing, where it’s not visible. This ensures that the part doesn’t lose its functionality while looking visually appealing and well-crafted.
Employing Z Seam Randomization
In addition to the Z seam alignment feature, Cura also provides an option to randomize the seam placement. By enabling Z seam randomization, the printer will vary the seam position between layers, making it less noticeable. This technique helps distribute the imperfections across the print, creating a more uniform appearance.
Utilizing Retraction and Combing Settings
Retraction is a technique where the printer retracts the filament slightly during non-printing moves, reducing the chances of stringing and oozing. Proper retraction settings can minimize the visibility of Z seam imperfections.
Combing, on the other hand, allows the printer to travel within the existing layers instead of moving over already printed areas. Enabling combing can help reduce the appearance of seams on the outer surface of the print.
Troubleshooting Z Seam Imperfections
Despite your best efforts, you may still encounter Z seam imperfections. If that happens, here are some troubleshooting steps you can take.
Calibrate your extruder’s E-steps
This ensures accurate extrusion, where the amount of filament entering the hot end matches the intended value.
Adjust the flow rate
Also known as the extrusion multiplier, this controls the rate at which filament is extruded. It’s best to calibrate the extruder first and then fine-tune the flow rate.
Adjust the nozzle temperature
The hotter the nozzle, the quicker the material will melt and flow through. Finding the optimal temperature can help minimize over-extrusion and reduce the visibility of the Z seam.
Adjust the print speed
Lower print speeds allow more time for the filament to extrude, reducing hot end pressure and minimizing the appearance of the Z seam.
Advanced Techniques To Hide The Z Seam
In addition to the above prevention techniques, you can also consider the following options.
Coasting
This feature stops active extrusion towards the end of a layer, relying on hot end pressure to finish the extrusion. It can help reduce the visibility of the Z seam, but be cautious not to set the coasting value too high, as it may result in gaps in the print.
Retraction
Retraction pulls back the filament from the hot end at the end of a nozzle move, relieving hot end pressure during pauses. However, excessive retraction can lead to nozzle jams, so adjust this setting carefully.
Wipe
Wiping involves moving the nozzle side to side for a short time after finishing a layer to relieve hot end pressure away from the printed model. It can be an effective technique to minimize the Z seam.
Linear advance
This firmware feature adjusts extrusion to compensate for hot-end pressure variations, helping to maintain consistent extrusion throughout the print.
Advanced Settings for Hiding the Z Seam
While prevention techniques can minimize the appearance of the Z seam, slicer settings can further hide it by strategically placing it in less noticeable areas.
Seam Corner Preference
This setting determines the starting point of the Z seam at the corners of the print, offering various options:
None
No special preferences for selecting the starting point.
Hide Seam
Places the seam on the inner corners, reducing its visibility.
Expose Seam
Places the seam on the outer corners, potentially making it more visible.
Hide or Expose Seam
Allows the use of either the innermost or outermost corners as the starting point.
Smart Hiding: Prioritizes innermost corners while still allowing outermost corners to be selected.
Spiralize Outer Contour
Also known as vase mode, this setting smooths the Z-axis jump by gradually moving the nozzle without pausing until the end of the print. It basically eliminates the visibility of the Z seam. You can further enhance the smoothness of vase mode by enabling the “Smooth Spiralized Contours” option.
But keep in mind that this mode will instruct the printer to print the walls of the model only, leaving it as hollow as a vase.
Post-Processing Techniques
While optimizing print settings in Cura can improve the appearance of Z seam imperfections, post-processing techniques can further enhance the final result. Here are some methods you can try.
Sanding and Smoothing the Surface
Use sandpaper to gently sand the surface of the printed object to smooth out any visible seams. This process works fast to blend the layers together and creates a more polished finish. For big seams, start with a coarse grit and gradually move to finer grits for a smoother surface.
Applying Filler and Primer
If the seams are still slightly visible after sanding, applying a filler or primer can help fill in the gaps and create a more seamless surface. Fillers like epoxy putty or automotive body filler can be used to fill imperfections. Once filled, apply a primer to the entire model for a consistent base before painting.
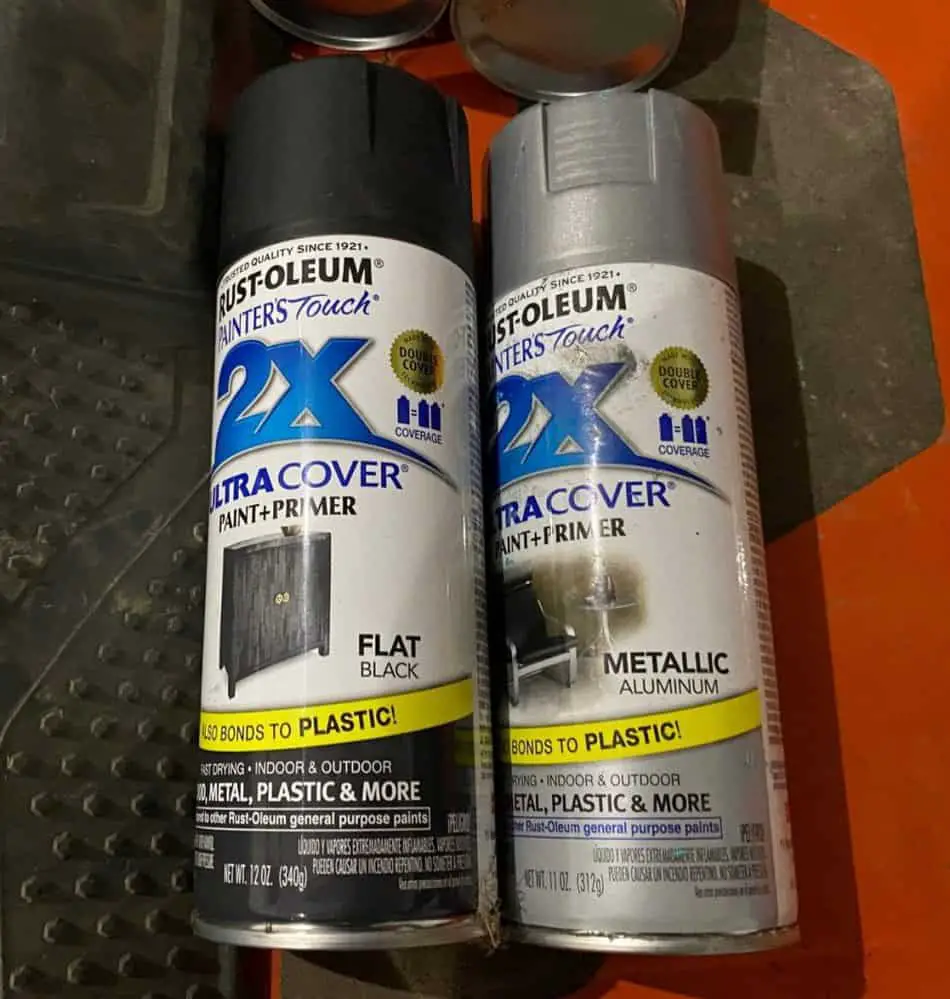
Painting and Finishing Touches
Painting your 3D-printed object can not only hide any remaining seam imperfections but also add a personalized touch. Choose a suitable paint type for the filament, such as acrylic or spray paint. Apply multiple thin coats and allow each layer to dry before proceeding. Adding additional finishes like clear coats or varnishes can further enhance the appearance.
Related Articles
- Cura Vase Mode
- Cura Won’t Open – Potential Causes and Fixes!
- Can You Design in Cura?
- Create a Temperature Tower Using Cura – The Easy Way
- Cura Profiles
Conclusion
Adjusting your print settings can greatly reduce the visibility of Z seam imperfections in 3D prints. Adjust settings like layer height, print speed, outer wall wipe distance, and utilize the Z seam alignment feature to minimize the appearance of seams and achieve smoother results.
Techniques like Z seam randomization, retraction, combing, and advanced options such as coasting, wiping, linear advance, and seam corner preference offer further control over the seam visibility.
You can go through troubleshooting steps, advanced techniques, and post-processing methods like sanding, filling, priming, painting, and finishing touches to enhance the final appearance of prints.
But you’ll have to combine these strategies in accordance with the machine and filament you’re using to find the optimal values.
Make sure you check out our YouTube channel, and if you would like any additional details or have any questions, please leave a comment below. If you liked this article and want to read others click here.