Vase mode, referred to as “spiralize outer contour” in Cura, is a fascinating feature that offers a unique printing method. It allows you to create hollow objects with a single continuous extrusion. If you’re new to 3D printing or simply curious about this feature, this article will provide you with a comprehensive understanding of vase mode. We will explore what it does, when to use it, and how to use it effectively.
Vase Mode enhances the aesthetic appeal of prints, particularly vase-like structures. Spiral mode or “spiralize outer contour”, is a feature in Cura that allows you to print objects in a continuous spiral fashion to create seamless, single-wall prints that showcase intricate designs.
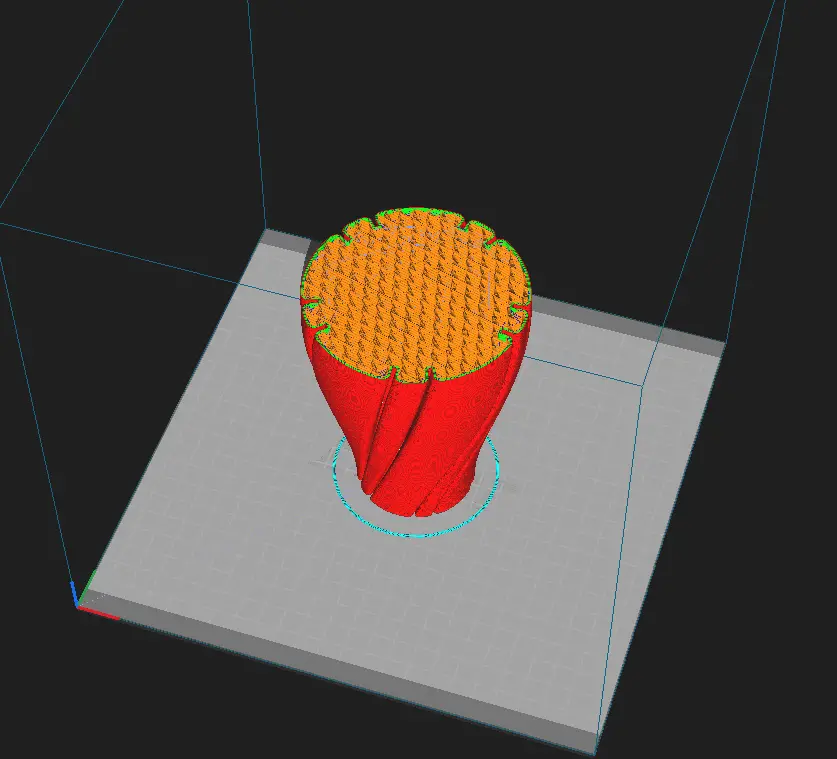
The 3D printer continuously extrudes filament in a single, unbroken path. It starts at the bottom of the object and works its way up, following the shape of the model’s outer walls. This method ensures that the object has a consistent wall thickness throughout the print. With no internal structures, like infill or top layers, vase mode prints are lightweight and require less material.
Benefits of Using Vase Mode
Vase mode offers several advantages for 3D printing enthusiasts:
Faster Printing
Vase mode prints are generally faster compared to traditional printing methods because they require fewer movements and layers.
Reduced Material Usage
Since vase mode prints have hollow interiors, they consume less filament, making them more cost-effective.
Smooth and Continuous Surfaces
Vase mode produces objects with smooth outer surfaces and no visible layer lines, resulting in visually appealing prints.
Lightweight Prints
The absence of infill and top layers makes vase mode prints lightweight, which can be advantageous for certain applications.
When to Choose Vase Mode
Vase mode is particularly suitable for certain types of objects and designs. Consider using vase mode when:
- You want to create decorative items, such as vases, lampshades, bowls, or sculptures.
- You aim to print objects with intricate, curvilinear shapes.
- You prefer a smoother and more visually appealing finish for your prints.
- You have limited time and want to complete prints quickly.
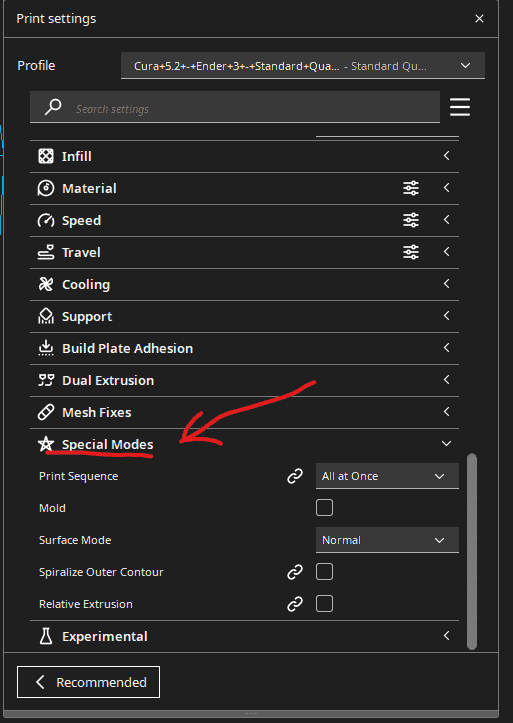
How to Enable Vase Mode in Cura
Enabling vase mode in Cura is a simple process. Follow these steps:
- Launch Cura and open your 3D model.
- Go to the “Print Settings” tab at the top-right side of the window.
- Scroll down and expand the “Special Modes” section.
- Enable the “Spiralize Outer Contour” option.
- Configure any additional settings to fine-tune your print.
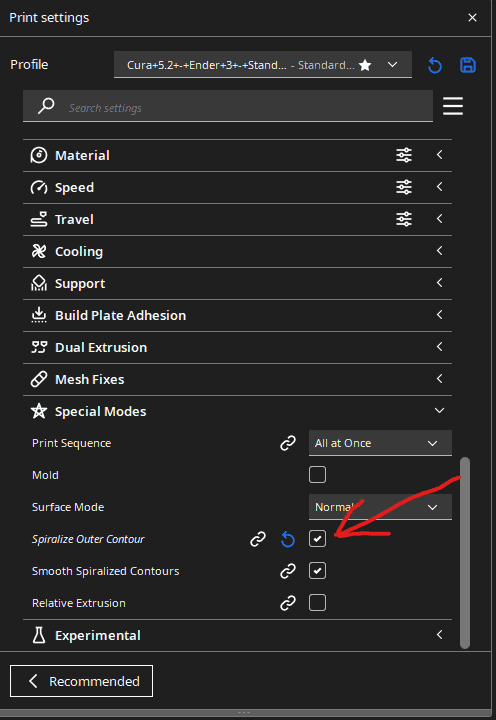
Configuring Vase Mode Settings
While enabling this mode activates the basic functionality, there are a few settings you can adjust to optimize your prints. These settings may vary depending on the version of Cura you’re using, but some common options include:
Wall Thickness
Set the desired thickness of the object’s walls. By default, this will be the same as the nozzle size. But you can set it up to around 0.6mm if you increase the temperature and slow the print speed down. Thicker walls provide more stability but require additional material and printing time.
Print Speed
Decrease the print speed to give the layers time to dry. There isn’t much to print compared to when there’s an infill pattern and if the nozzle comes back around too quickly, there won’t be time for the layer to solidify. Faster speeds can save time but compromise print quality.
Bottom Layers and Top Layers
Depending on what you’re printing, set the number of solid layers printed at the bottom and top of the object for improved stability and a more finished appearance.
Printing Tips for Vase Mode
To achieve optimal results with vase mode, consider the following tips:
- Ensure proper bed adhesion to prevent warping or detachment during the print.
- Use a suitable print surface, such as a glass plate or painter’s tape, to promote adhesion.
- Calibrate your printer’s extrusion multiplier to ensure accurate filament flow.
- Check the filament diameter to make sure it corresponds to the slicer value.
- Monitor the print closely during the initial layers to detect any potential issues.
- Optimize cooling settings to prevent overheating and improve print quality.
- Experiment with different layer heights and wall thicknesses to find the ideal balance between speed and quality.
Troubleshooting Common Issues
While printing in vase mode, you might encounter some challenges. Here are solutions to common issues:
Bulging or Sagging
Increase wall thickness or decrease print speed to improve stability.
Layer Separation
Slow down the print speed and check the extrusion multiplier to make sure the filament is feeding correctly.
Weak Bottom Layers
The bottom layers can come out weak because they don’t have the infill pattern for support. In this case, increase the number of bottom layers for added stability.
Poor Bed Adhesion
Clean the print surface thoroughly and use a suitable adhesive if needed. Make sure that the bed is leveled properly.
Inconsistent Wall Thickness
Ensure that the model is designed properly. If the design looks good, adjust the slicing settings like temperature and print speed.
Vase Mode vs Normal Mode
Vase mode and normal mode offer distinct advantages depending on what you want to print. While vase mode is suitable for creating hollow, decorative prints, normal mode is better suited for functional objects that require strength and durability. So it really just depends on if the part needs to be hollow.
Vase Mode Creative Possibilities
Here are some ideas you can try out using Vase mode:
- Design and print unique vases or flower pots with intricate patterns.
- Create custom lampshades with captivating light diffusion effects.
- A mesmerizing spiral-shaped lampshade that diffuses light beautifully.
- A sculptural piece inspired by nature, featuring organic curves and textures.
- Print artistic sculptures or figurines with smooth, continuous surfaces.
- Experiment with multi-color filament prints to enhance the visual appeal.
- A delicate flower vase with intricate lace-like patterns.
- Craft elegant and decorative bowls or plates for special occasions.
- A decorative bowl with an elegant design, perfect for showcasing fruits or serving snacks.
- A unique and artistic vase with a twisty, intertwined structure.
Maintenance and Post-Processing
Maintaining your 3D printer is essential for consistent print quality. Regularly clean the printer’s nozzle, check for filament jams, and ensure proper lubrication of moving parts. After printing in vase mode, consider post-processing techniques such as sanding, painting, or adding a clear coat to enhance the appearance of your prints.
Are Vase Mode Prints Strong?
Vase mode prints are generally not as strong as prints with infill patterns. Vase mode focuses on creating hollow objects with a single continuous extrusion. So it doesn’t print any infill patterns or top layers. This makes the structural integrity and strength of vase mode prints to be fragile.
Does Vase Mode Work With Flexible Filaments?
Vase mode works best with rigid filaments compared to flexible filaments like TPU or TPE. Flexible filaments have elasticity and require support from an infill. Continuous extrusion can cause issues with flexible filaments like poor layer adhesion.
For printing with flexible filaments, it’s best to use infill patterns and top layers for better support and stability and stronger prints.
Limitations To Using Cura Vase Mode
Complex designs with overhangs or internal structures may not work well in Vase Mode. You should choose models that have a single continuous outer wall and minimal intricate details.
How Can I Optimize My Design For Cura Vase Mode?
To optimize your design for Cura Vase Mode, use symmetrical patterns, and gradual shape transitions. Print things that don’t require sharp turns. Also, ensure that your model has an appropriate wall thickness for stability and strength.
Is Cura Vase Mode Suitable For Functional Prints?
Cura Vase Mode is primarily used for creating decorative and artistic prints, not for functional objects. Because it only prints a single-wall structure, the strength, and durability are limited compared to prints with multiple walls. But with the right design and material choice, you can print some functional parts, like vases that are strong enough to hold something inside.
Related Articles
- Cura Won’t Open – Potential Causes and Fixes!
- Is Cura a CAD Software?
- Can You Design in Cura?
- Create a Temperature Tower Using Cura – The Easy Way
- Cura Profiles
In Summary
Vase mode, also called “spiralize outer contour” in Cura, allows you to create hollow objects by means of continuous extrusion. It instructs the printer to print the outer walls only. This method is faster, reduces material usage, and produces smooth surfaces with a hollow interior.
To enable vase mode in Cura, follow the provided steps and adjust settings like layer height and wall thickness. Proper bed adhesion, calibration, and monitoring are crucial for successful prints.
Vase mode is suitable for decorative items and curvilinear shapes, but not for functional objects. It works best with rigid filaments so avoid the flexible ones. Complex designs and internal structures are not recommended. Consider symmetrical patterns and thicker wall thickness values for the best results.
Make sure you check out our YouTube channel, and if you would like any additional details or have any questions, please leave a comment below. If you liked this article and want to read others click here.