3D printing is an exciting technology that has revolutionized various industries, from manufacturing to healthcare. However, like any technology, it comes with its challenges. One common issue faced by 3D printing enthusiasts is “stringing.” Stringing occurs when thin strands of filament are left behind between different parts of a printed object. These strings can negatively impact the print quality and overall aesthetics of your 3D prints. In this article, we will explore what stringing is, its causes, and most importantly, how to avoid it.
Understanding Stringing in 3D Printing
Stringing, sometimes referred to as “oozing”, happens when the printer’s extruder nozzle oozes melted 3D printer filament while moving between different sections of a 3D print. These unwanted strands can cause issues such as poor surface finish, entangled parts, and even failed prints if the strings get in the way of the print head.
Causes of Stringing
Several factors can contribute to stringing in 3D printing:
Extruder Temperature: If the extruder temperature is too high, the 3D printer filament can become too fluid, leading to excessive oozing.
Retraction Settings: Retraction is pulling the filament slightly backward when the print head moves between different parts of the print. Insufficient retraction or improper retraction settings can result in stringing.
Print Speed: Higher print speeds can cause the filament to ooze out more than usual, especially when the print head changes direction.
Travel Speed: The speed at which the print head moves between different parts of the print can impact stringing. Faster travel speeds may leave behind more strings.
Filament Quality: The quality and type of filament used can also influence stringing. Some 3D printer filaments are more prone to stringing than others. For example, PETG.
To troubleshoot and mitigate stringing, you can perform two essential tests: a temperature tower and a retraction test.
Temperature Tower:
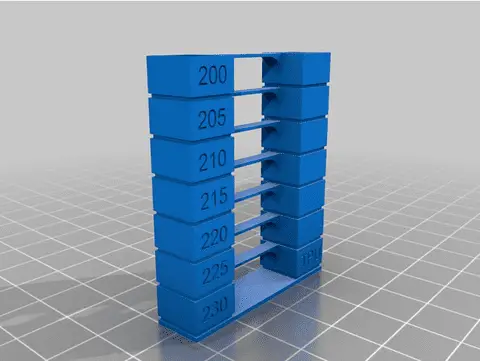
A temperature tower is a test print that consists of multiple vertical columns, each printed at a different temperature. This test helps determine the ideal temperature for your specific filament and printer setup. Various temperature towers can be used. Temperature towers also include a
stringing test within the tower itself. My suggestion is to print a temp tower and a string test separately to get optimal results.
Link to Various Temp Towers according to filament type: Https://www.thingiverse.com/thing:2493504
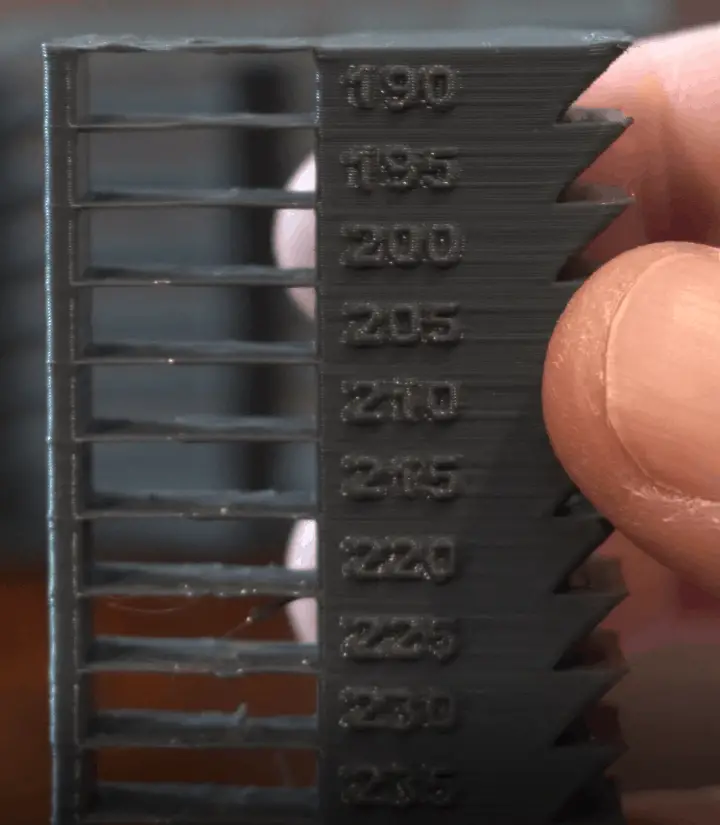
Start by finding a suitable temperature range for the filament you are using based on the manufacturer’s recommendations. For example, if the recommended temperature range is 200°C to 220°C, you can create a temperature tower with columns printed at 200°C, 205°C, 210°C, 215°C, and 220°C.
By examining the columns after printing, you can identify which temperature produces the least amount of stringing. Use this optimal temperature in your subsequent prints to minimize stringing issues.
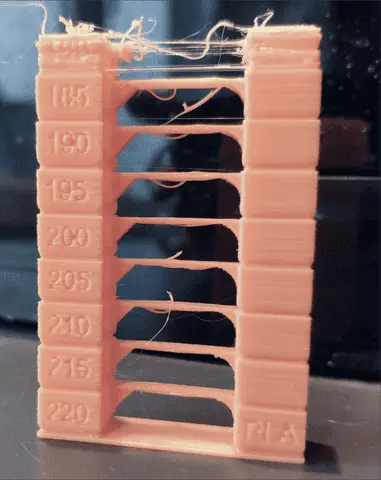
As shown above, you can see that the optimal Temp for this particular brand of PLA is 220 as it has the “cleanest” look. Whilst you can see that at 190 Degrees and lower, the nozzle can barely extrude any filament, thus the print quality degrades.
Retraction Test:
A retraction test enables you to set the two main retraction factors that are most likely to solve your retraction issues. The retraction Length and Retraction speed.
Retraction Length:
Retraction length refers to the distance in millimeters that the filament is pulled back into the hot end during retraction. The optimal retraction length depends on various factors, including the type of filament, the printing temperature, and the specific 3D printer model. It is essential to find the right balance to prevent stringing without causing other issues like under-extrusion or clogs.
Retraction Speed:
Retraction speed determines how quickly the filament is pulled back into the nozzle during retraction. A higher retraction speed means the filament is retracted more rapidly, while a lower speed results in a slower retraction process. Again, finding the right retraction speed is crucial to achieving clean, string-free prints without negatively affecting the print’s overall quality.
Using a Retraction Test
A retraction test, also known as a retraction calibration print, is a straightforward and effective way to determine the ideal retraction settings for your 3D printer and filament combination.
Here’s a step-by-step guide on how to perform a retraction test:
Prepare the Model:
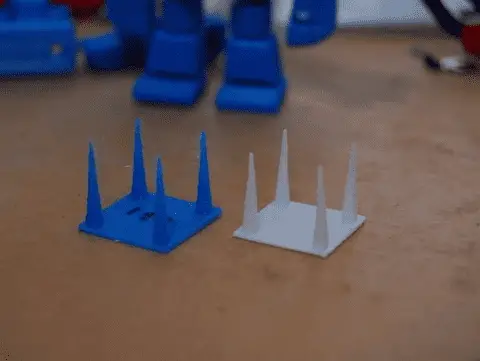
Find or create a simple test model that allows for easy adjustments and showcases stringing issues effectively. A popular choice is a tower or pyramid with multiple levels and gaps between each level. This will help you visualize the impact of different retraction settings on stringing. I use this model: https://www.thingiverse.com/thing:909901
Slice the Model:
Import the test model into your preferred slicing software. Ensure you have the latest version of your slicing software, as newer versions may offer better retraction options and settings.
Adjust Retraction Settings:
In the slicing software, navigate to the retraction settings. You will typically find options for retraction length and retraction speed. The values are usually given in millimeters and millimeters per second, respectively. Again depending on the type of printer you have (direct Drive or Bowden Tube) you might need to tweak different settings accordingly.
A good starting point is 5.5mm retraction distance with 50mm/s speed for bowden type printers and between 0.5 to 3.00mm distance and 30mm/s speed.
Print the Test Model:
Slice the model with different retraction settings and save each version as a separate G-code file. Label each G-code file with the corresponding retraction settings to keep track of them.
Perform the Test:
Start printing each G-code file one by one. Observe the stringing and quality of each print. Take note of any changes in stringing between different settings.
Analyze the Results:
Examine the printed models and identify the retraction settings that produce the cleanest prints with minimal or no stringing. Pay attention to both the retraction length and speed to find the ideal combination.
Refine the Settings:
Based on the results, fine-tune the retraction settings further. You can narrow down your choices by selecting the best-performing retraction length and then experimenting with different retraction speeds (or vice versa) to achieve optimal results.
Implement the Optimal Settings:
Once you have determined the best retraction settings for your filament and printer, apply these settings to your regular print profiles. This will help minimize stringing in all your future 3D prints.
Now that we understand the causes of stringing and have performed the necessary tests, let’s explore some essential tips to avoid stringing in 3D printing:
Optimize Retraction Settings: Ensure that your retraction settings are correctly configured in your slicing software. Increase the retraction distance and speed to prevent filament oozing during travel moves.
Calibrate Print Speed: Lower the print speed, especially for small or intricate prints, to reduce the chances of stringing.
Adjust Travel Speed: Decrease the travel speed to minimize the filament’s oozing during non-printing moves.
Fine-tune Temperature: Use the temperature tower results to set the optimal extruder temperature for your filament to minimize stringing.
Use High-Quality Filament: Invest in high-quality filament such as Sunlu’s Vast range of high-quality filament.
Enable Z Hop: Some slicing software allows you to enable Z hop, which slightly lifts the print head during travel moves, preventing it from dragging across the print.
Print Multiple Objects Simultaneously: Printing multiple objects together can help reduce stringing, as the print head moves between different objects rather than traveling across open spaces.
Related Articles
- Is PETG Always Stringy? 5 Important Facts
- At What Temperature Does PETG Start to Warp?
- Does PETG 3D Printing Create Toxic Fumes?
- All About 3D Printer Plastic
- Can You Drill Into and Cut 3D Printed Plastic?
Conclusion
Stringing in 3D printing can be frustrating, but with proper understanding, testing, and adjustments, it can be effectively minimized or eliminated. By performing temperature towers and calibration shapes, fine-tuning settings, and using high-quality filament, you can significantly improve the quality of your 3D prints and avoid the annoyance of stringing. Happy printing!
Make sure you check out our YouTube channel, and if you would like any additional details or have any questions, please leave a comment below or join us on Discord. If you liked this article and want to read others click here.