The 3D printing infill pattern determines the strength, durability, and overall quality of what you’re printing. Today we’ll explore the basics of infills, including the types of patterns, how to choose the right one, infill densities, optimization techniques, benefits, challenges, and tips for achieving the best results.
3D printing infills are printed within the walls of the model to give it structural support. You can set the density and specific pattern depending on your needs. A low-density produces a lighter model and uses less material while a high-density offers strength at the cost of time and more material.
So the infill is the internal structure that fills the empty space within a printed object.
Optimizing the infill pattern and density helps in many ways. It provides structural support and improves the overall strength of the print. It also reduces material usage and minimizes print time.
The choice of infill pattern and density greatly impacts the final characteristics of the printed object. Here are a few things to consider when choosing a pattern.
How To Choose The Right Infill Pattern
Time and Material
Some patterns are quicker and use less material, like concentric or lightning. But if you need something really strong, you might have to wait longer and use more material and a stronger pattern like the grid, cubic, or triangular patterns.
Strength Requirements
Think about what your object needs to do. If it needs to be strong, choose a pattern that makes it sturdy, like the tri-hexagon or cubic ones. For lighter things, simpler patterns like lines or grids might be okay. Stronger parts need higher infill densities but more on that later.
Surface Finish Preferences
Some patterns make it smoother, like concentric or grid patterns. But if you care more about strength, choose a stronger pattern as described later in the article.
Challenges Associated with 3D Printing Infills
Intricate infill patterns and higher densities can significantly increase print time and the likelihood of errors to occur. I suggest turning the printing speed down when printing complex models.
Removing support structures and finishing printed objects may pose challenges, especially with intricate infill patterns or dense structures so think about how much post-processing will be required depending on the infill and supports you choose.
Tips for Achieving Optimal Results with 3D Printing Infills
You’ll need to print a few test prints with different infill settings for fine-tuning and optimization based on specific project requirements.
Carefully placing support structures and adjusting infill settings will minimize overhangs ensure proper adhesion and result in high-quality prints with minimal defects.
Continuously adjusting infill density, pattern, and other parameters based on the results you’re getting is the only way to get exactly what you’re looking for in the end.
Infill Pattern Considerations
Layer Height
The layer height is the thickness of each layer of material printed and applies to the infill pattern as well. A lower layer height results in finer details and smoother surfaces. It also increases print time and can make the part stronger. A larger layer height speeds up printing but sacrifices surface quality and strength.
The layer height determines the resolution and density of the infill pattern. Finer layer heights allow for finer details and higher densities. Thicker layers limit the level of detail and may require lower densities to prevent print issues.
Nozzle Size
When selecting the infill pattern and density, the nozzle size influences the flow rate of material and the spacing between infill lines or layers. Larger nozzles may require lower infill densities to prevent over-extrusion and maintain structural integrity, while smaller nozzles enable higher densities for stronger internal structures.
So the nozzle size determines the width of the extruded filament and directly impacts the amount of material deposited per layer. A larger nozzle size extrudes more material for faster printing but sacrifices surface detail. A smaller nozzle size produces finer details but requires more time to print.
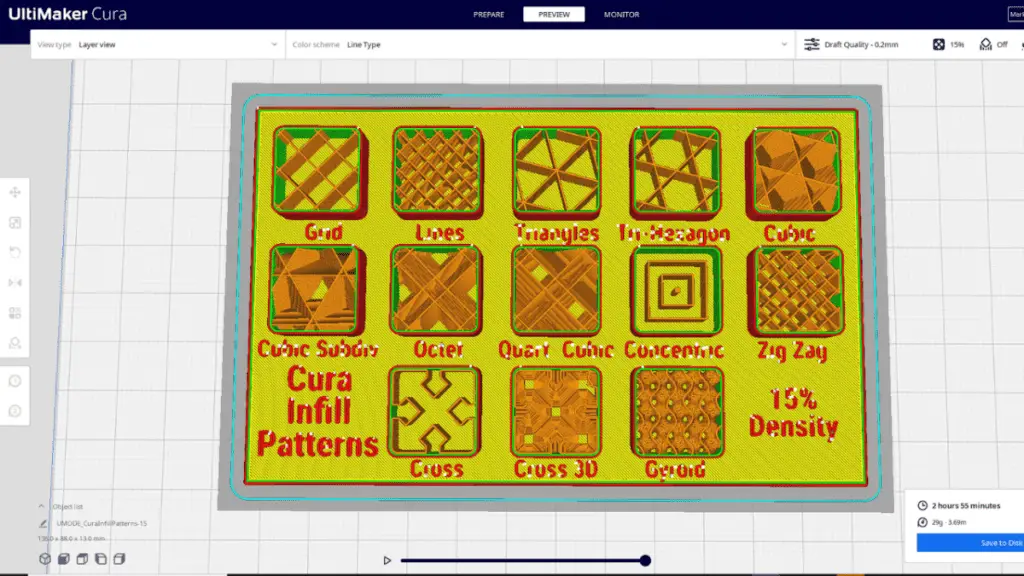
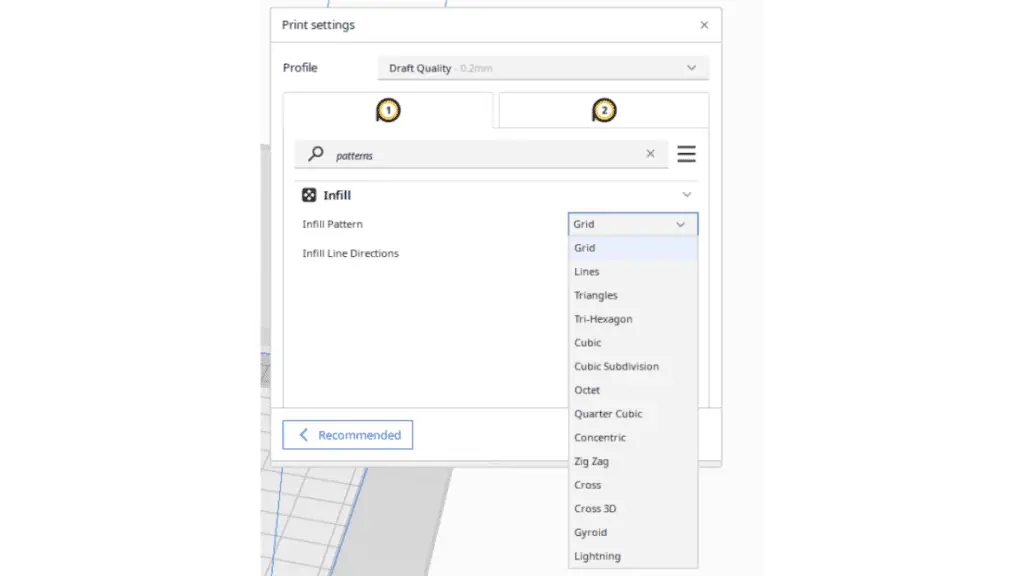
Popular Infill Patterns
Each infill pattern offers a unique combination of strength, material, and print efficiency. Here are most of the infill patterns along with some characteristics and their ideal applications.
Line
The line infill pattern is the most simplistic and is made up of parallel lines along each layer. This provides strength in two dimensions. I like to use this pattern for prints with long, flat surfaces, like panels, brackets, or anything else that needs structural support. But you shouldn’t really use it for intricate or complex designs because it has its weak points. There are other patterns better suited to ensure support in all directions.
Grid
This pattern is made up of a cubic grid design that offers good support for large prints with flat surfaces. Use this pattern for architectural models, furniture prototypes, and engineering parts where stability and durability are needed for structural integrity.
Cross
The cross pattern is ideal for flexible parts that need to be able to bend and twist without breaking. It’s typically used to print wearable devices, textile-based accessories, and robotics parts. These parts need flexibility, so the elasticity that this pattern provides is ideal for their flexible and functional performance.
Cubic
Created by printing cube-shaped volumes between layers the cubic pattern strikes a balance between strength and material usage. It’s adaptable, versatile, and suitable for a wide range of different models. Examples include automotive parts, electronics, tooling fixtures, and more.
Lightning
The lightning infill strategically prints internal support structures only where they are necessary. This optimizes the print time but results in a weaker part compared to most of the other infills. This option is ideal for quick prototyping or disposable components where functionality is more important than durability. Concept models or temporary fixtures are a couple of examples.
Triangular
This pattern is formed by a triangular grid that offers stability and support for large and smaller prints. I mostly use this with architectural models, gaming accessories, and signage because the rigidity and accuracy are perfect for these types of visually appealing objects.
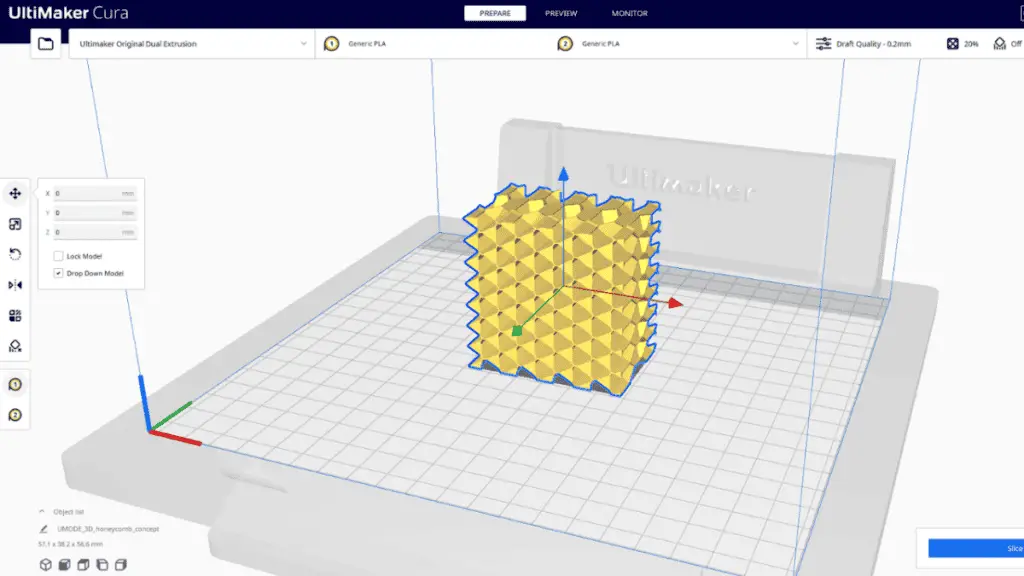
Tri-Hexagon
The tri-hexagon infill provides high strength for structural components that undergo heavy loads or high stress. It combines hexagonal patterns interwoven with triangles and is well-suited for mechanical parts, industrial components, and functional test prints where durability and reliability are required.
Octet
The octet pattern is made up of pyramid-like volumes for the infill. It’s ideal for objects with large horizontal surfaces. It enhances print quality by minimizing sagging and ensuring uniform support. It’s also suitable for architectural models, tabletop displays, and mechanical prototypes.
Gyroid
This pattern has alternating wavy lines or curves ideal for parts that have mechanical properties. It’s highly effective for parts that need balanced strength in all directions. Prints with intricate internal geometries like lightweight aerospace components or custom prosthetics can benefit from the gyroid infill pattern because it has optimal material distribution.
Concentric
This is a simple pattern that has circular lines concentric to the part’s perimeter. It offers quick print times but sacrifices some strength compared to other patterns. It’s best suited for decorative or ornamental pieces where structural integrity doesn’t matter too much. For example, artistic sculptures or intricate jewelry designs.
Infill Density
The infill density is simply the amount of plastic that’s printed within the walls of the model. So at 0% density, the part will be hollow while 100% will make it solid. Selecting the right infill density is important because it influences the structural integrity, weight, and printing time of the part. If you’re printing something that’s going into water, the infill density also affects the buoyancy of the part.
Prototypes and hobbyist creations typically go for lower infill percentages, around 10-20% to prioritize cost-effectiveness and rapid printing.
On the other hand, functional parts subjected to mechanical stress like load-bearing components or tools require higher infill densities exceeding 50% to ensure adequate strength and durability.
Consider a scenario where you’re printing a prototype of a bracket for holding lightweight objects. In this case, a modest infill density of 20-30% might suffice since the primary purpose is to assess the bracket’s fit and form rather than its mechanical strength.
However, if you’re printing a functional gear or a structural component for a robotics project, you’d need to opt for a much higher infill density, around 70-100%, to withstand the forces and stresses it will encounter during operation.
When it comes to figurines or models intended for display purposes, where weight and mechanical strength are less critical, lower infill densities ranging from 5 to 15% can work. This not only reduces material usage but also speeds up printing time while creating enough structural integrity for the purpose.
Besides the infill pattern, the infill density also plays a crucial role in flexible prints, especially those made with materials like TPU (thermoplastic polyurethane). Higher infill densities enhance rigidity and reduce flexibility. So for objects that need both flexibility and strength, like a phone case or gasket, a reasonable infill density of around 30-50% might be a good balance.
General guidelines for Infill Density:
It’s difficult to give specific infill densities for the part you’re printing because the geometry of the part also affects the amount of infill it requires, but here are very basic guidelines for you to consider.
- Standard prints: 20 to 50%
- Functional prints: 50 to 100%
- Figurine and model prints: 0 to 20%
- Flexible prints: 1 to 100%
Conclusion
Carefully select the right infill pattern and density and optimize the infill settings to enhance efficiency, reduce material waste, and produce high-quality prints. Each infill pattern offers a unique combination of strength, material efficiency, and print time to suit diverse printing needs and requirements.
While prototypes and hobbyist creations may tolerate lower infill percentages of around 20-30%, functional parts exposed to mechanical stress often require higher infill densities exceeding 50% to ensure optimal strength and durability.
Higher infill densities enhance rigidity, but they may compromise flexibility. For objects requiring both flexibility and strength, such as phone cases or gaskets, a cross-infill pattern and moderate infill density of 30-50% might strike the right balance.
Make sure you check out our YouTube channel, and if you would like any additional details or have any questions, please leave a comment below or join us on Discord. If you liked this article and want to read others click here.