Even though Cura isn’t really meant for altering 3D models, there are a couple of basic ways to get the job done. Splitting a model inside Cura is very straight forward but there are a few things you need to keep in mind when doing it.
The easiest way to split a model in Cura is to simply position half of it underneath the build plate with the move and rotate tools and print. But to separate an STL into multiple parts, use a plugin called Mesh Tools to split models in Cura. It also allows you to split the parts in an STL file and print them individually.
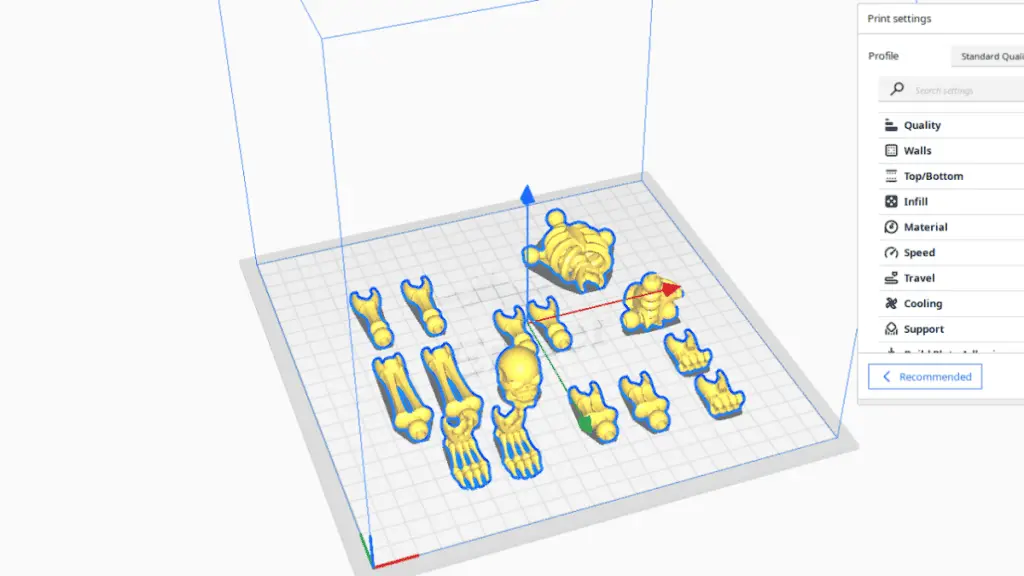
Moving the object underneath the print bed works well for splitting one object into multiple pieces, but it doesn’t help if you have multiple objects in an STL file that need to be printed individually. So this technique only works for splitting a model vertically while Mesh Tools is the best option to separate parts within an STL file in many different ways.
Here are both methods, along with more details and advice on how to use them. I’ll also go through a few other ways to slice models with other more appropriate applications.
Basic Method: Moving and Rotating
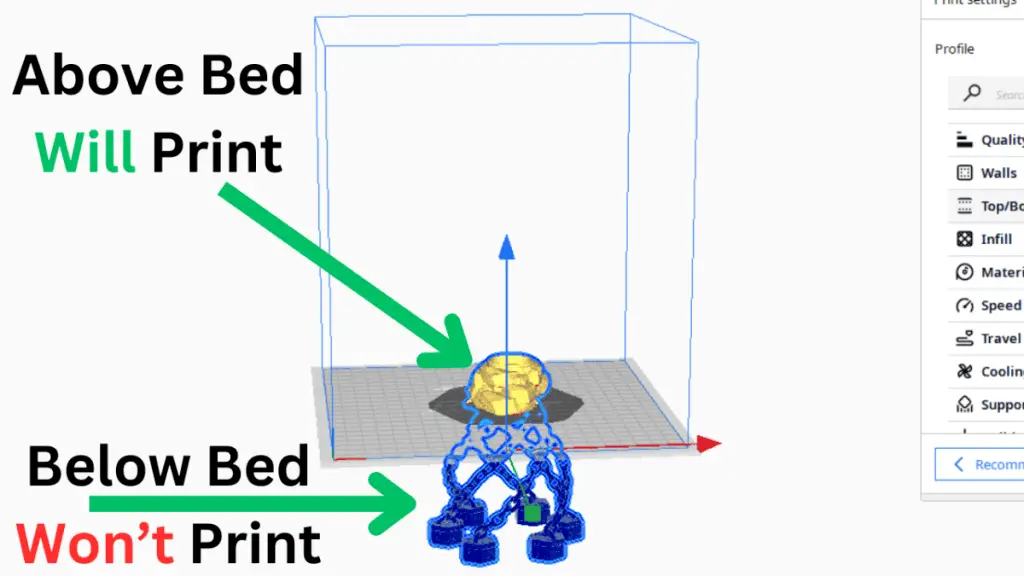
The easiest but also most restrictive technique is to use Cura’s built-in move and rotate controls. Just load the model into Cura, select it, and move it partially underneath the build plate.
With the part you want to print above the build plate, you can proceed with slicing it as usual. This will cause the printer to only print anything above the bed and nothing below. This method is more suitable for splitting one object into multiple pieces vertically rather than dealing with multiple objects in a single STL file.
Depending on the orientation of your model, you may need to adjust it more to make sure it can print only the piece that you need.
This method is nice and easy but it has its limitations compared to the precision offered by the Mesh Tools plugin. But it’s effective for simpler splitting tasks.
Mesh Tools Plugin
The Mesh Tools plugin is the perfect for splitting models in Cura because you can separate the model in so many different ways, including separating into multiple parts within one STL file. Here’s how to get Mesh Tools in Cura, and how to use it.
Download and install the Mesh Tools plugin from the marketplace in Cura. Then follow these steps:
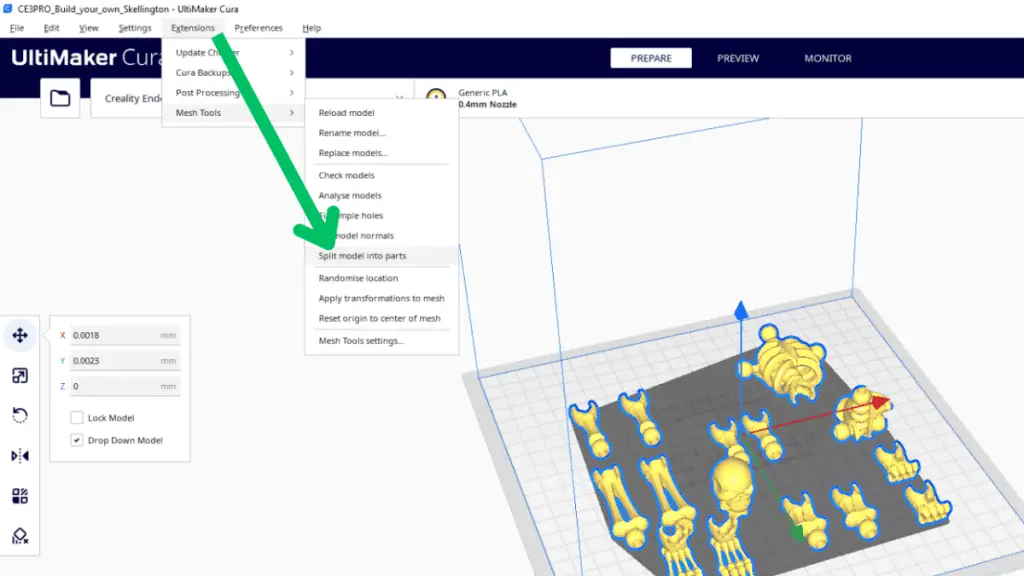
- Load your model into Cura and then navigate to the Extensions tab, and then selecting Mesh Tools. Click on the option to split the model and you’ll be prompted to specify how you want to do it, either by specifying a plane or by selecting a point.
- If you choose to split by specifying a plane, you’ll need to position a slicing plane within your model where you want the split to occur. If you opt for splitting by selecting a point, you’ll need to choose a point on the model from which the split will start.
- You may need to adjust some parameters such as the thickness of the slicing plane. It will depend on the model.
- Once you’re satisfied with the positioning and parameters, confirm the split. Cura will generate separate parts of your model and then you can arrange and print them individually.
The Mesh Tools plugin provides a more precise and flexible way of splitting models compared to moving objects under the build plate. It’s extremely useful when dealing with multiple objects within a single STL file that need to be printed separately.
Other Programs To Split 3D Models
CAD (Computer-Aided Design) software provides powerful tools for manipulating 3D models, making it an excellent choice for splitting models before printing. Programs like Autodesk Fusion 360, SolidWorks, and Blender offer comprehensive functionalities for this purpose.
In CAD software, you can import your STL file and then use various tools to manually split it into separate parts. These tools often include features like slicing, cutting, and Boolean operations, allowing you to precisely divide your model as needed.
For example, let’s say you have a large model of a mechanical assembly that needs to be printed in individual components. With CAD software, you can isolate each component and then export them as separate STL files. This level of control enables you to tailor the splitting process to your specific project requirements.
There are also several third-party slicers available that offer advanced splitting functionalities. Slic3r, Simplify3D, and PrusaSlicer are popular choices among 3D printing enthusiasts and professionals alike.
These slicers often provide more intricate slicing options compared to built-in tools, allowing for greater control over the splitting process. For instance, you can define custom slicing planes, specify precise cut paths, and even create assembly guides to ensure seamless alignment of printed parts.
If you’re working on a model of a complex sculpture that needs to be split into sections for easier printing and assembly, using a third-party slicer, you can meticulously plan the slicing strategy, taking into account factors like print orientation, support structures, and part interlocking mechanisms.
Online Services That Split 3D Models
Several online services cater to 3D printing enthusiasts by offering model-splitting functionalities directly through their platforms. Websites like Tinkercad, 3D Slash, and Sculpteo provide user-friendly interfaces for splitting models without the need for specialized software.
These online services typically allow you to upload your STL file, interactively define cutting planes or regions, and then preview the resulting split model in real time.
Some platforms even offer additional features like automatic part orientation optimization and integrated printing services for added convenience. For example, imagine you have a complex architectural model that needs to be divided into sections for printing at different scales.
Related Articles
Conclusion
There are a few ways to split a model in Cura, each with its advantages and limitations. Whether you choose the precision of the Mesh Tools plugin or the simplicity of basic manipulation controls in Cura, it just depends on your situation at the time.
If you want to modify the STL file outside Cura, follow this guide on my YouTube channel.
Make sure you check out our YouTube channel, and if you would like any additional details or have any questions, please leave a comment below. If you liked this article and want to read others click here.