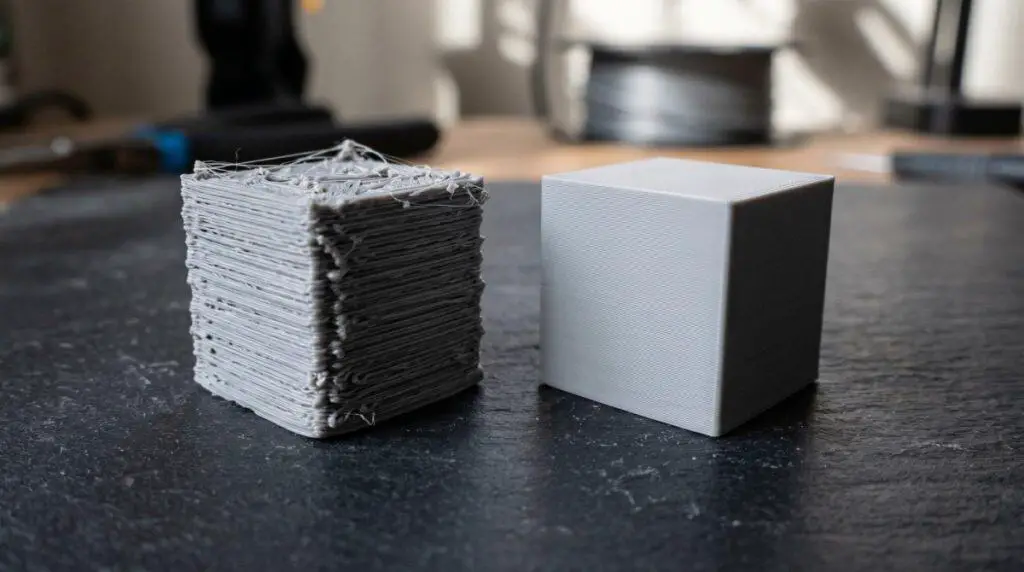
If your 3D prints are coming off the printer looking rough, stringy, or just plain ugly — you’re not alone. The good news? You don’t need a new printer or expensive filament. Five settings in Bambu Studio can fix most of the surface quality issues you’re seeing, and they take roughly two minutes to change.
Same printer. Same filament. Just five tweaks that make the difference between an amateur-looking result and a professional one.
Setting #1 — Outer Wall Speed
Where to find it: Speed → Advanced → Outer Wall Speed
This is the single biggest quality lever you can pull. By default, Bambu Studio sets the outer wall speed to 60 mm/s. That’s fast — great for saving time, bad for surface smoothness.
The fix: Drop the outer wall speed by roughly one-third. From 60 → 40 mm/s.
I typically reduce the inner wall speed too (from 150 → 100), but the outer wall is where you’ll see the real improvement. The only downside? Print time. On a standard 50×50 mm calibration cube, this change alone adds about 13 minutes (from 1:15 to 1:27).
Pro tip: If results still aren’t where you want them, you can drop the speed even further (try 30 mm/s). But once you get below the two-thirds mark, the quality gains diminish while the time cost keeps climbing. It’s not worth it past that point.
| Setting | Default | Recommended | Time Impact |
|---|---|---|---|
| Outer Wall Speed | 60 mm/s | 40 mm/s | +13 min |
| Inner Wall Speed | 150 mm/s | 100 mm/s | (included above) |
Setting #2 — Wall Order (Inner/Outer → Outer/Inner)
Where to find it: Quality → Advanced → Order of Walls
By default, Bambu Studio prints the inner wall first, then the outer wall. This can leave visible seams on the exterior surface where the inner wall’s start/stop points bleed through.
The fix: Switch from Inner/Outer to Outer/Inner.

This prints the outer wall first, so any seam artifacts from the inner wall end up on the inside of the print — where nobody sees them. The impact on print time is essentially zero. It’s a free quality upgrade.
Why it matters: Those inner-wall seams are subtle but they add up, especially on larger prints with many perimeters. Flipping the order gives you a smoother, cleaner exterior with no time penalty.
Setting #3 — Avoid Crossing Walls
Where to find it: Quality → Advanced → Avoid Crossing Walls
When the nozzle travels from one area to another, it usually takes the shortest path — which often means crossing right over printed walls. This leaves scars, scratches, and stringing marks on the surface.
The fix: Check the Avoid Crossing Walls box and leave the defaults.
This forces the nozzle to route travel moves around the outside of the part whenever possible, instead of cutting across walls. It can’t eliminate all wall crossings, but it reduces them significantly.
Time impact: Minimal — about 1 minute added on the calibration cube. That’s a tiny price to pay for cleaner surfaces.
Caveat: If your printer isn’t well-tuned for retraction, this setting can actually increase stringing because of the longer travel distances. Make sure your retraction settings are dialed in first.
Setting #4 — Variable Layer Height
Where to find it: Select the part → Top toolbar → Variable Layer Height
This one’s situational, but when it works, it works really well — especially on curved or rounded models.
How it works: Instead of printing every layer at the same height, Variable Layer Height adjusts layer thickness dynamically. On curved sections, it uses thinner layers for finer detail. On flat sections, it uses thicker layers to save time.
Two modes to know:
- Adaptive — Changes layer height in specific areas based on the model’s geometry. Best for organic/curved shapes.
- Smooth — Blends layer height changes more gradually. Better for flat-topped models where abrupt layer changes would be visible.
Time impact: Roughly 2 minutes on the test cube, though results vary heavily by model.
The catch: On models with mostly flat surfaces (like a calibration cube), Variable Layer Height can actually make things worse — the changing layer heights become visible as banding. Test it on your specific print before committing.
Setting #5 — Top Surface Ironing
Where to find it: Quality → Ironing → Top Surfaces
Ironing runs a second pass over the top surfaces of your print at a very low extrusion rate, essentially “ironing” out layer lines for a glass-smooth finish.
When to use it: Flat top surfaces, nameplates, badge-style prints — anything where the top face needs to look flawless.
When NOT to use it: Prints where the ironing pass would cross an edge or transition (like the face of a letter on a calibration cube), as it can leave a visible line where the ironing height changes.
Two pattern options:
- Rectangular (default) — Best for most prints
- Concentric — Better for rounded/flexible parts
Time impact: Significant — adds about 10 minutes to the calibration cube. Use this one selectively.
The Quick-Start Recommendation
For most prints, you’ll want to enable three of the five settings right away:
| Setting | Enable? | Why |
|---|---|---|
| Outer Wall Speed (40 mm/s) | ✅ Yes | Biggest visual improvement |
| Wall Order (Outer/Inner) | ✅ Yes | Free quality upgrade, no time cost |
| Avoid Crossing Walls | ✅ Yes | Minimal time cost, cleaner surfaces |
| Variable Layer Height | ⚠️ Test first | Great for curved models, risky on flat ones |
| Top Surface Ironing | ⚠️ Test first | Excellent for flat tops, adds significant time |
With just those three settings enabled, the test cube went from 1:15 to 1:27 — 12 extra minutes for a noticeably cleaner, smoother print. That’s a trade most makers would take every time.
The other two settings (Variable Layer Height and Ironing) are powerful, but they’re model-dependent. Try them on a case-by-case basis.
Bottom Line
These five settings take about two minutes to configure and can be the difference between a print that looks like it came from a budget rig and one that looks like it came from a professional shop. The key is matching the right settings to the right print — not blindly enabling everything.
If you’re going to be printing a lot of a particular model, it’s absolutely worth spending the extra time to test which combination of these settings works best. Once you find the sweet spot, save it as a custom profile and reuse it every time.
Want more 3D printing tips? Check out the full video tutorial below and subscribe to 3D Printscape on YouTube for weekly guides, reviews, and honest comparisons.
Watch Full Video
Have questions? Drop a comment on the video or join the 3D Printscape Discord community.